Oracle Time and Labor Fundamentals
Setup User Guide
Table of Contents
Practice 1: Defining Time Entry Rules and Rule Groups 7
Defining Time Entry Rules – Using Period Maximum Formulas 8
Defining Time Entry Rules – Using Mapping for Approval Style 11
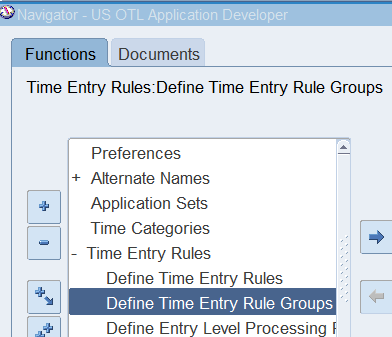
Defining Time Entry Rule Groups 12
Practice 2: Defining Approval Periods 15
Defining Recurring Time Periods 15
Practice 3: Defining a Approval Style 18
Defining an Approval Style for Warehouse Employees 18
Defining an Approval Style for Retail Employees 20
Defining an Approval Style for Corporate Employees 22
Creating Overtime Pay Earnings 23
Creating Double Time Pay Earnings 31
Modifying Double Time Pay Earning 34
Entering Element Time Information 38
Practice 5: Creating Element Sets 42
Creating an Element Set for Retail Employees 42
Creating an Element Set for Corporate Employees 45
Running Generate Flexfield and Mapping Information 46
For Demonstration – Reviewing Mapping and Mapping Components 52
Reviewing Mapping and Mapping Components 52
Viewing Retrieval Processes 55
Practice 6: Defining Alternate Names 58
Defining Alternate Names for Warehouse Employees 58
Defining Alternate Names for Retail Employees 63
Defining Alternate Names for Corporate Employees 66
Practice 7: Defining Employees 68
Create 16Corporate Employee 68
Create 16Warehouse Employee 75
Practice 7: User Preferences 78
Corporate Employees will need the following 10 preferences: 78
Retail Employees will need the following 9 preferences: 79
Warehouse Employees will need the following 17 preferences: 80
Adding Preferences to a branch 83
Preferences for Warehouse Employees 90
Preferences for Retail Employees 99
Defining Eligibility Criteria – For Warehouse, Retail, Corporate 103
Viewing People Preferences 105
Practice 8: Defining Holiday Calendars 108
Defining a Holiday Calendar for Corporate Employees 108
Defining a Holiday Calendar for Retail Employees 112
Practice 9: Defining Shifts / Work Plans / Rotation Plans 113
Defining a Work Plan for Retail Employees 115
Defining a Work Plan for Corporate Employees 118
Defining a Rotation Plan for Retail Employees 119
Defining a Rotation Plan for Corporate Employees 122
Practice 10: Defining Earnings Group 123
Practice 11: Defining an Hour Deduction Policy 125
Practice 12: Defining Shift Differential, Premium Eligibility and Premium Interaction Policies 127
Defining Shift Differentials 128
Defining Premium Eligibility Policies 130
Defining Premium Interaction Policies 133
Practice 13: Defining Earning Policies 136
Defining an Earning Policy for Retail Employees 136
Defining an Earning Policy for Corporate Employees 139
Practice 14: Assigning Structures and Policies to an Employee 141
Viewing Employee Assignment Information Folder 144
Practice 15: Automatic Timecard Generation 146
Viewing Auto generated Timecards 148
Transferring Timecards to Element Entries 155
Review Transferred timecards in Element Entries 158
Practice 16: Entering Timecard using Self Service 161
Create Application User for the Corporate Employee 161
Entering time and labor for warehouse employees using the projects/payroll timecard layout 164
Entering time and labor for Retail employees using the work schedule timecard layout 170
Entering time and labor for corporate employees using the exception timecard layout 173
Workflow Background Process 174
Approvals for 16RETAIL and 16WAREHOUSE 176
Transferring Time from OTL to BEE 178
Running the Transaction Import from OTL to Oracle Projects 185
Review the results in Oracle Projects 187
Running the Retrieval Error Handing Report 188
Practice 17: Transfer time for Corporate Employee 191
Transferring Time from OTL to BEE 191
Validating Timecards for BEE 195
Transferring Timecards to BEE 197
Practice 18: Using Oracle Time & Labor Reports 206
Reviewing Employee Time Folder 207
Practice 19: Defining Reason Codes for CLA 208
Defining Change Audit Reason Codes 208
Defining Late Audit Reason Codes 209
Practice 20: Defining Time Categories for Change and Late Audit 211
Defining Time Categories for Change and Late Audit 211
Practice 21: Defining Time Entry Rules for Change and Late Audit 213
Defining Time Entry Rules for Change and Late Audit 213
Defining Time Entry Rule Groups 215
Practice 22: Defining Preferences for Change and Late Audit 217
Defining Eligibility Criteria 218
Viewing People Preferences 218
Adding Preferences to a branch 219
Defining Eligibility Criteria for an employee 229
Viewing People Preferences 230
Create Application User for the Corporate Employee 231
Practice 23: Entering a Timecard for Change and Late Audit 233
Enter a Late Audit Timecard 233
Practice 1: Defining Time Entry Rules and Rule Groups
This demonstration explain how to define time entry rules and time entry rule groups. Time entry rules use formulas to generate warnings or errors at the time of submission, resubmission or both.
Business Scenario
Define a time entry rule using a formula to validate that timecard entries do not exceed 40 hours per week averaged over two-week period for all warehouse employees.
Note: Make sure the validation is at both time of submission and resubmission
Define a time entry rule to ensure that timecards for all employees are sent for approval whenever they enter or change any of the data that is retrieved by Oracle Projects.
Using the formula time entry rule created, define a Time Entry Rule Group. Select Error as the outcome to notify the worker when the time entry rule is broken.
Solution
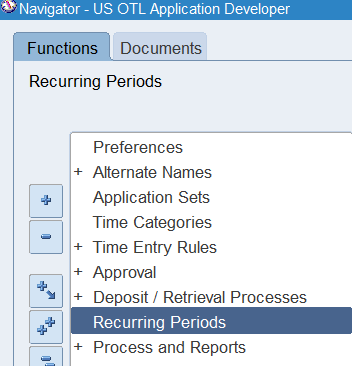
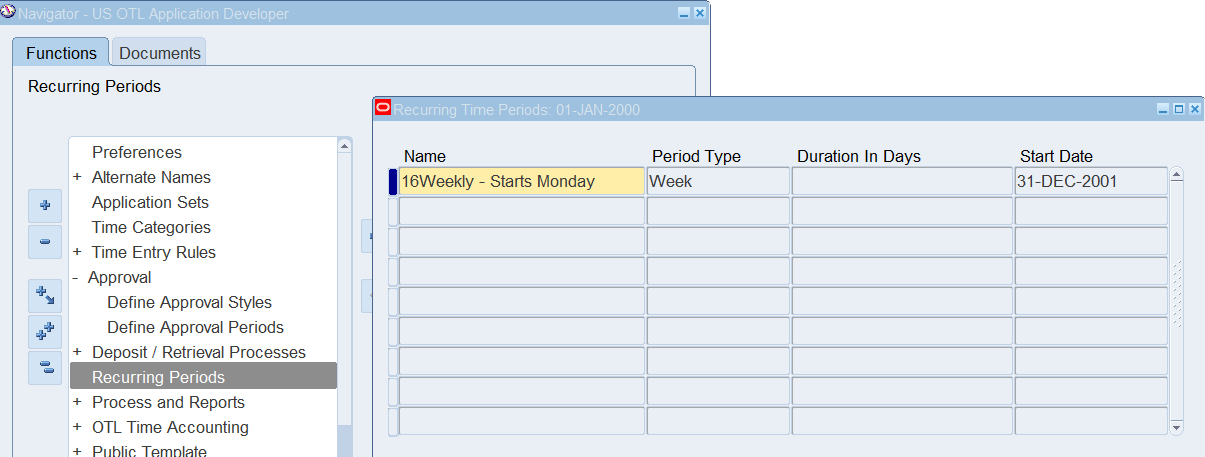
Defining Recurring Periods
Responsibility : US OTL Application Developer
Navigation : (N) Recurring Periods
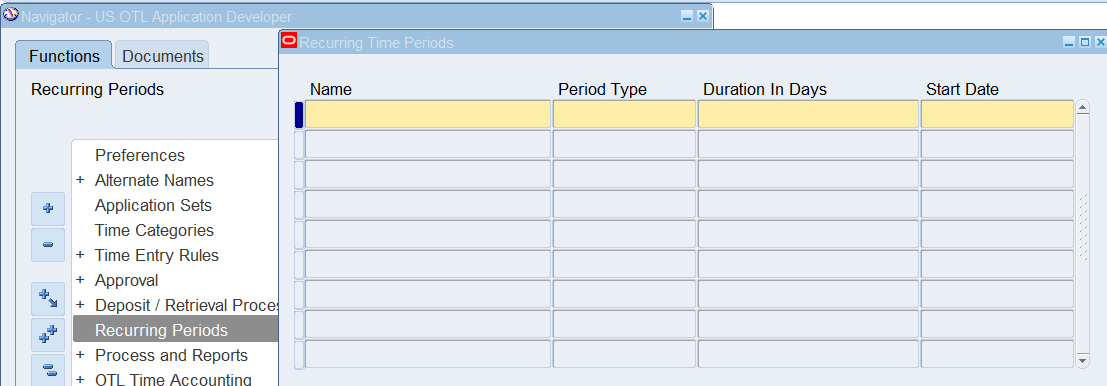
| Name | 16Weekly – Starts Monday |
| Period Type | Week |
| Start Date | 31-Dec-2001 |

Note: 31-DEC-2001 is a Monday
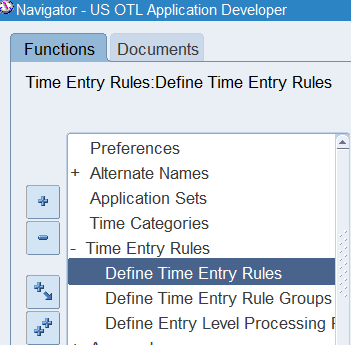
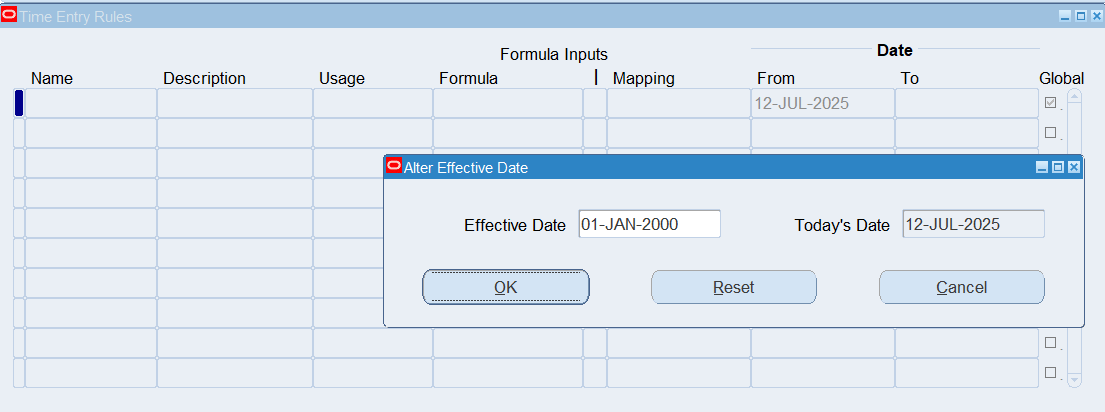
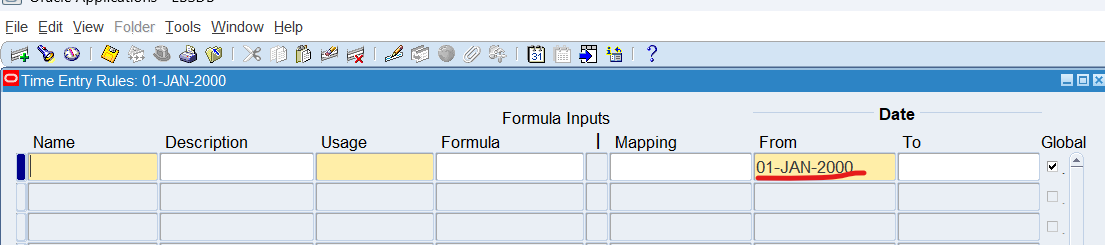
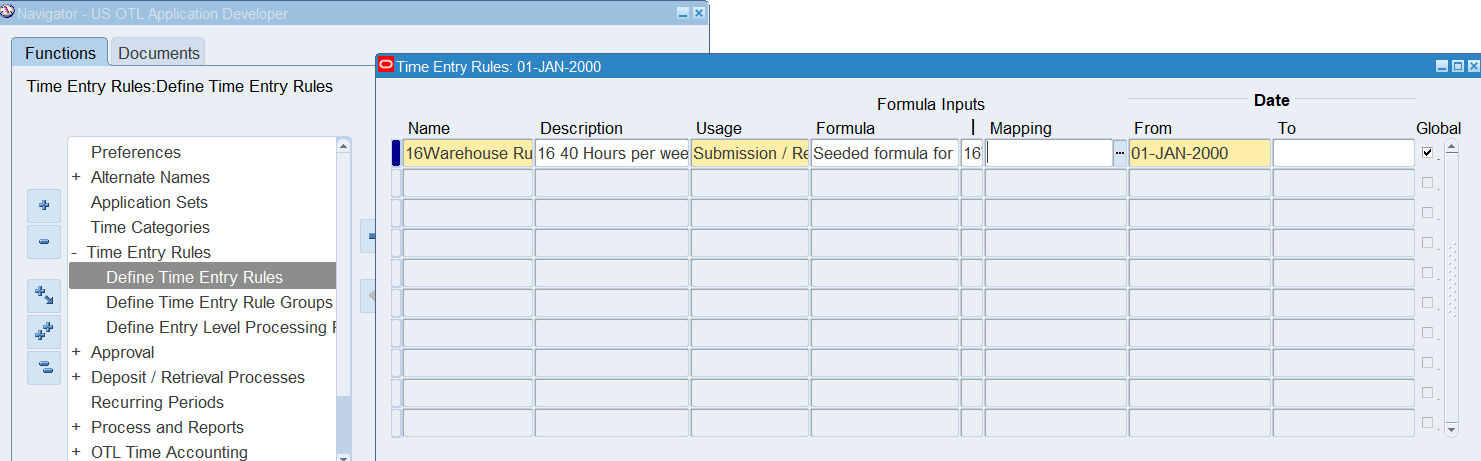
Defining Time Entry Rules – Using Period Maximum Formulas
Responsibility : US OTL Application Developer
Navigation : (N) Time Entry Rules 🡪 Define Time Entry Rules
Date Track : 01-Jan-2000
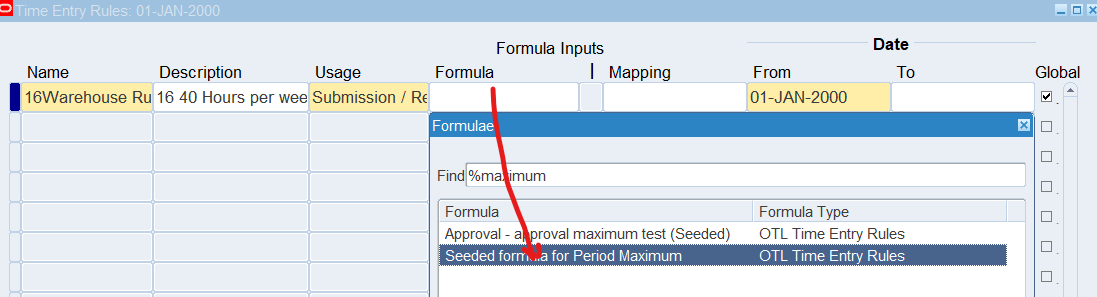
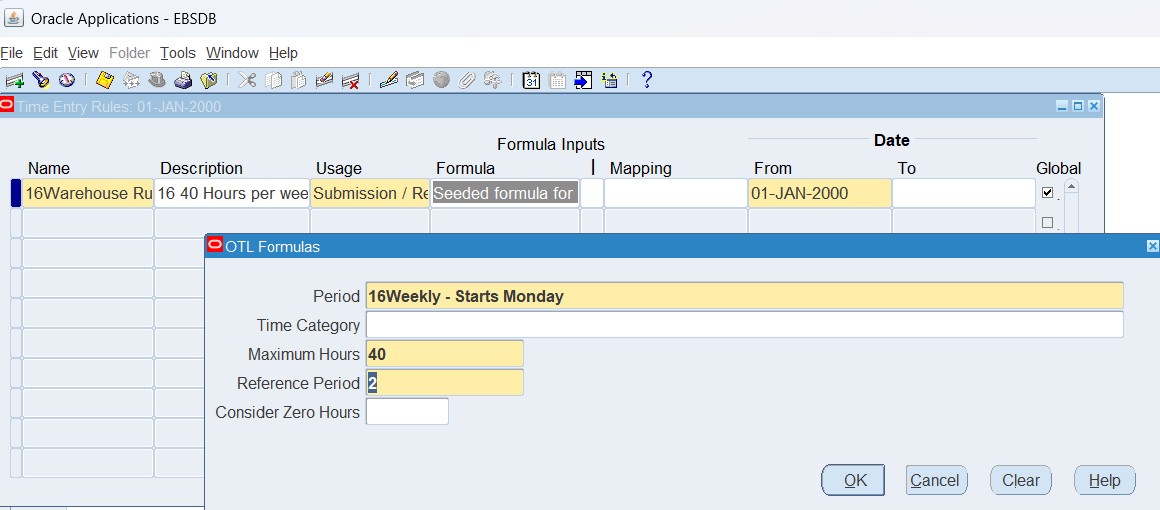
| Name | 16Warehouse Rule |
| Description | 16 40 Hours per week over a 2-week period |
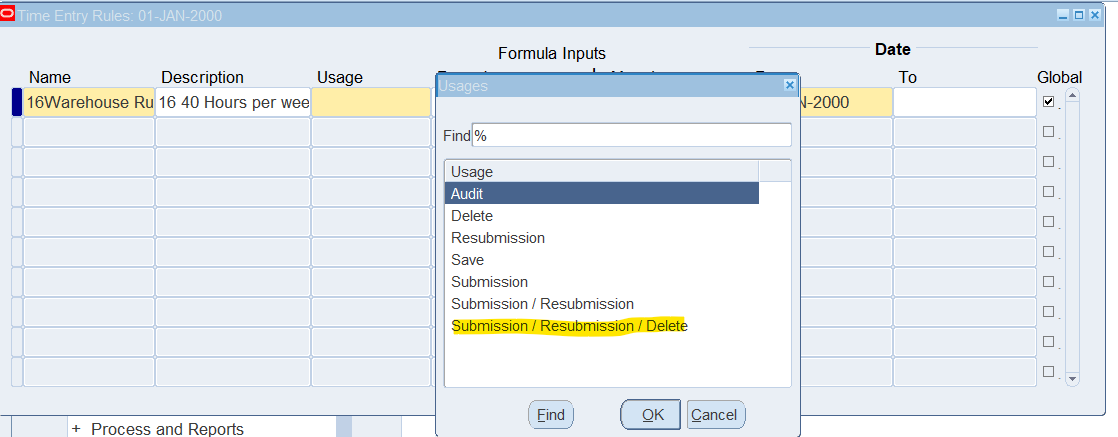
| Usage | Submission / Resubmission / Delete |
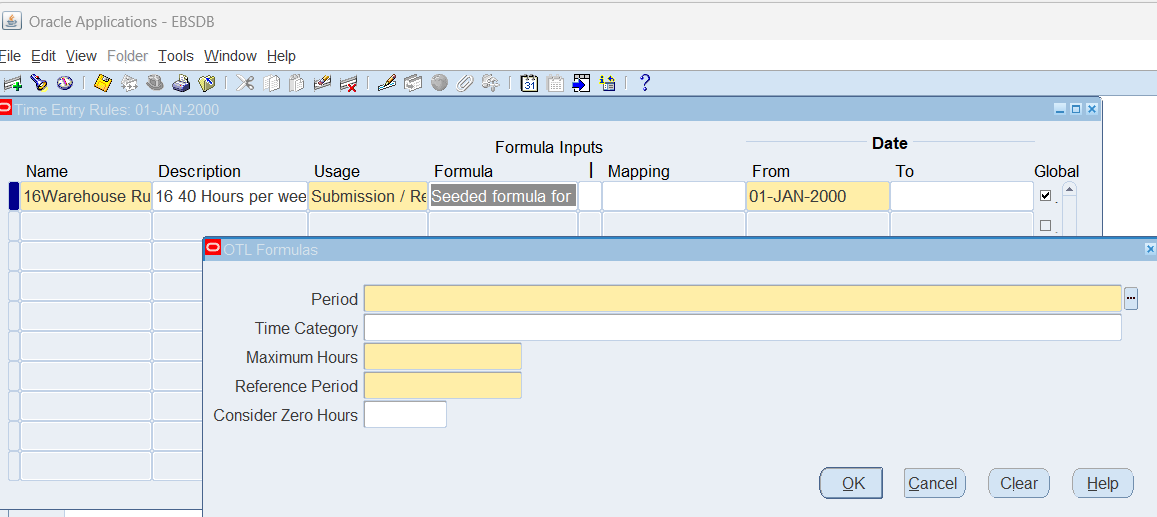
| Formula | Seeded formula for Period Maximum |
| Period | 16Wekly – Start Monday |
| Maximum Hours | 40 |
| Reference Period | 2 |

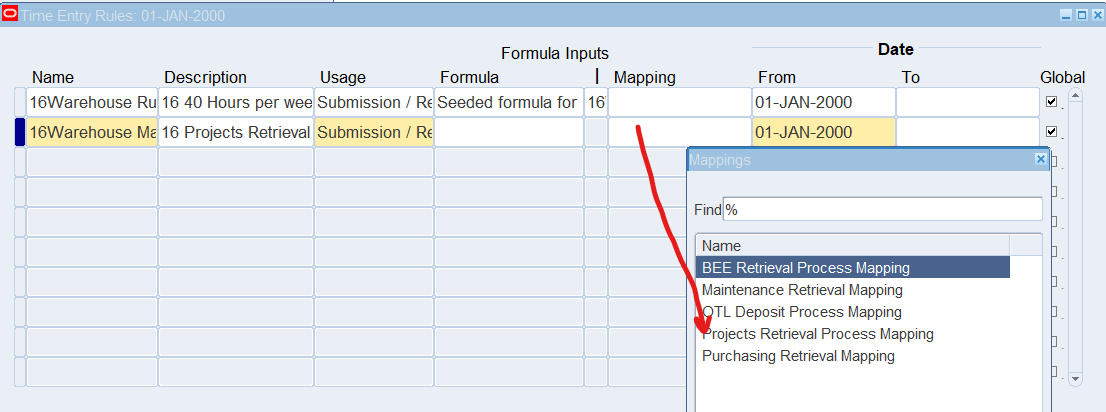
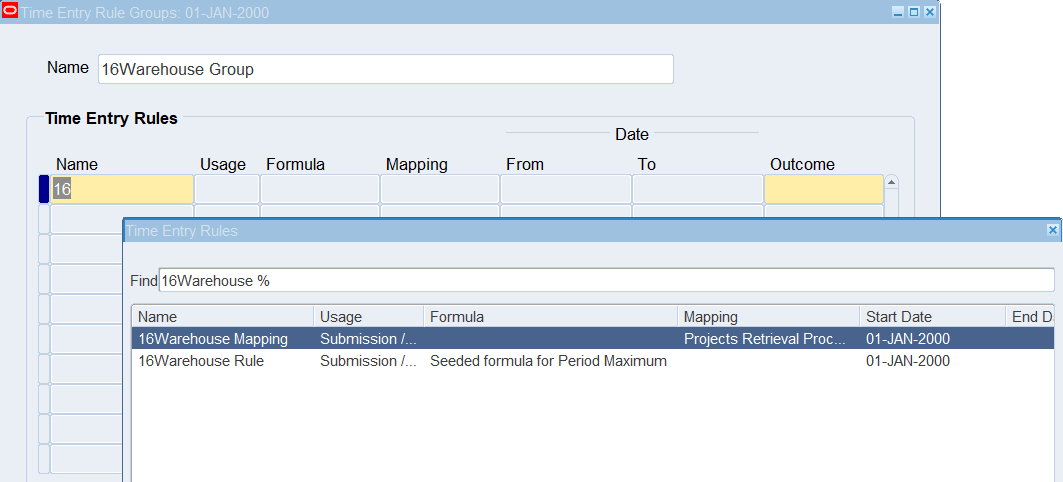
Defining Time Entry Rules – Using Mapping for Approval Style
Responsibility : US OTL Application Developer
Navigation : Time Entry Rules 🡪 Define Time Entry Rules
| Name | 16Warehouse Rule |
| Description | 16 Projects Retrieval Process Mapping |
| Usage | Submission / Resubmission / Delete
Note: This determines approval is required at the initial submission and when the employee change the time and labor data after approval |
| Blank (not required) | |
| Mapping | Projects Retrieval Process Mapping |

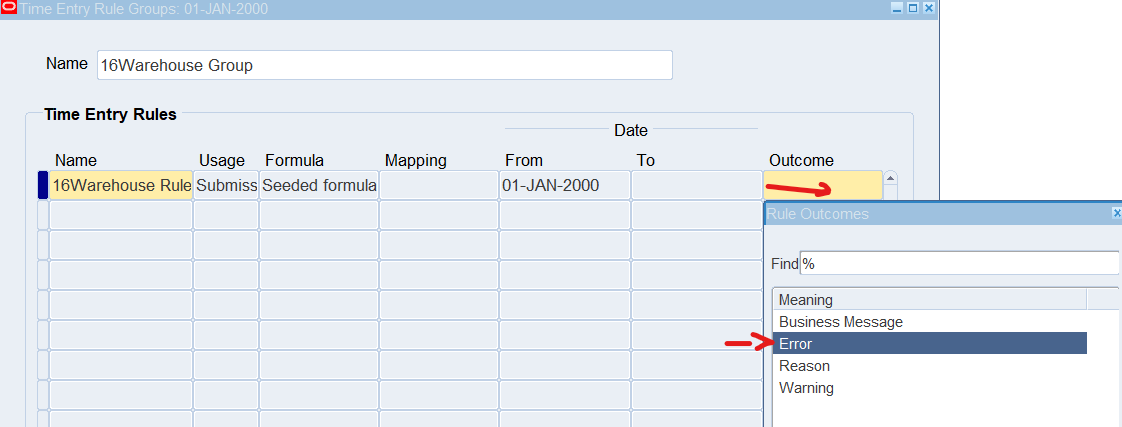
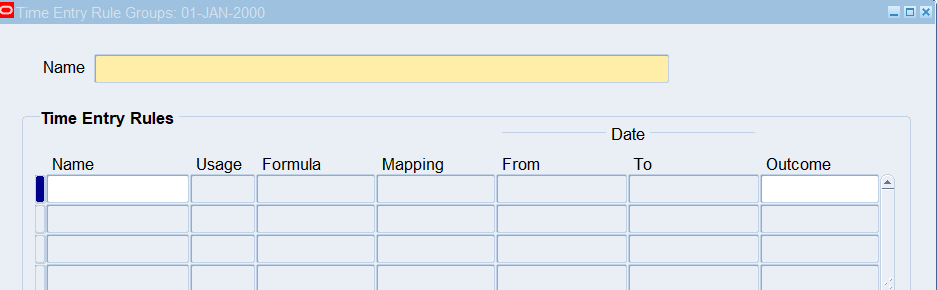
Defining Time Entry Rule Groups
Responsibility : US OTL Application Developer
Navigation : Time Entry Rules 🡪 Define Time Entry Rule Groups
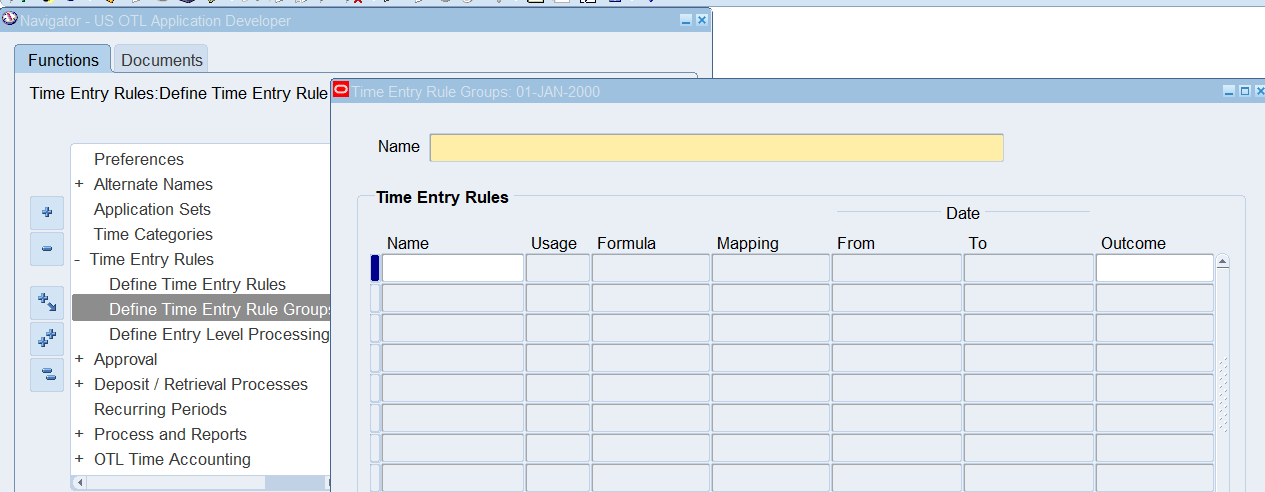
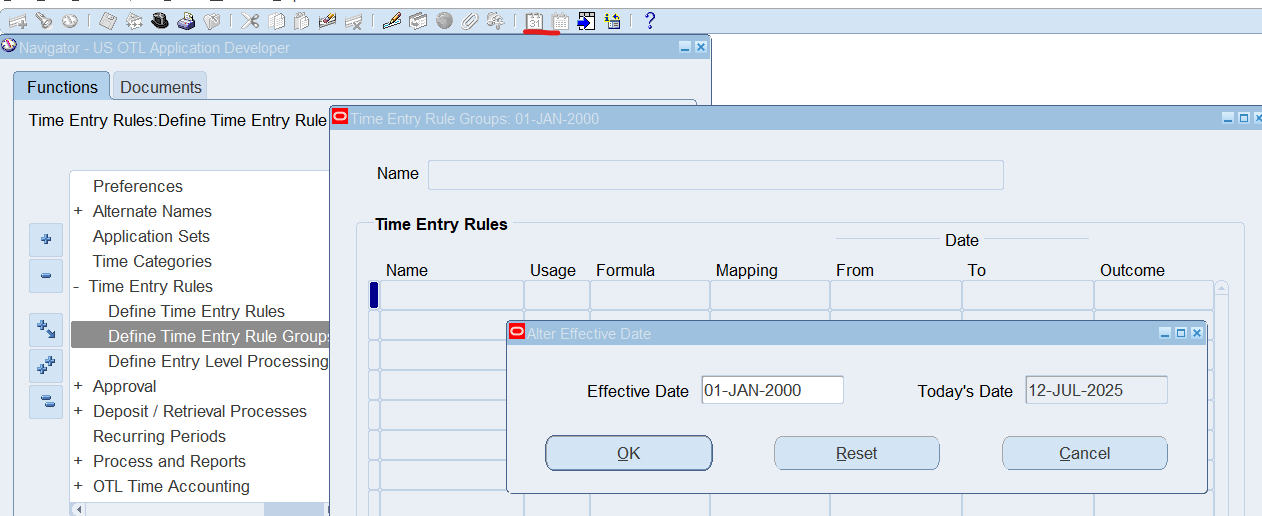
Date Track to 01-Jan-2000
| Name | 16Warehouse Group |
| Name (Time Entry Rule Section) | 16Warehouse Rule |
| Outcome | Error
Note: This will produce an error on the timecard and stop the submission process until the error is corrected. |
| Save and Close Form |
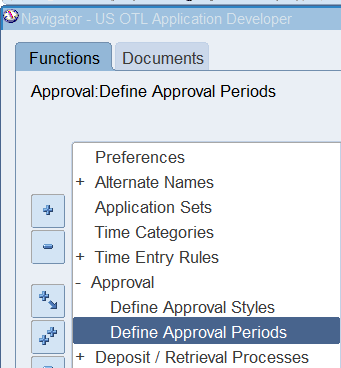
Practice 2: Defining Approval Periods
Defining Recurring Time Periods
Recurring time periods determine the frequency of timecard entry and approval. Once a recurring time period has been define, you can associate the period with an application to define periods in the Approval Periods window
Business Scenario
Define a recurring time period for warehouse, retail and corporate employees. This recurring period will be “16Weekly – Start Monday”
The approval period for both “Oracle Projects (warehouse employees) and Oracle Payroll (retail employees) can also be set to “16Weekly – Start Monday”
Define Approval Periods
Responsibility : US OTL Application Developer
Navigation : (N) Approval 🡪 Define Approval Periods
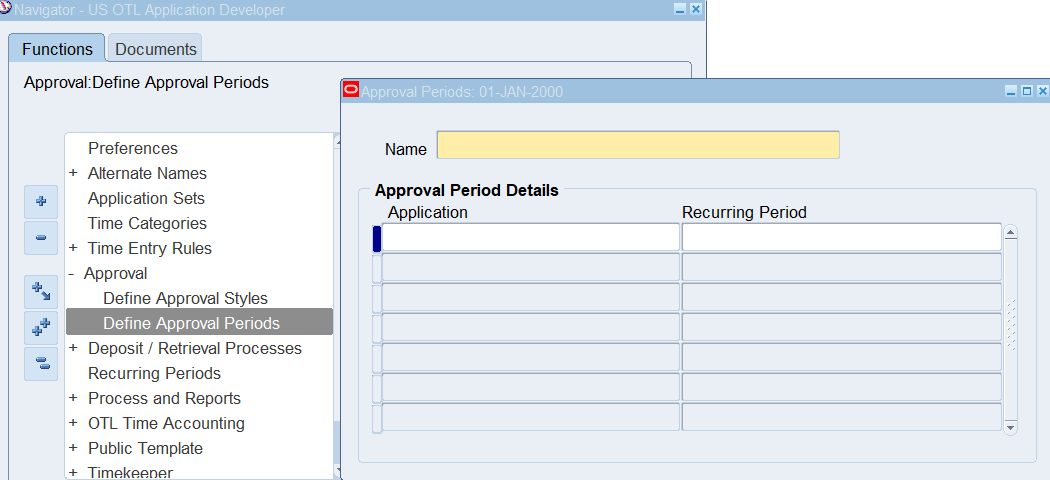
Name : 16Weekly Period – Start Monday
| Application | Recurring Periods |
| Projects | 16Weekly – Starts Monday |
| Payroll | 16Weekly – Starts Monday |
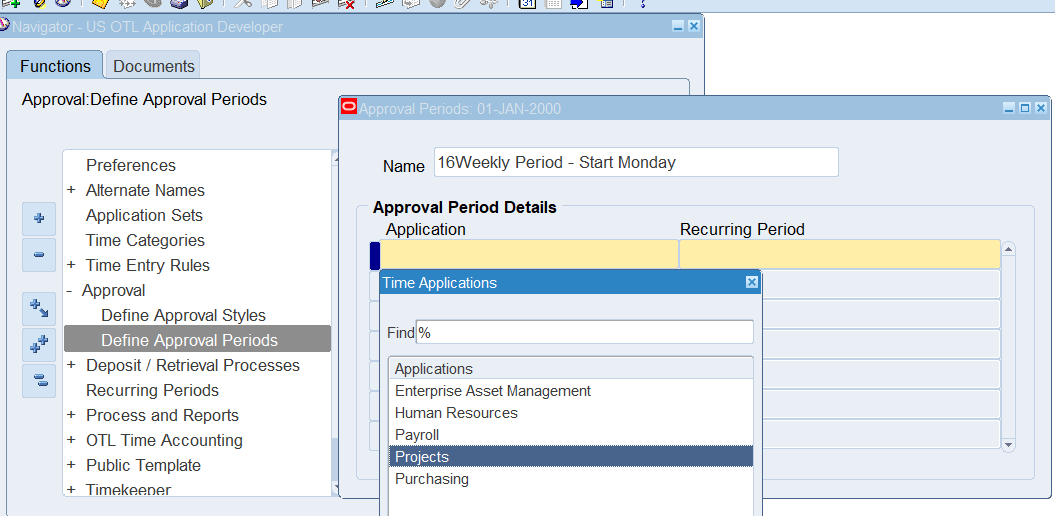
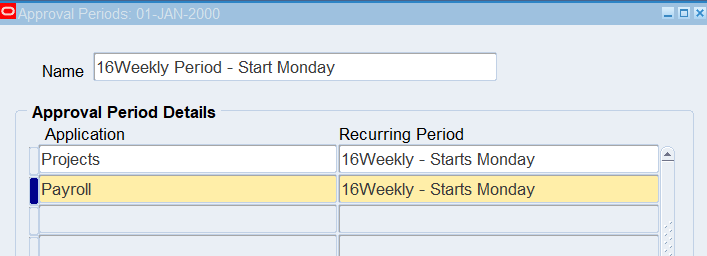
Note: We already define Recurring Periods “16Weekly – Starts Monday”
Practice 3: Defining a Approval Style
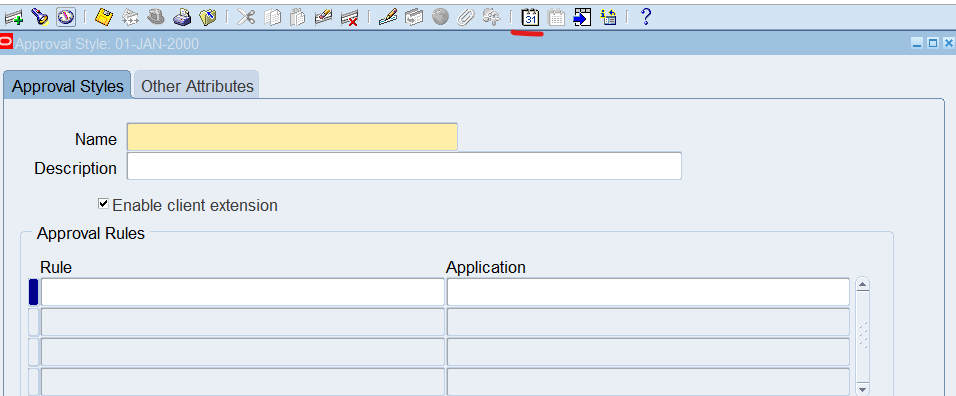
Approval Styles
Approval Styles are used to alert the approver when timecards are waiting to be approved. The approval style define who approves the timecards for each recipient application. The approval style also define which data needs to be approved for each application, and which data changes require resubmission
Business Scenario
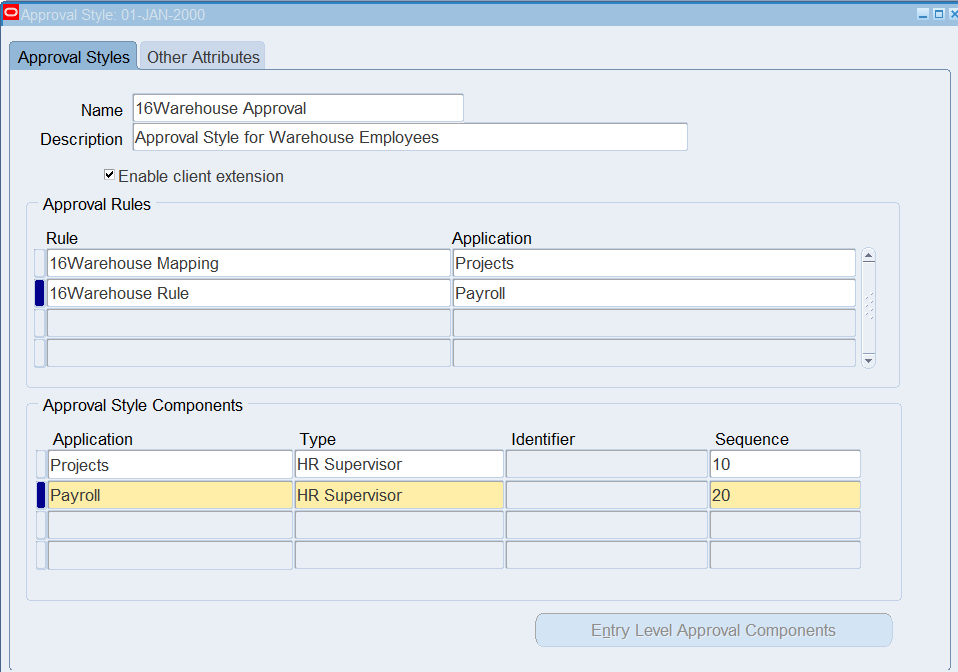
Warehouse employees will need an approval style to alert the warehouse supervisor when timecards are waiting to be approved as well as notification of when project, task and or type information has been changes
Retail employees will need an approval style to alert the store manager that timecards are waiting to be approved.
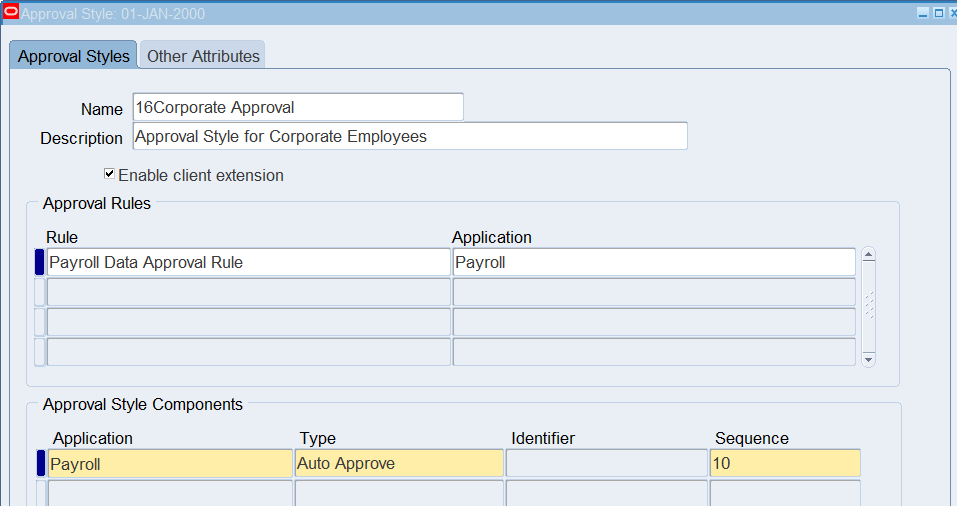
Corporate employees are not required to have timecards approved. To accomplish this, will create an approval style for “Auto Approve” for all corporate employees
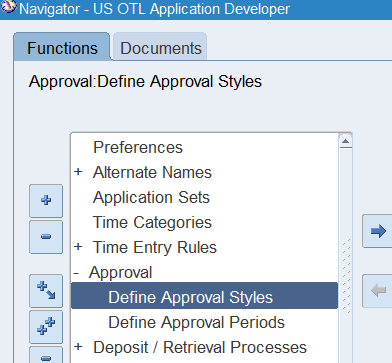
Defining an Approval Style for Warehouse Employees
Responsibility : US OTL Application Developer
Navigation : (N) Approval 🡪 Define Approval Styles
Date Track : 01-Jan-2000
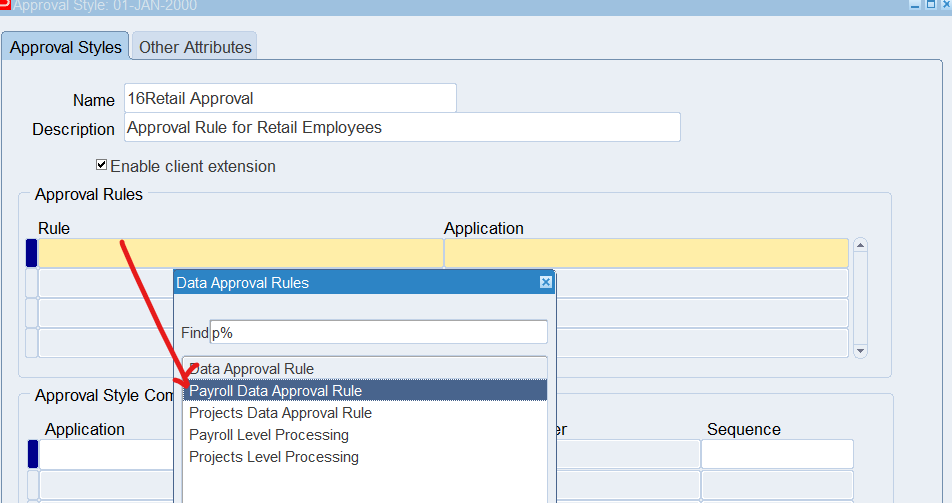
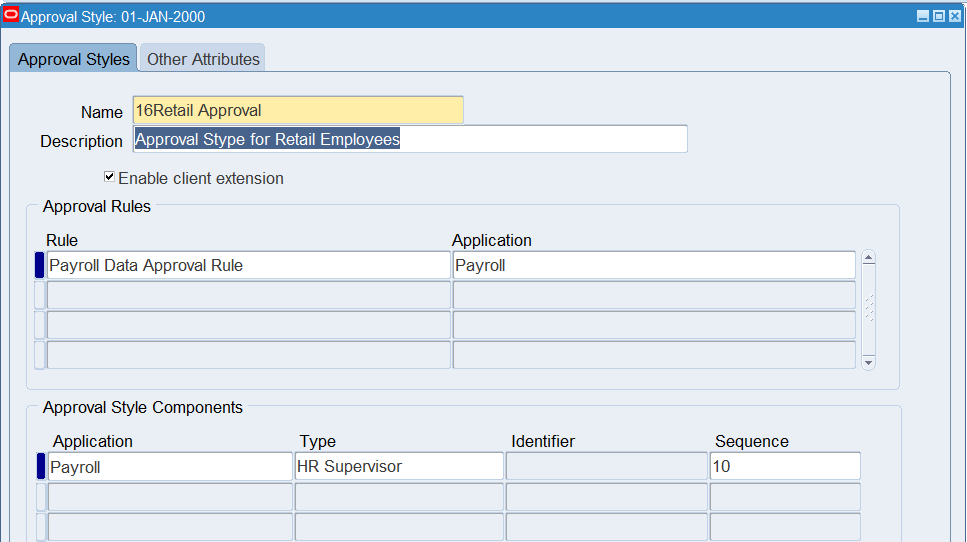
Defining an Approval Style for Retail Employees
Name : 16Retail Approval
Description : Approval Rule for Retail Employees
| Rule | Application |
| Payroll Data Approval Rule | Payroll |
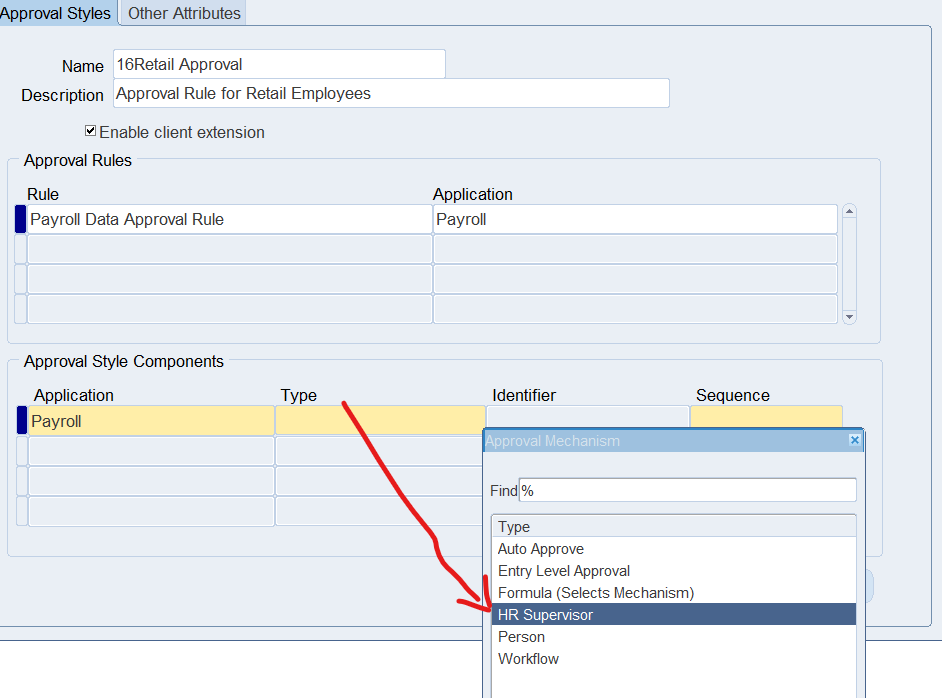
Defining an Approval Style for Corporate Employees
Name : 16Corporate Approval
Description : Approval Style for Corporate Employees
| Rule | Application |
| Payroll Data Approval Rule | Payroll |
| Application | Type | Sequence |
| Payroll | Auto Approve | 10 |
Practice 4: Using Elements
Using Elements for time and labor entry and create element sets for payroll retrieval. Elements are essential compensation and benefit components that represent earning types.
Business Scenario
Retail employees require overtime and double time earnings
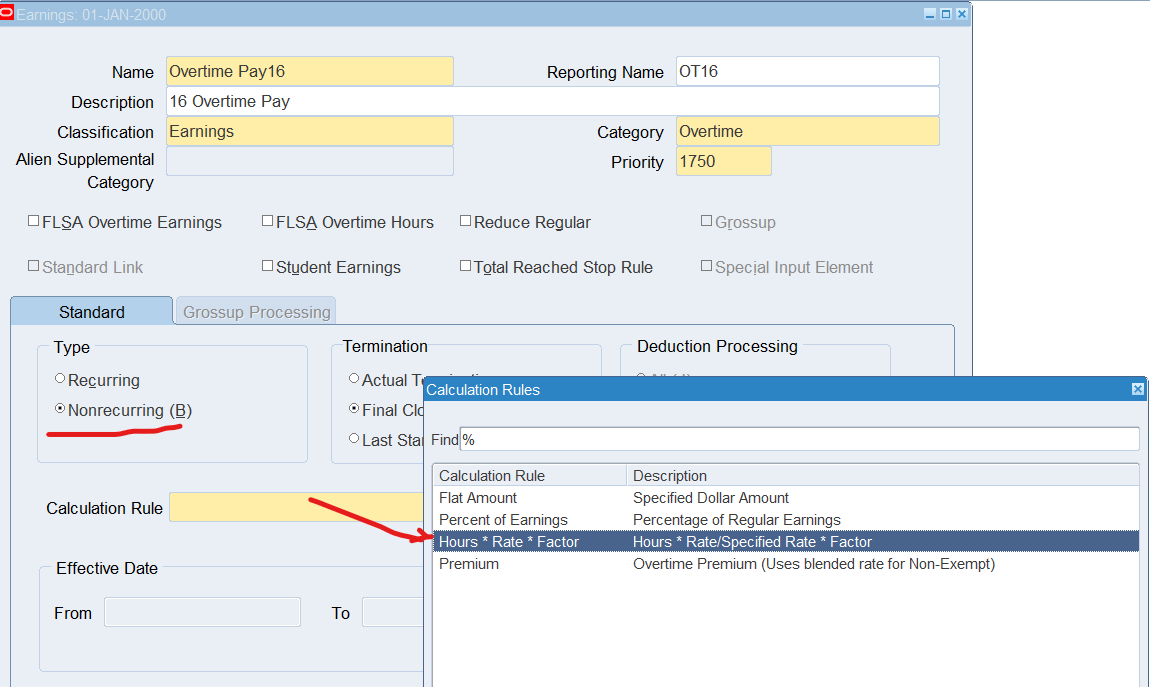
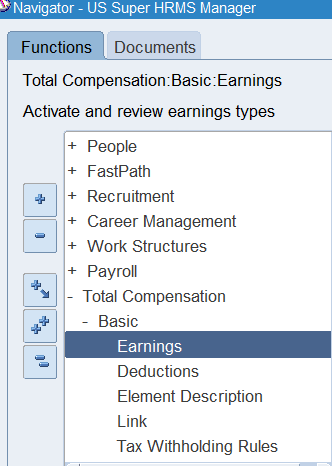
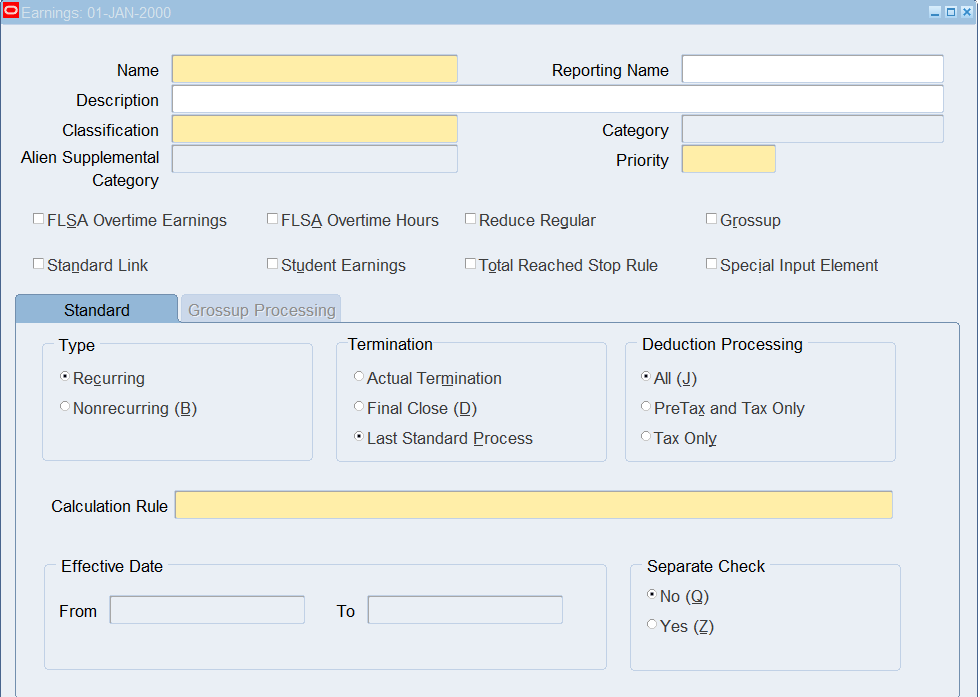
Creating Overtime Pay Earnings
Responsibility : US Super HRMS Manager
Navigation : (N) Total Compensation 🡪 Basic 🡪 Earnings
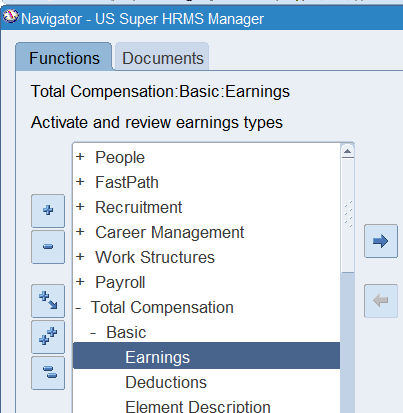
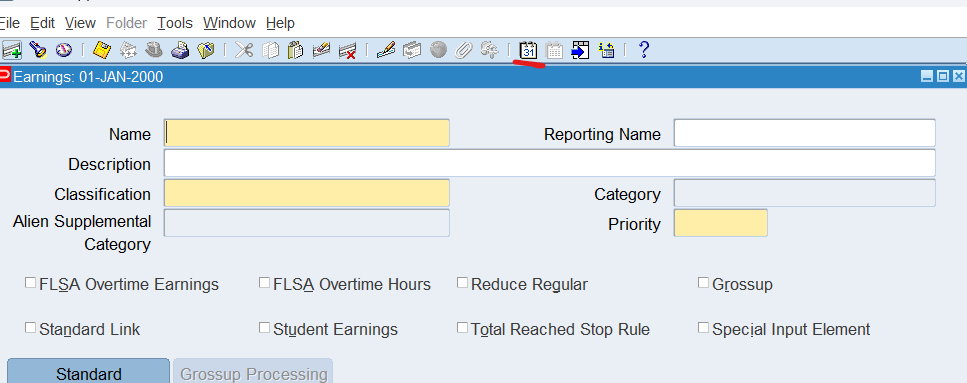
Set effective date to 01-Jan-2000
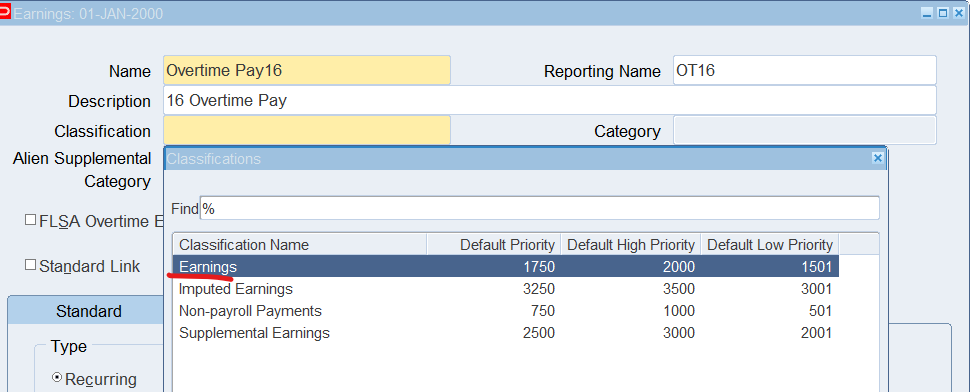
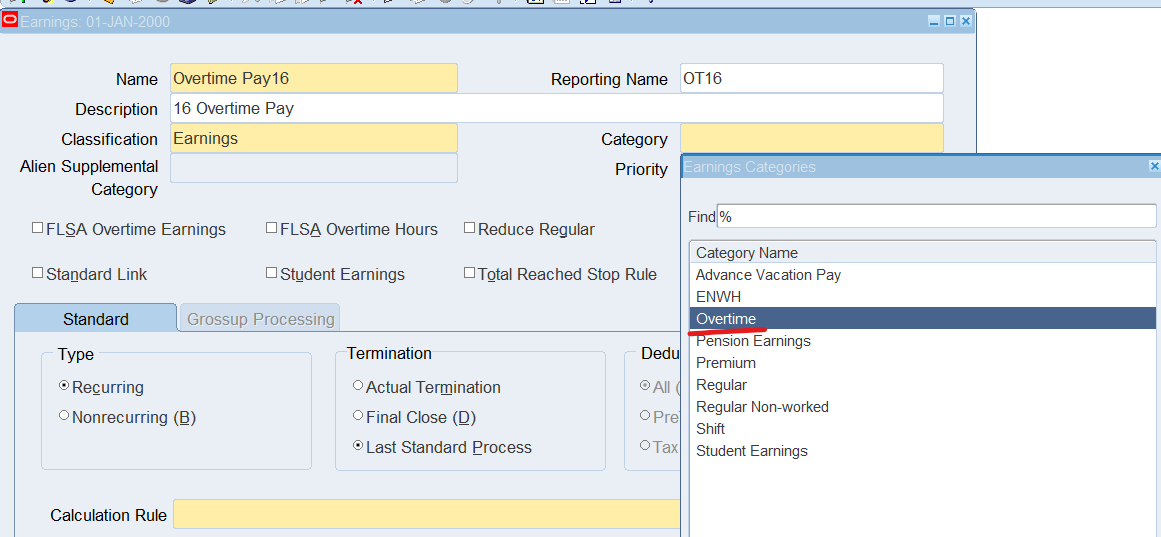
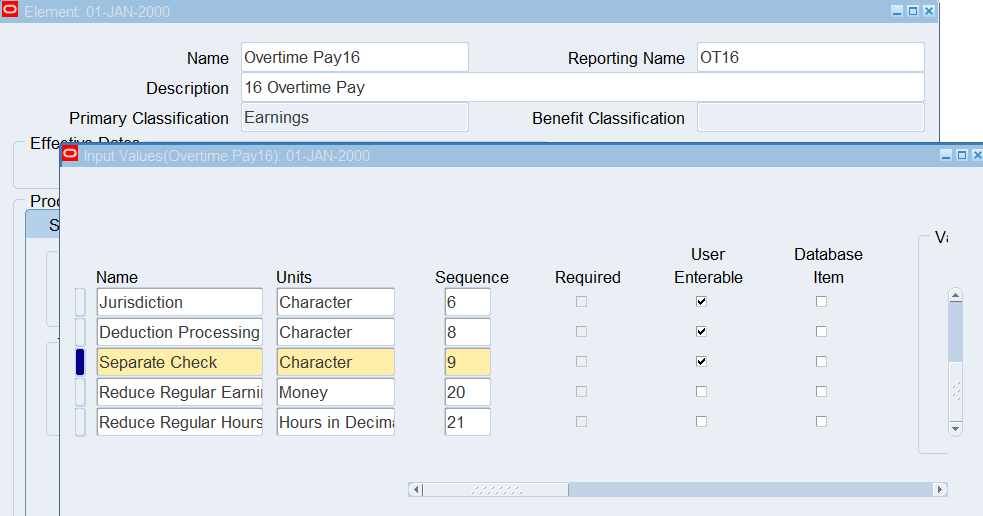
Name : Overtime Pay16.
Reporting Name : OT16
Description : 16 Overtime Pay
Classification : Earnings
Category : Overtime
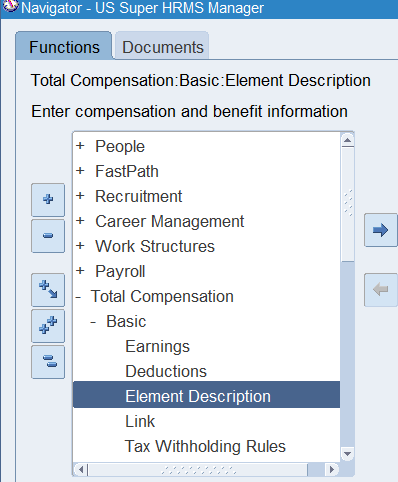
Modifying the Element
Navigate to Element (N) Total Compensation 🡪 Basic 🡪 Element Description
Set Date to: 01-Jan-2000
Query earning element “Overtime Pay16”
Ensure the “Multiple Entries Allowed” and “Process in Run” checkboxes are enabled/checked
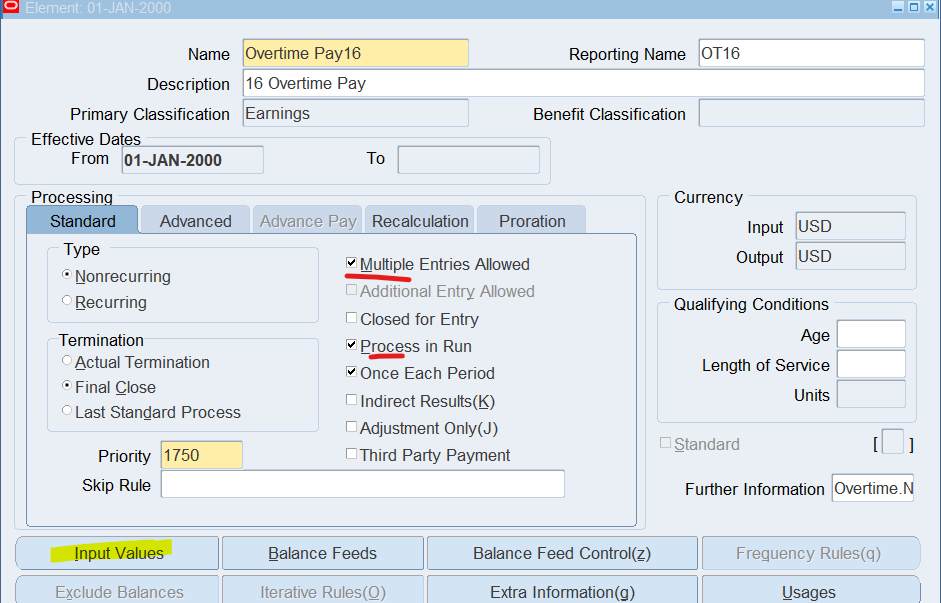
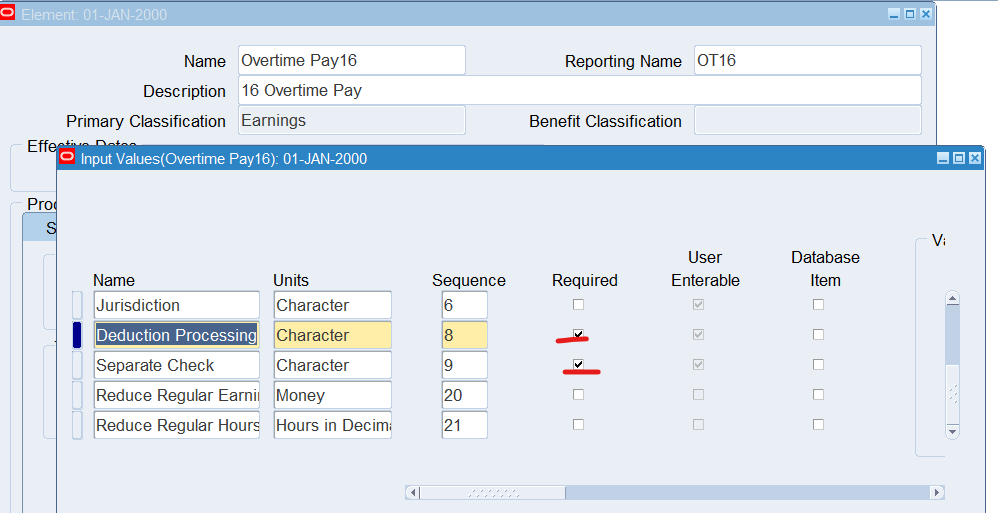
Select “Input Values”

Verify that there are Input Values called Hours, Pay Value, Multiple, Rate and Rate Code. In US, you also require Jurisdiction, ‘Deduction Processing’, and ‘Separate Check’.
Uncheck the Required checkbox for both ‘Deduction Processing’ and ‘Separate Check’ input values if required.
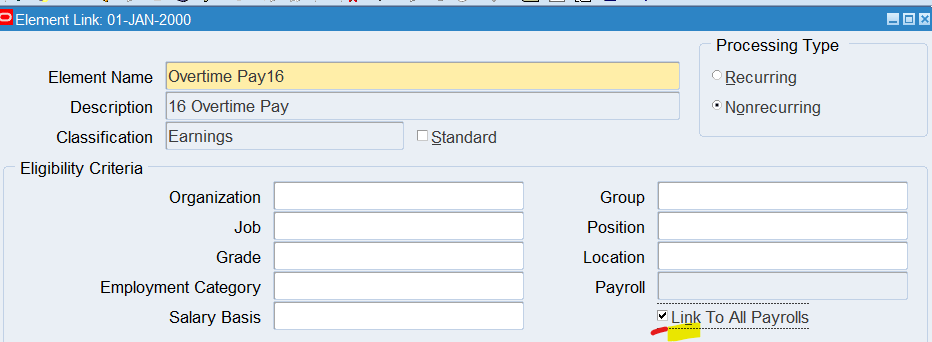
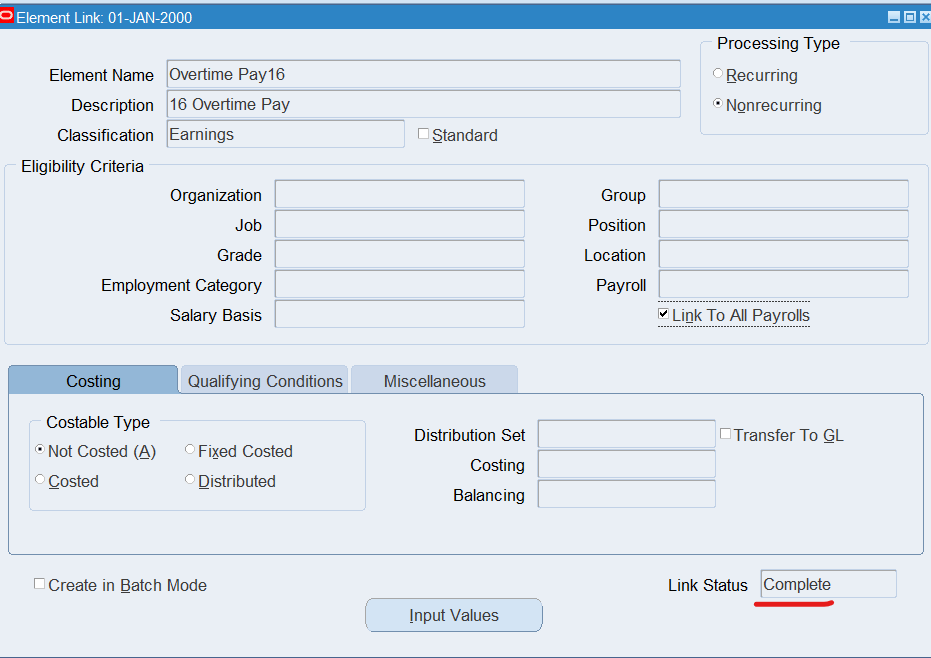
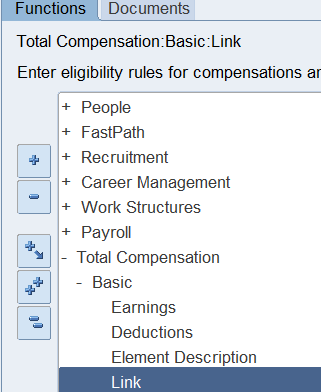
Linking Element
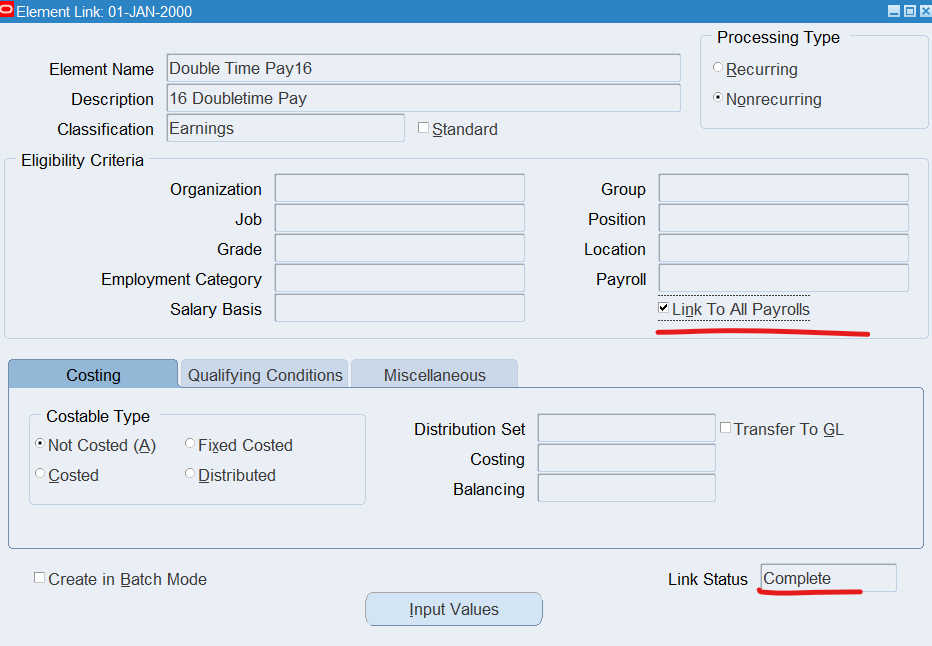
Navigate to the Element Link using “US Super HRMS Manager”
(N) Total Compensation 🡪 Basic 🡪 Link
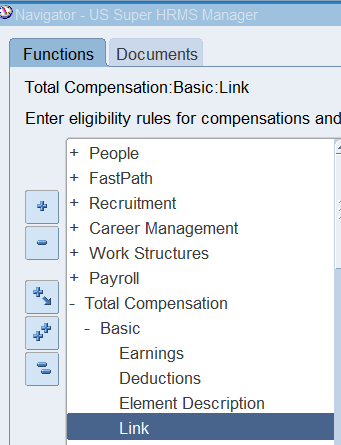
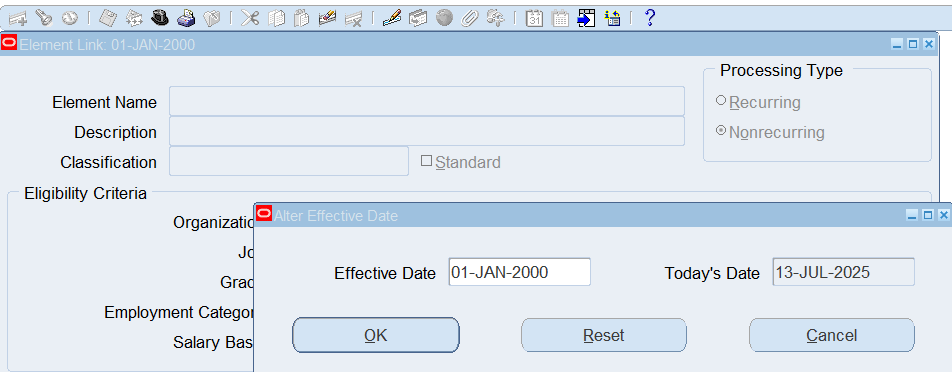
Set effective date to 01-Jan-2000
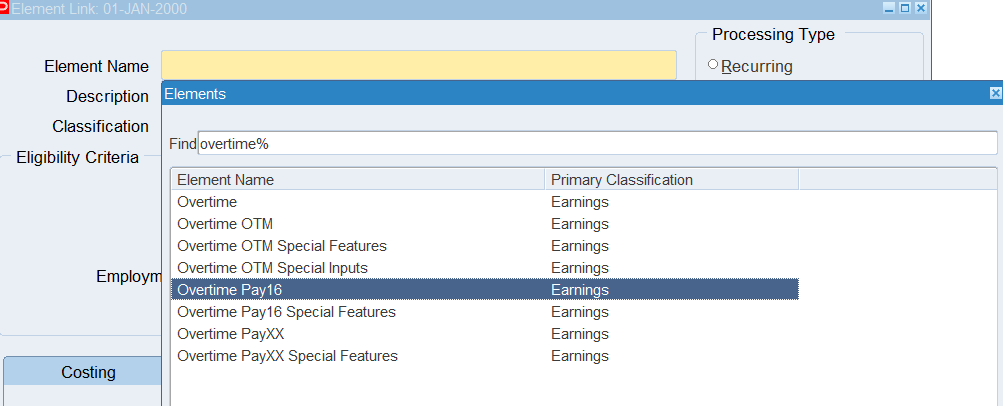
Select “overtime Pay16”
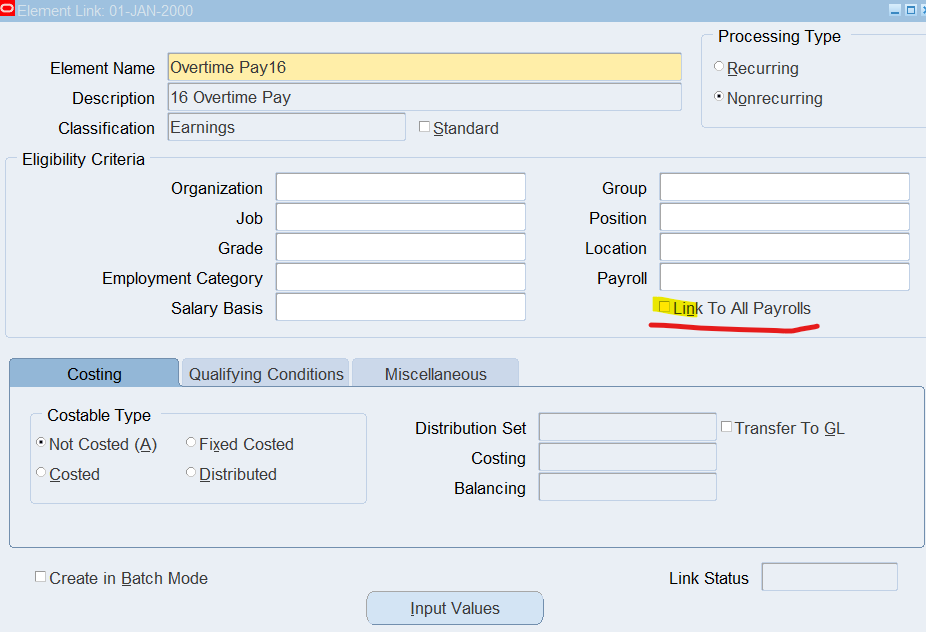
Note: check the “Link to All Payrolls” checkbox
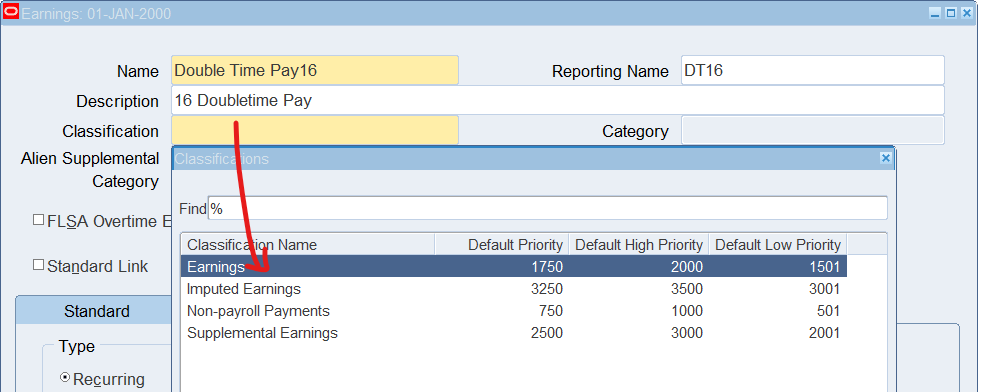
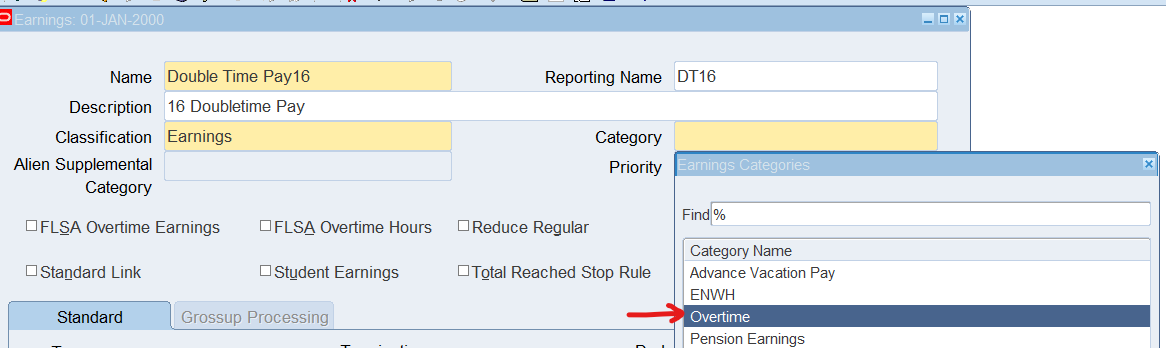
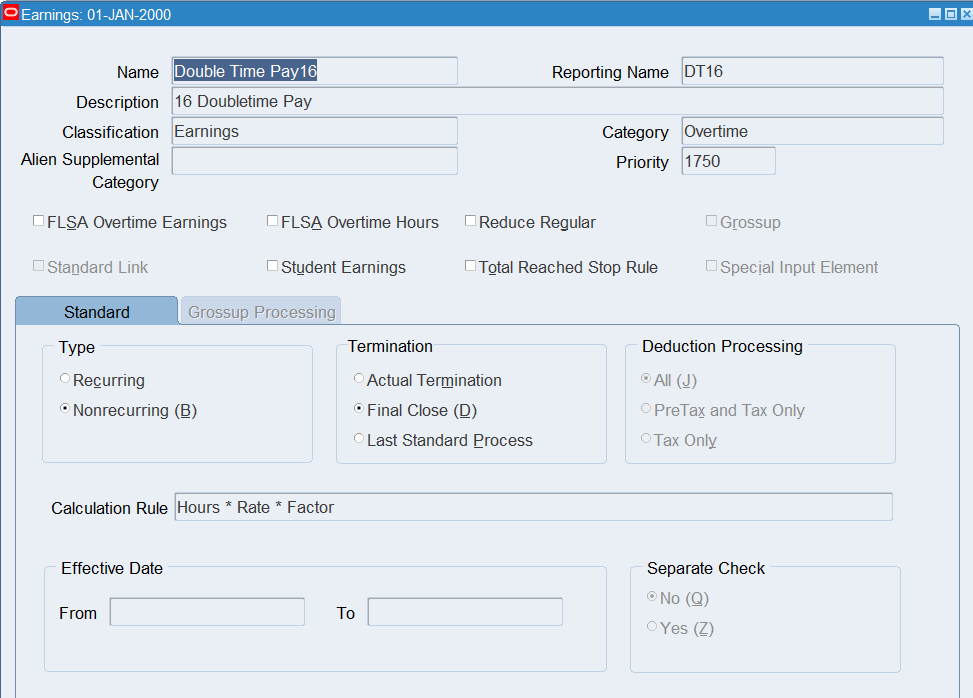
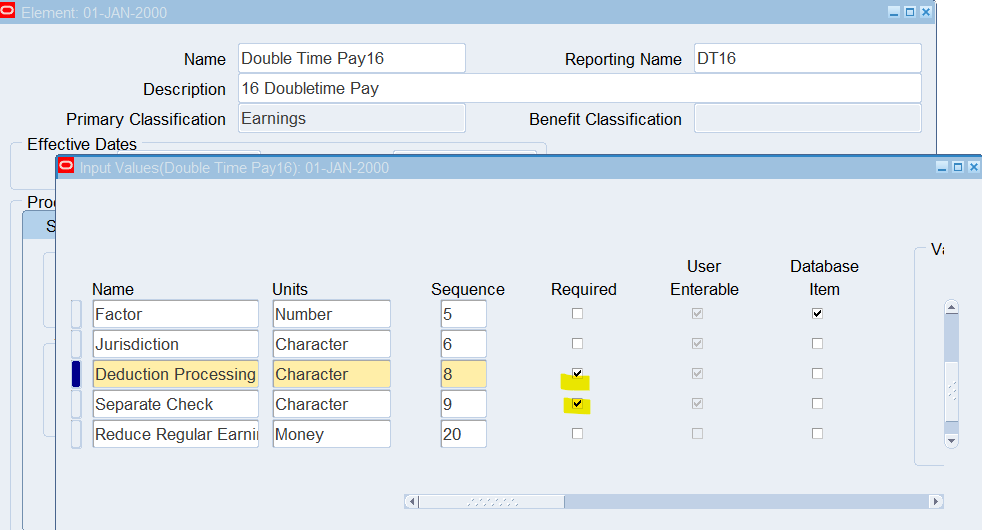
Creating Double Time Pay Earnings
Navigate to the Earning window using the US Super HRMS Manager responsibility
Responsibility : US Super HRMS Manager
Navigation : (N) Total Compensation 🡪 Basic 🡪 Earnings
| Name | Double Time Pay16 |
| Reporting Name | DT16 |
| Description | 16 Doubletime Pay |
| Classification | Earnings |
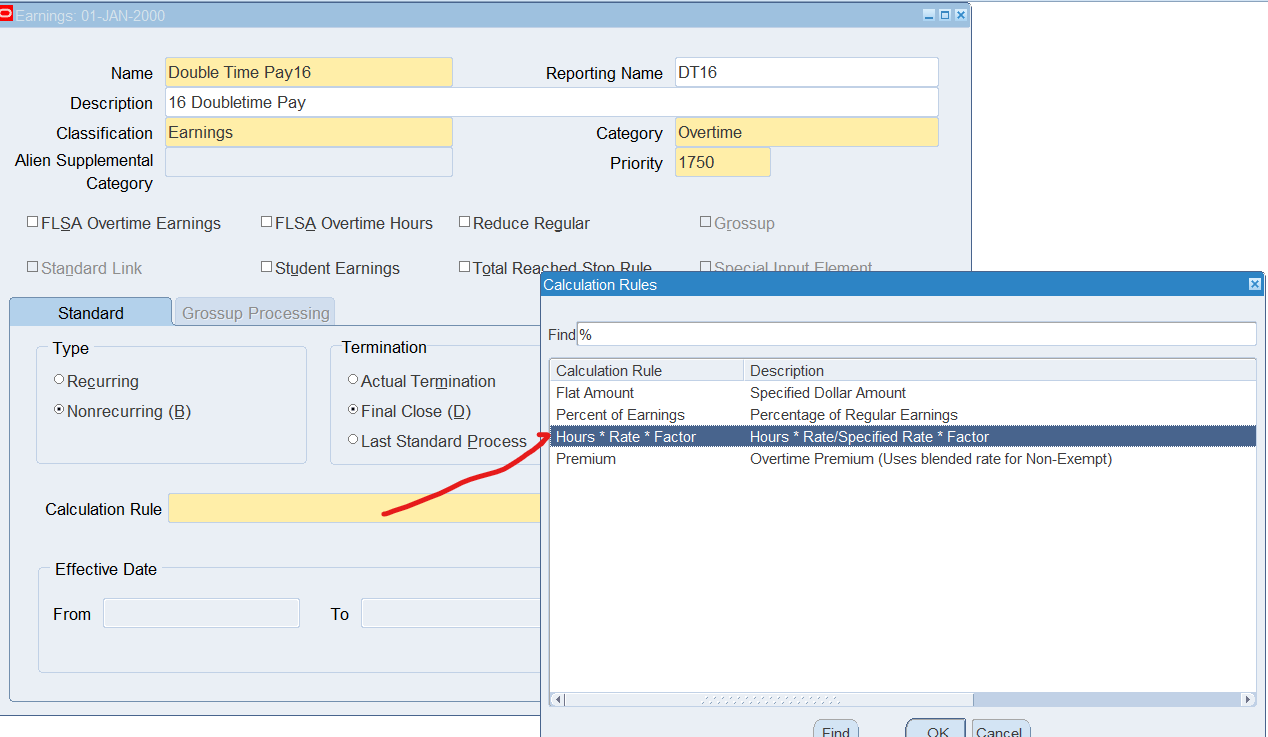
| Category | Overtime |
| Processing | Nonrecurring |
| Calculate Rule | Hours * Rate * Factor |
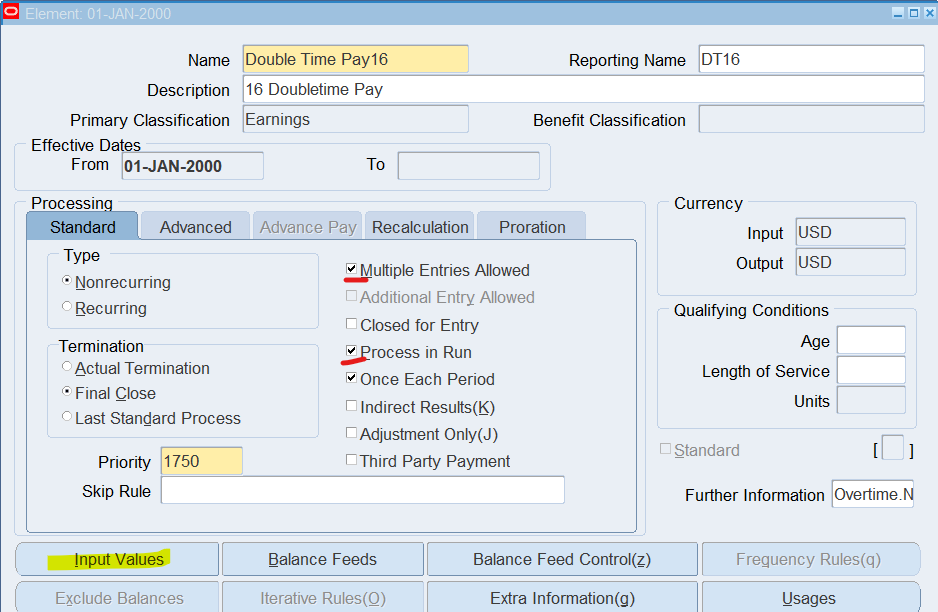
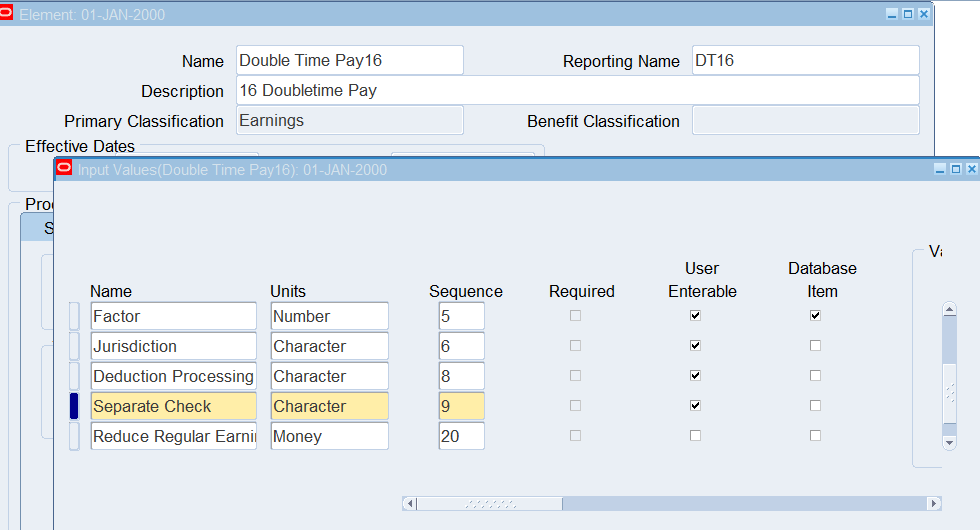
Modifying Double Time Pay Earning
Navigation : (N) Total Compensation 🡪 Basic 🡪 Element Description
Effective date : 01-Jan-2000
Query “Double Time Pay16”,
Ensure “Multiple Entries Allowed” and “Process in Run” checkboxes are checked
Select the Input Values
Verify that there are Input Values called Hours, Pay Value, Multiple, Rate and Rate Code. For US legislation, you also require Jurisdiction, ‘Deduction Processing’, and ‘Separate Check’ for Payroll processing
Uncheck the Required checkbox for both ‘Deduction Processing’ and ‘Separate Check’ input values if required
Linking Element
Navigate to the Element Link using “US Super HRMS Manager”
(N) Total Compensation 🡪 Basic 🡪 Link

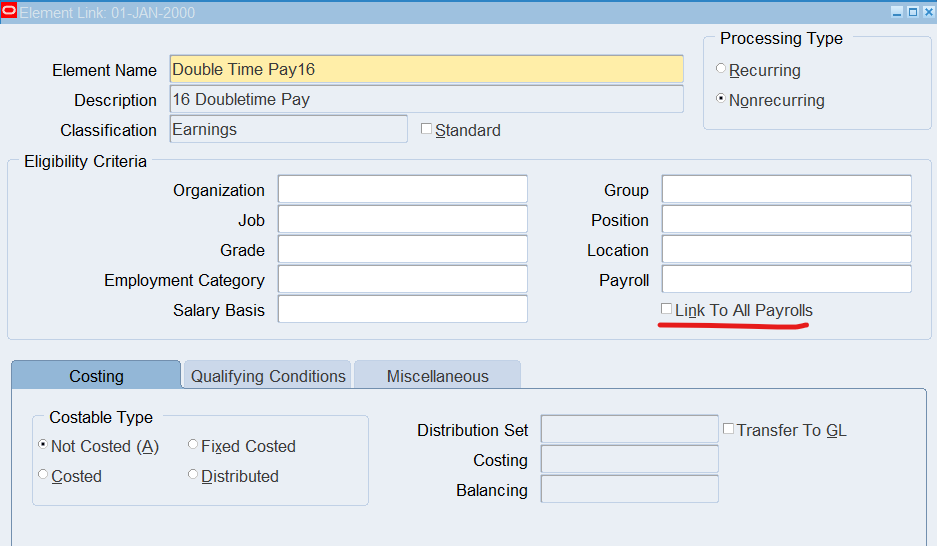
Select “Link to All Payrolls”
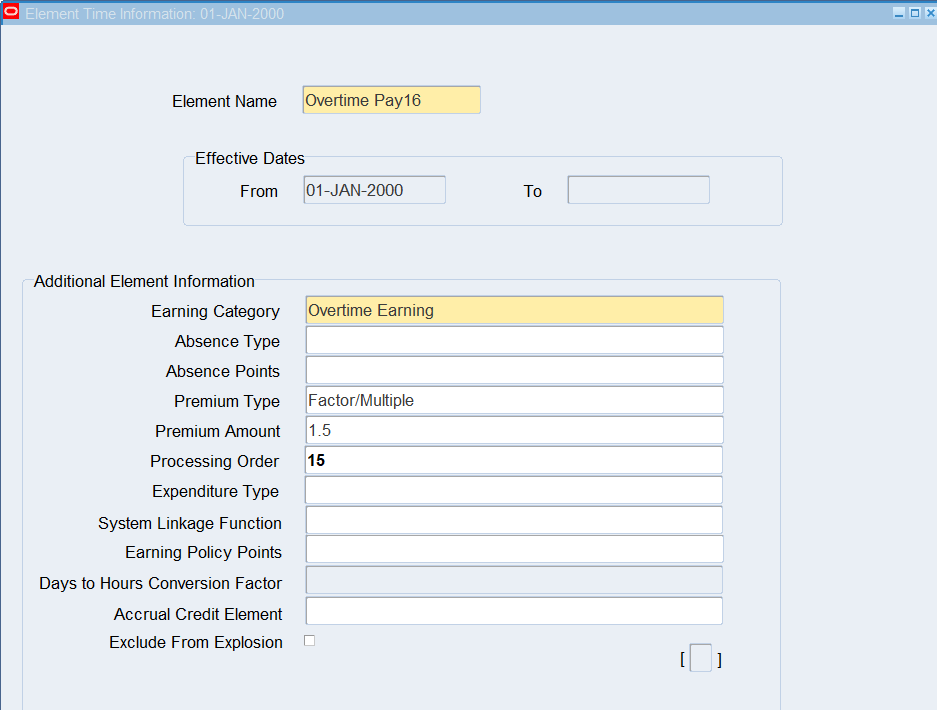
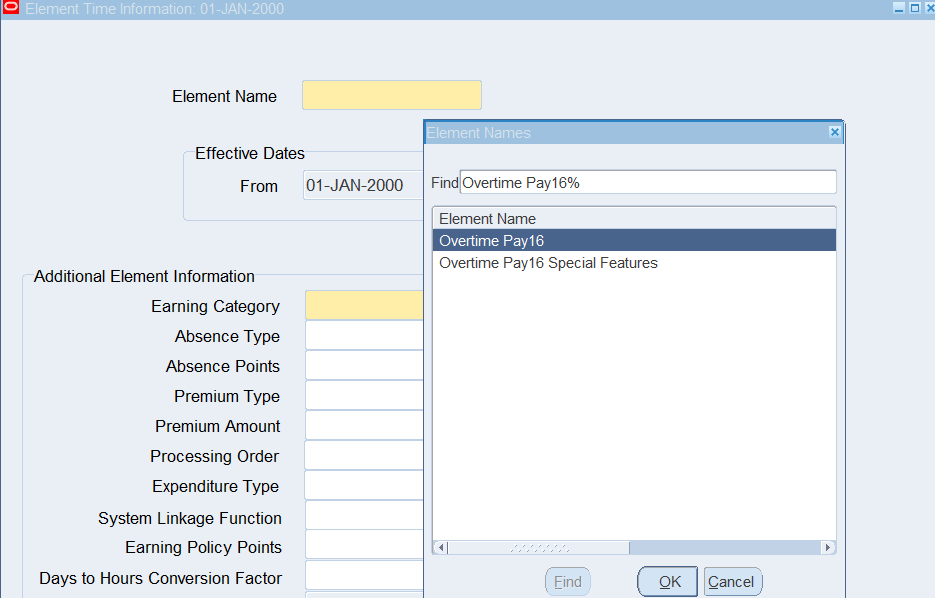
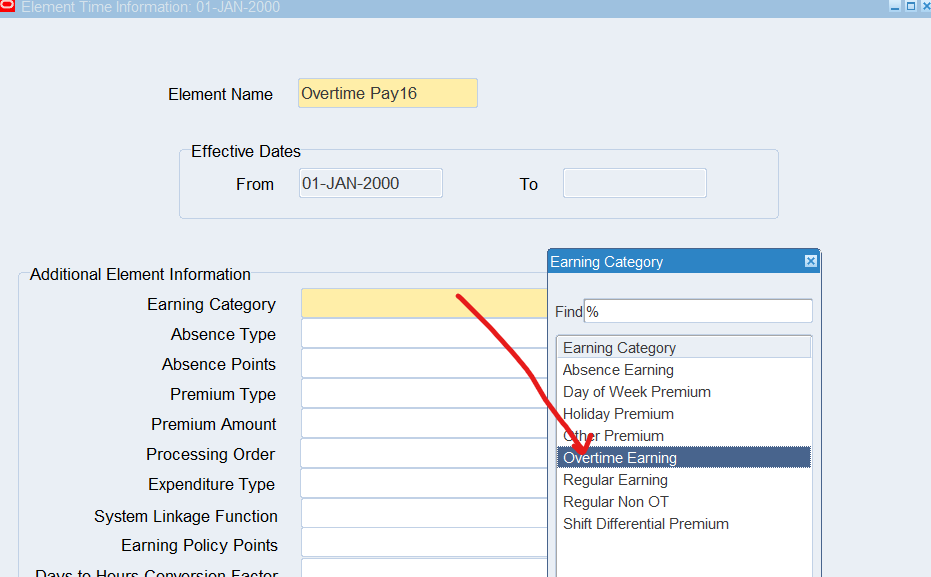
Entering Element Time Information
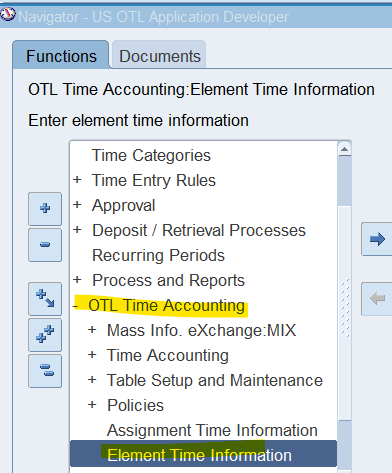
Responsibility : OTL Application Developer
Navigation : (N) OTL Time Accounting 🡪 Element Time Information
Effective Date : 01-Jan-2000
| Element Name | Overtime Pay16 |
| Earning Category | Overtime Earning |
| Premium Type | Factor/Multiple |
| Premium Amount | 1.5 |
| Processing Order | 15 |
Practice 5: Creating Element Sets
If you have Oracle HR or Payroll retrieval rules, you define Element Sets to specify the elements to be fed to Oracle Time & Labor. You can select individually all the elements you require.
Business Scenario
1st Create an Element Set for Retails Employees and include Overtime Pay and Double Time Pay earning elements.
2nd Element Set for Corporate Employees requires Vacation, Sick Time and Jury Duty earnings.
Creating an Element Set for Retail Employees
Navigate to the Element and Distribution Set window using the US Super HRMS Manager responsibility
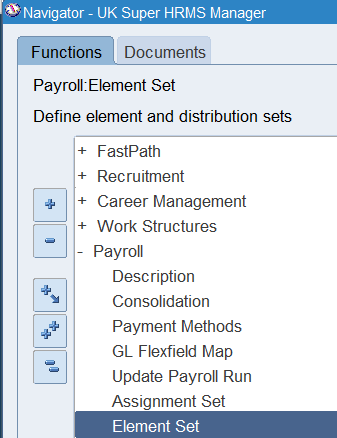
Navigation : (N) Payroll 🡪 Element Set
Date Track : 01-Jan-2000
Name : Retail Element Set 16
Type : Run Set
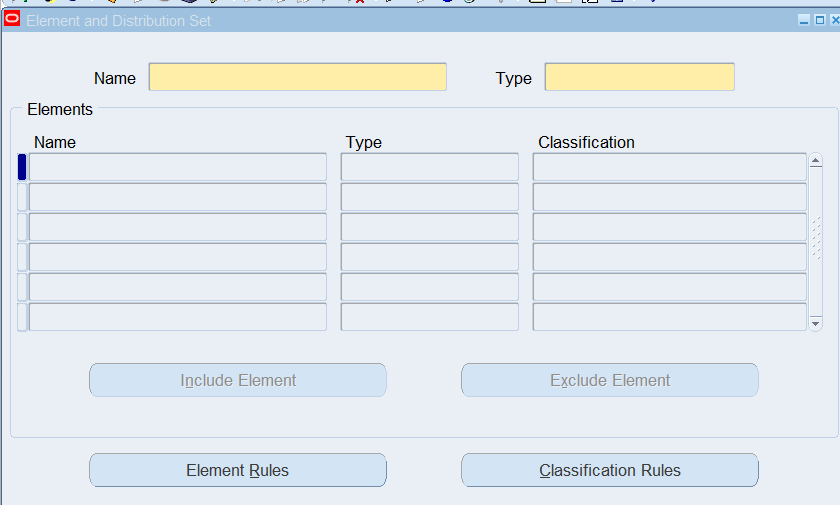
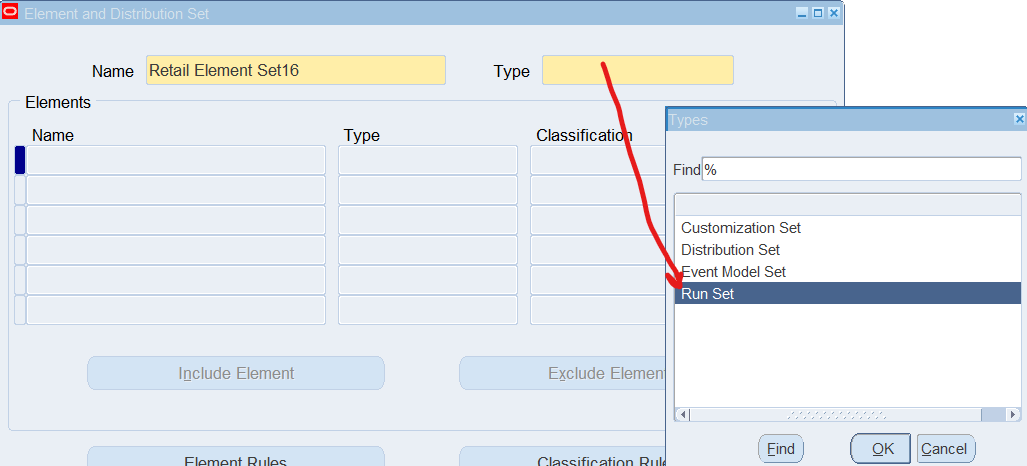
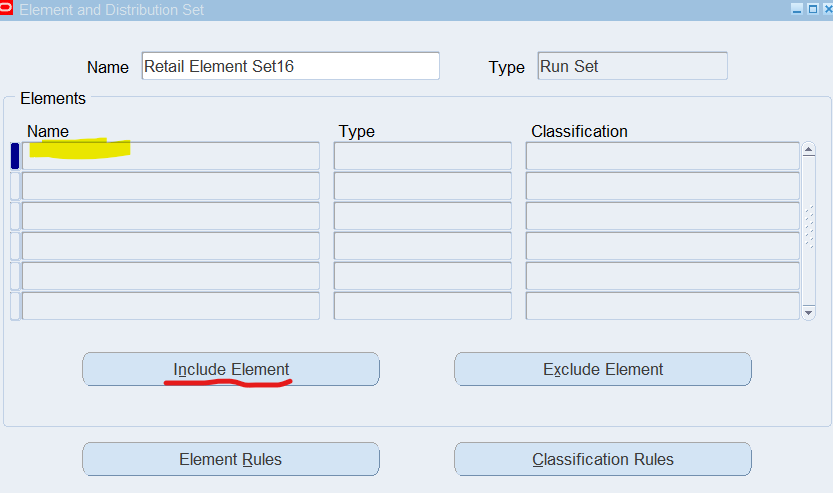
Choose Include Element button to display elements available for selection
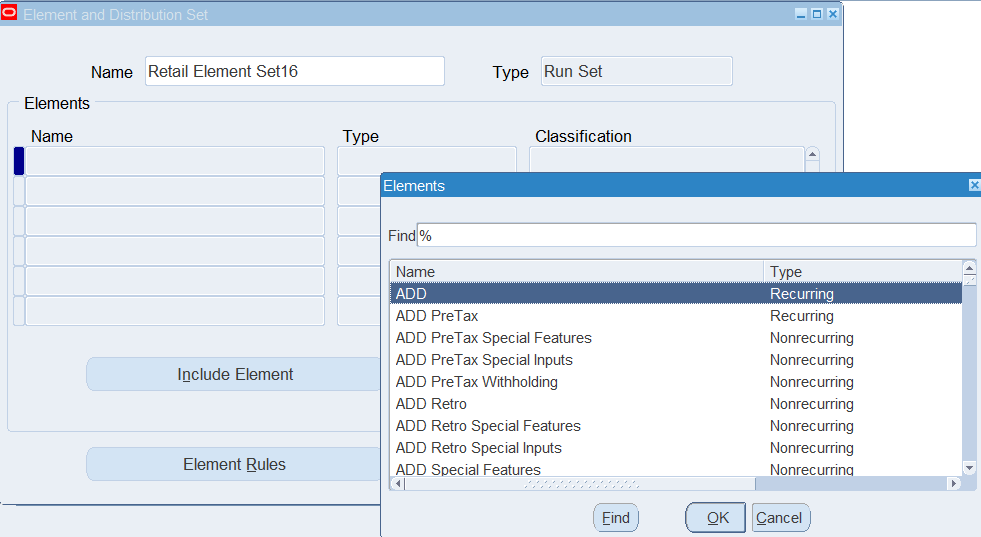
Select OTL Regular Pay, Overtime Pay16, Double Time Pay16, OTL Shift Pay

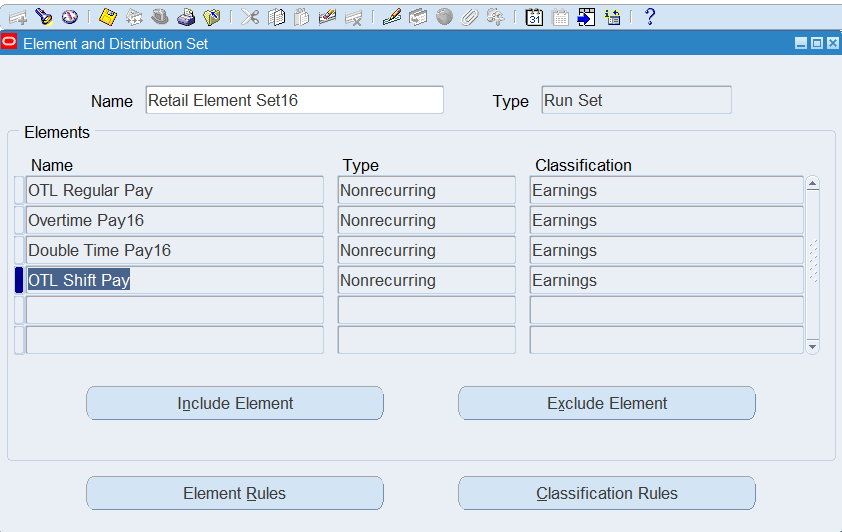
Save and create new element set
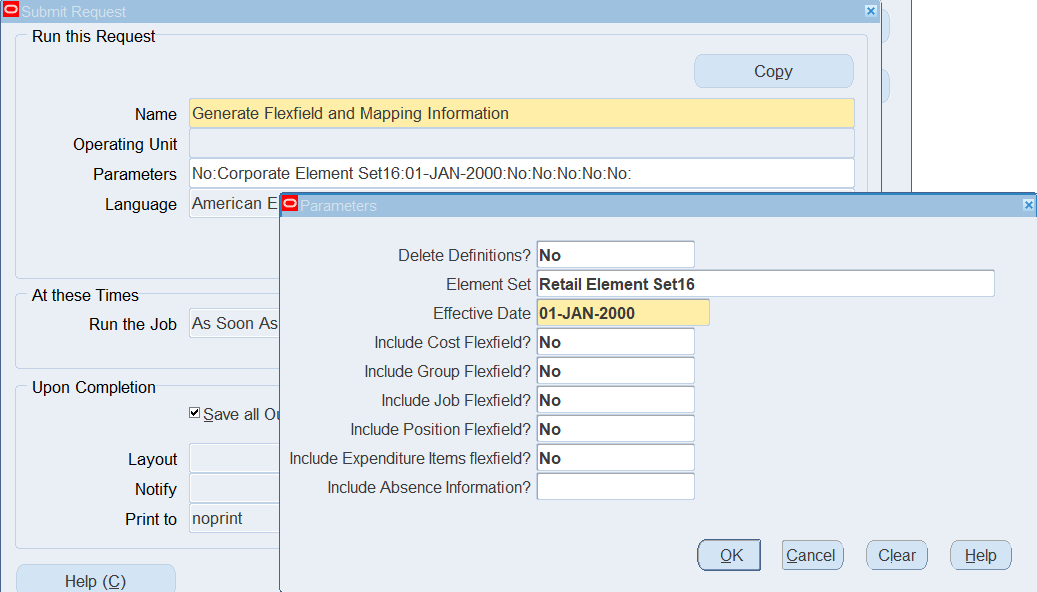
Creating an Element Set for Corporate Employees
Name : Corporate Element Set16
Type : Run Set
Elements : OTL Regular Pay, OTL Vacation Pay, OTL Sick Pay, OTL Jury Duty
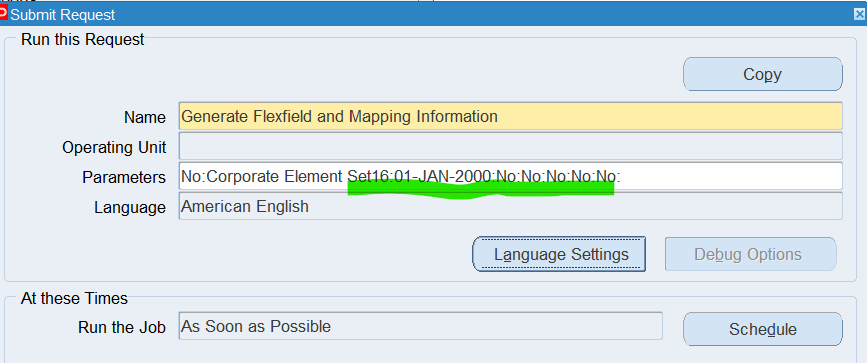
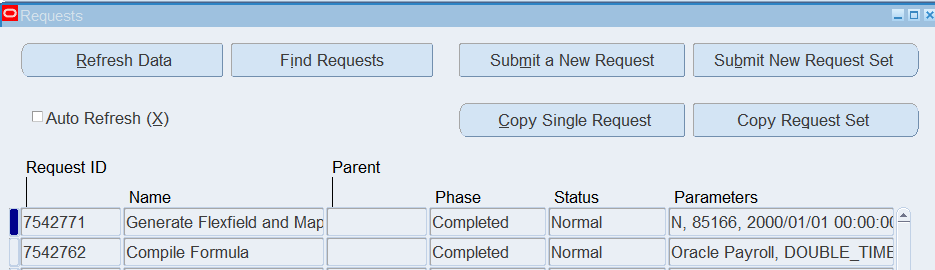
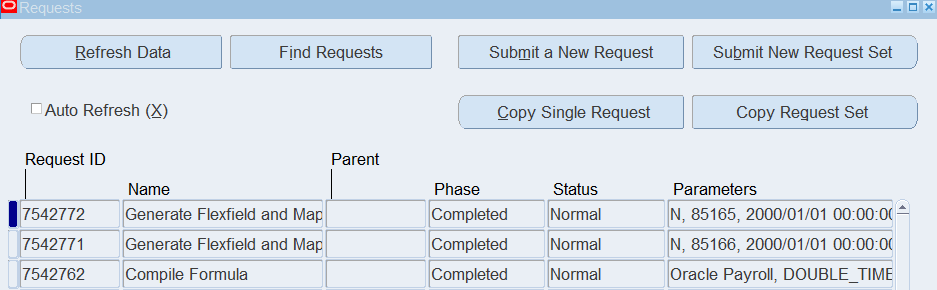
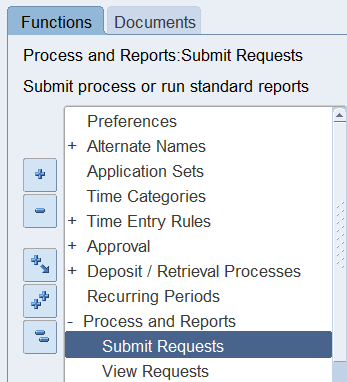
Running Generate Flexfield and Mapping Information
Navigate to Submit Request using US OTL Application Developer responsibility
Responsibility : US OTL Application Developer
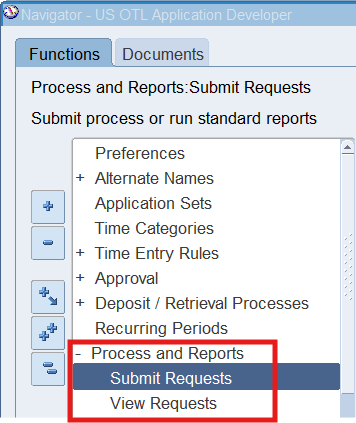
Navigation : (N) Process and Reports 🡪 Submit Requests
Select Single Request
Program Name : Generate Flexfield and Mapping Information

Verifying Results
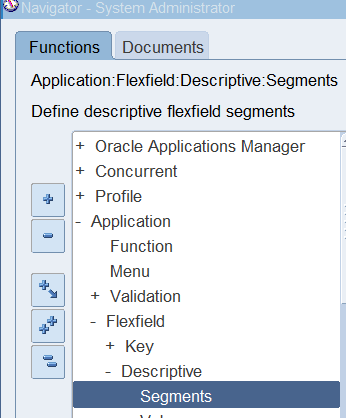
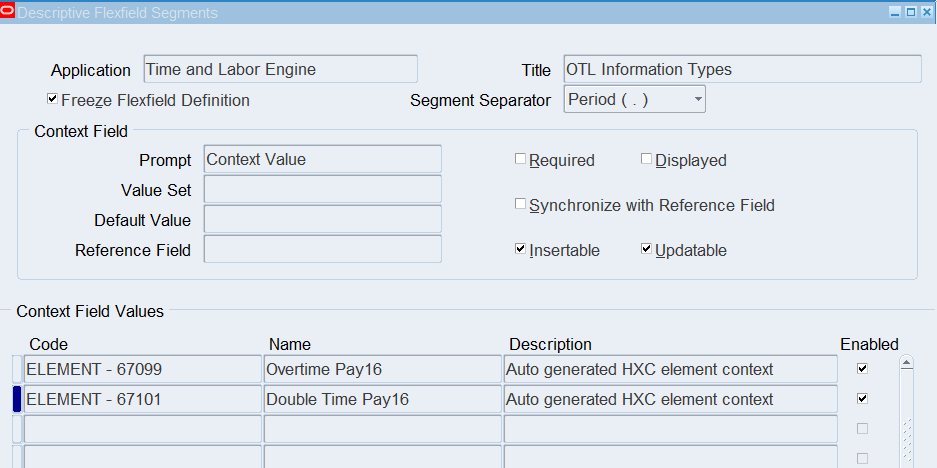
Navigate to the Descriptive Flexfield Segment window using the System Administrator responsibility
(N) Application 🡪 Flexfield 🡪 Descriptive 🡪 Segments
Query 🡪 Title 🡪 OTL Information Types (CTRL + F11)
Title 🡪 OTL Information Types
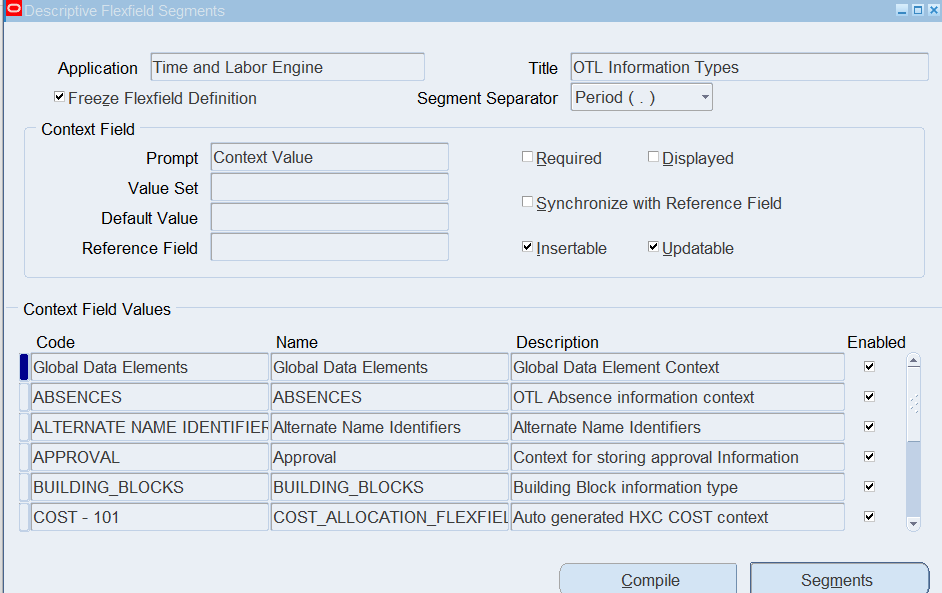
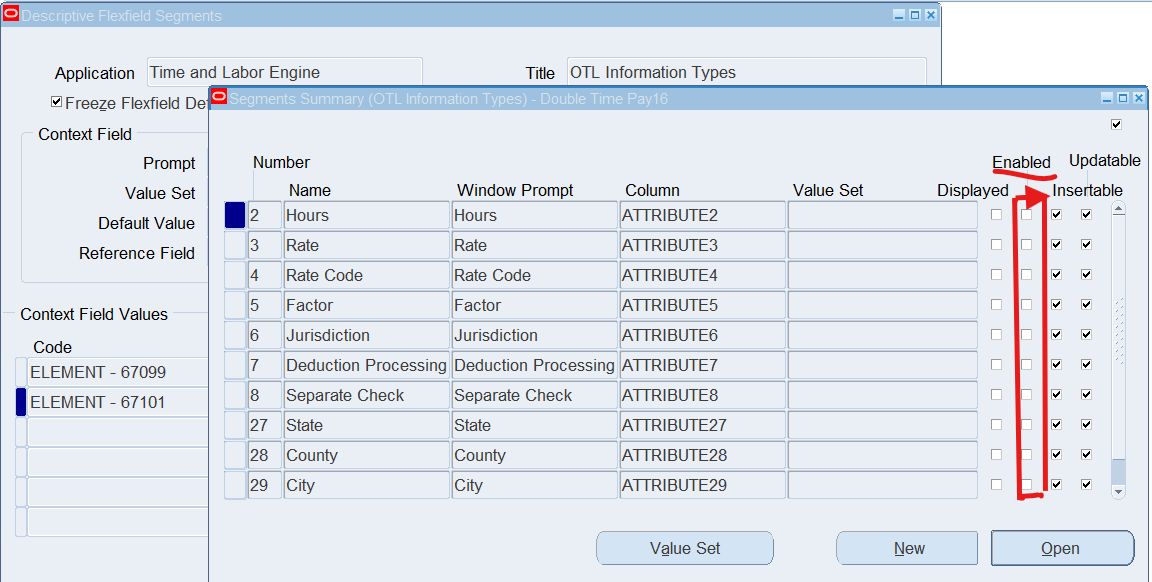 Note: Input Values (Segments) have not been Enabled.
Important: To Define the Alternate Name will enable these segments
For Demonstration – Reviewing Mapping and Mapping Components
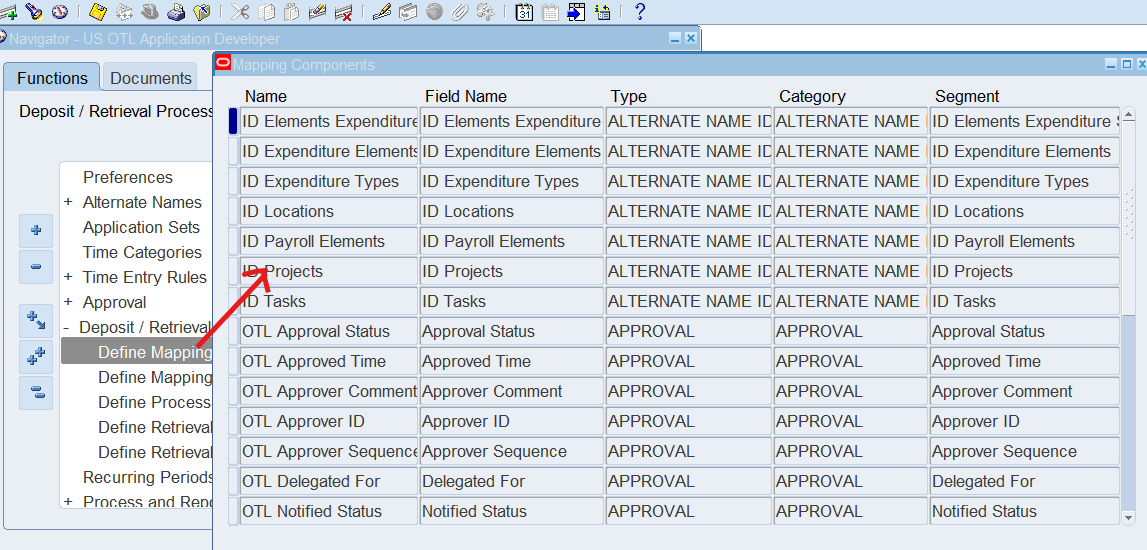
Each deposit and retrieval process refers to a mapping. The mapping defines the set of timecard fields that the process deposits or retrieves, and where these are held in the time store. The fields are defined as mapping components. There are predefined mapping for the predefined processes
Note: We do not need to define new fields to be captured by Oracle Time & Labor. Therefore, we will not need to define new contexts and segments for the OTL Information Types descriptive flexfield
Reviewing Mapping and Mapping Components
Responsibility : US OTL Application Developer
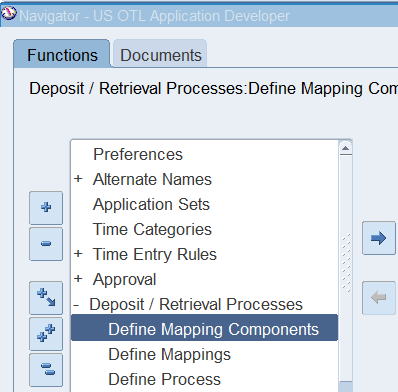
Navigation : (N) Deposit / Retrieval Processes 🡪 Define Mapping Components
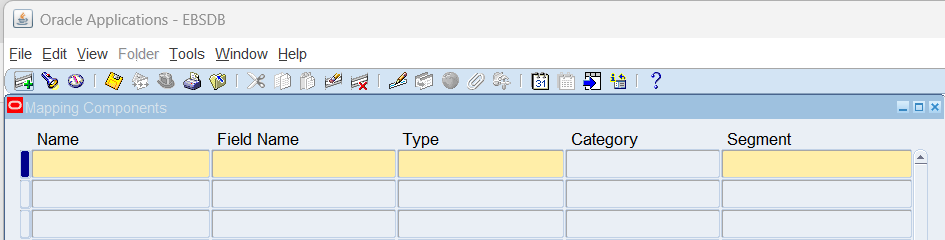
Perform an open query on the window (CTRL + F11) to show all mapping components defined.
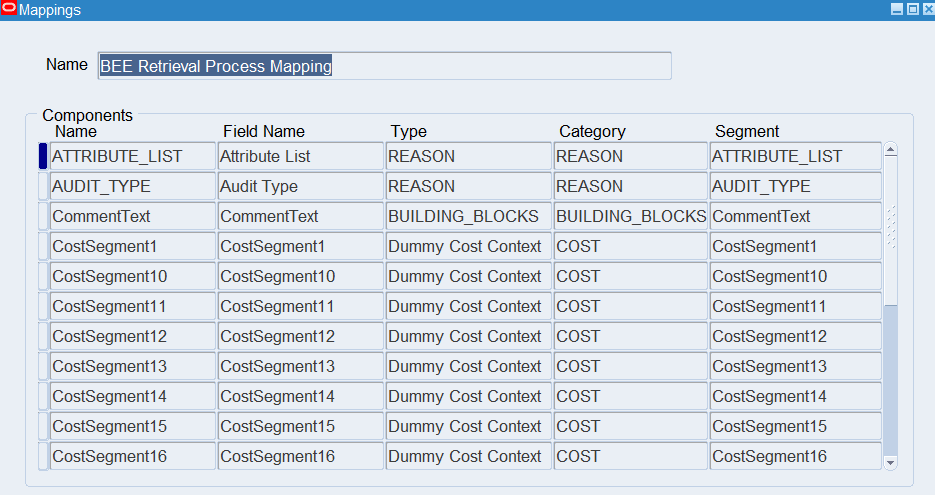
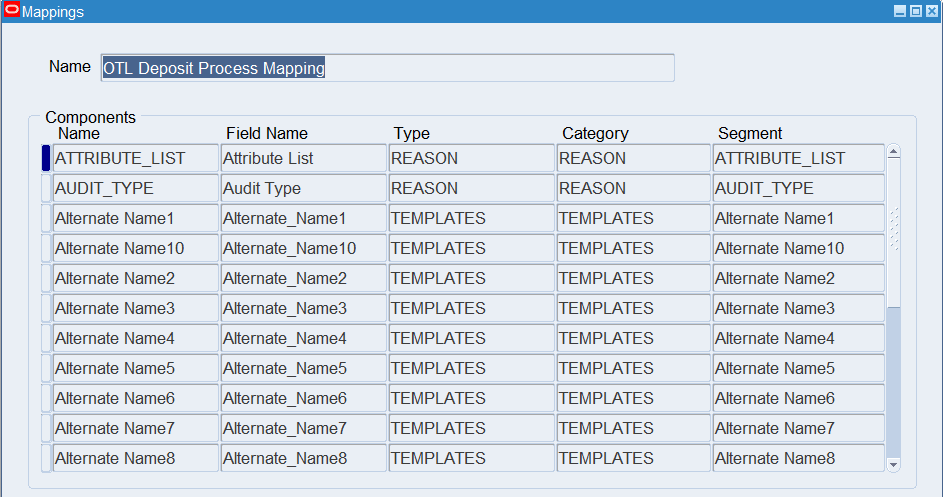
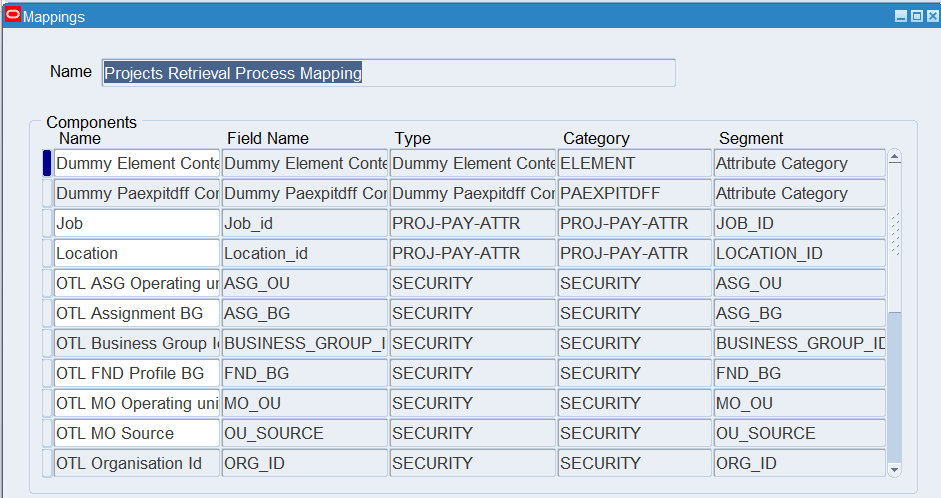
Review Define Mappings
(N) Deposit / Retrieval Processes 🡪 Define Mappings
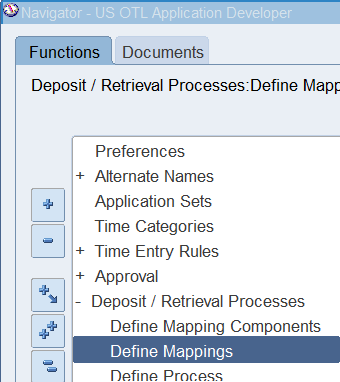
Run Open Query (CTRL + F11) to show all the predefined Mappings:
- BEE Retrieval Process
- OTL Deposit Process
- Projects Retrieval Process
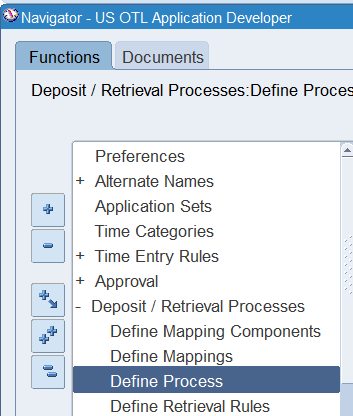
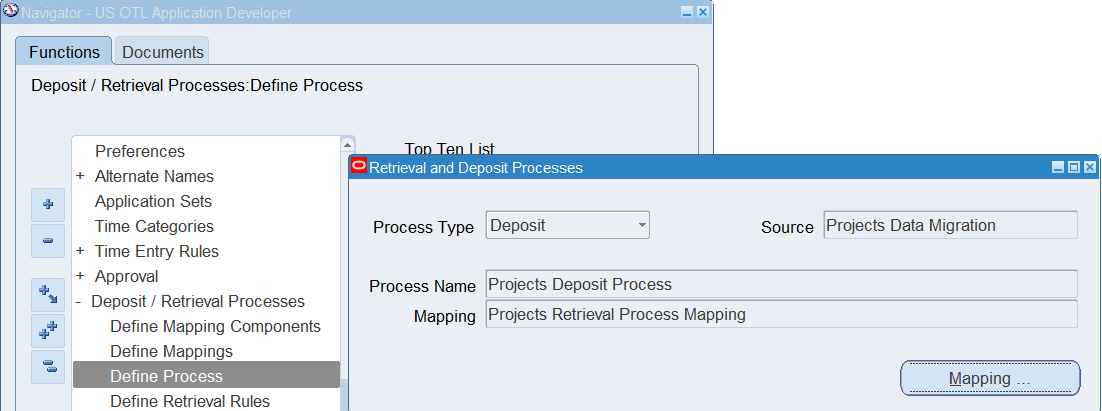
Viewing Retrieval Processes
A retrieval process defines the data that a recipient application can retrieve from the time store. There are predefined retrieval processes for Oracle Human Resources, Oracle Projects and Oracle Payroll.
Responsibility : US OTL Application Developer
Navigation : (N) Deposit / Retrieval Processes 🡪 Define Process
Perform an open query on the window and scroll through all the deposit and retrieval process
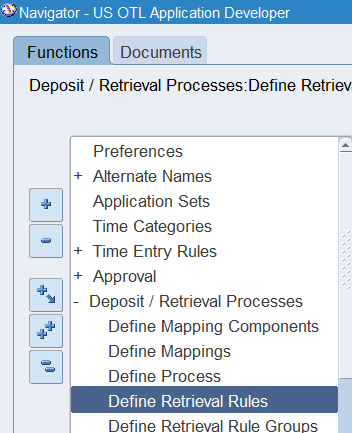
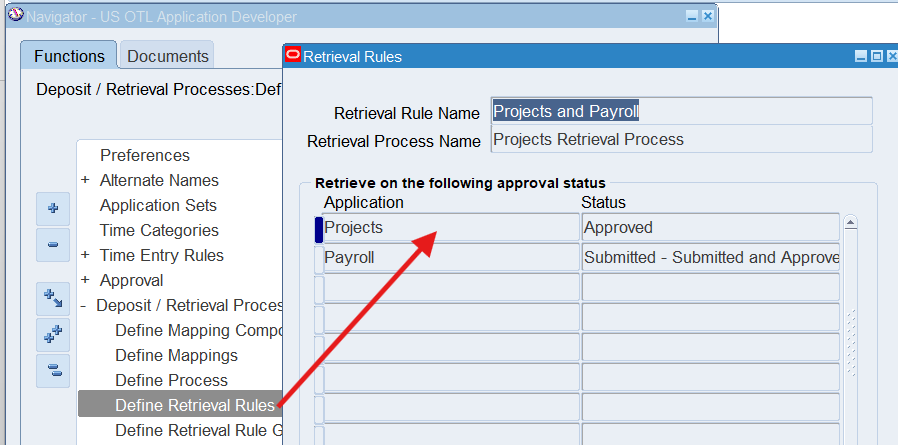
Viewing Retrieval Rules
Review the retrieval rule – Projects and Payroll – Approved. This rule indicates that Oracle Projects and Oracle Payroll both require data to be approved before it can be retrieved.
For retail and corporate employees, you can review the retrieval rule – Payroll. This rule indicates that Oracle Payroll requires data to be approved before it can be retrieved.
Responsibility : US OTL Application Developer
Navigation : (N) Deposit / Retrieval Processes 🡪 Define Retrieval Rules
Perform an open query (CTRL+F11) to view all the Retrieval Rules

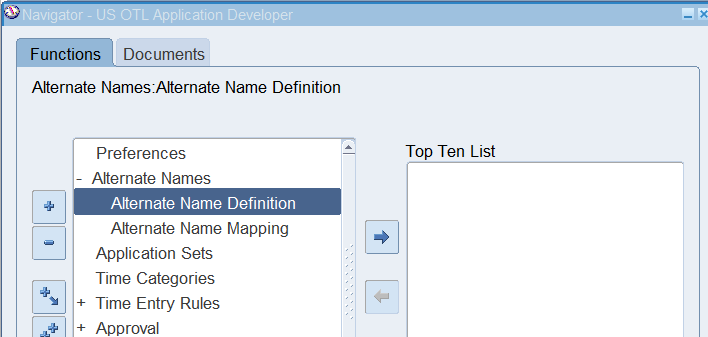
Practice 6: Defining Alternate Names
Using Alternate Names, configure lists of values on timecards. You may wish to change the name of an element, limit the display of values in a list, or derive the value of a filed from the value in another field.
Business Scenario
Warehouse employees will need to use alternate names to derive the expenditure type from the entry of project.
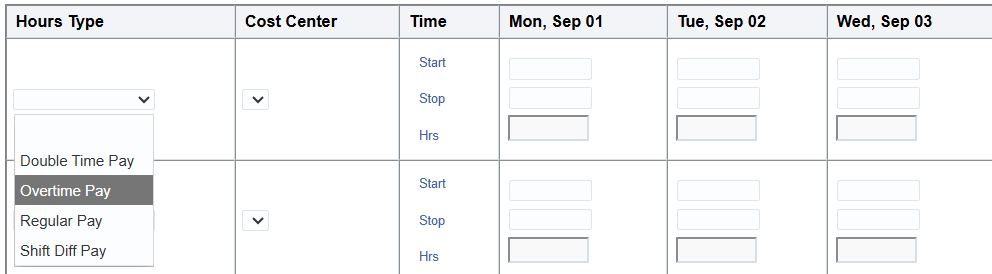
Retail employees do not need to see vacation, sick or jury duty in their list of values because they do not get paid for these hour types. However, they will need to have overtime pay and double time pay elements in their list of values.
Corporate employees should see elements with the name regular pay, sick pay, jury duty and vacation
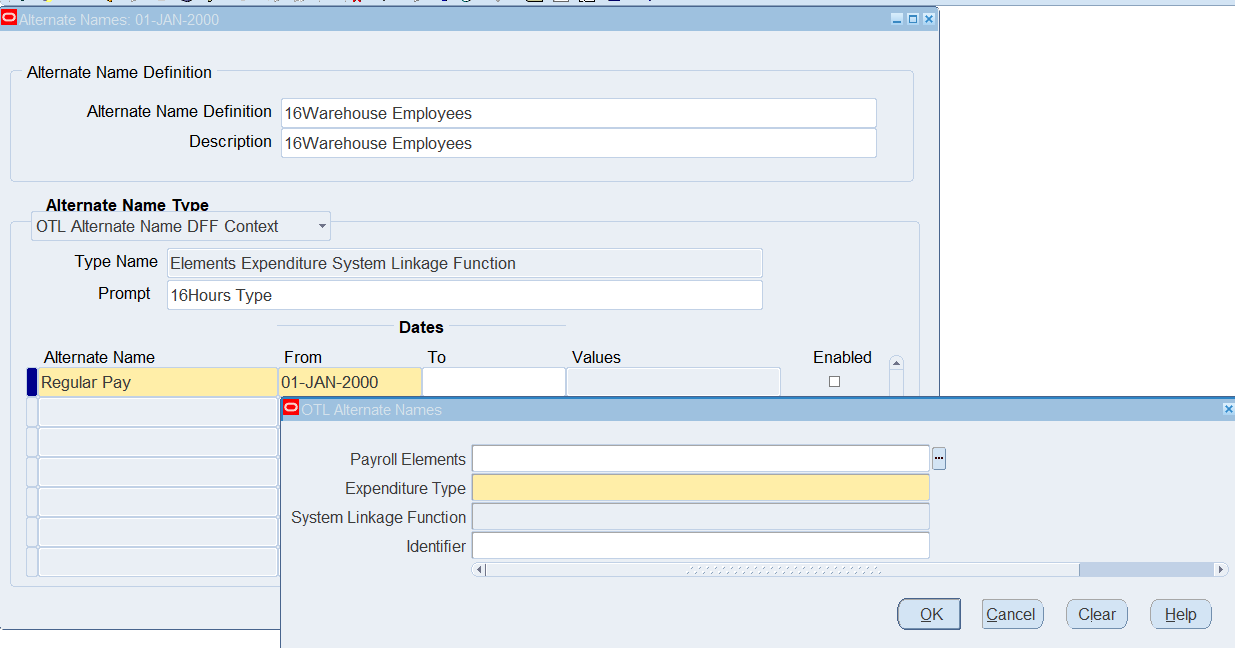
Defining Alternate Names for Warehouse Employees
Responsibility : US OTL Application Developer
Navigation : (N) Alternate Names 🡪 Alternate Name Definition
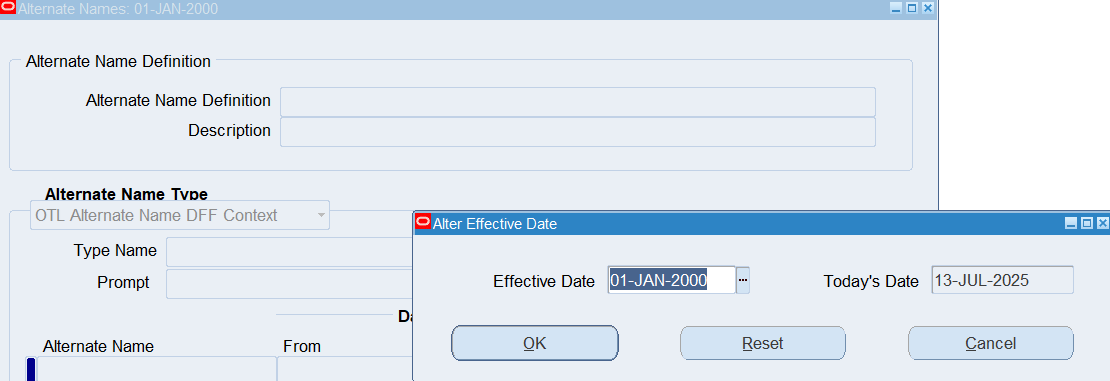
Date Track : 01-Jan-2000

| Alternate Definition | 16Warehouse Employees |
| Description | 16Warehouse Employees |
| Alternate Name Type | OTL Alternate Name DFF Context |
| Type Name | Elements Expenditure System Linkage Function |
| Prompt | 16Hours Type |
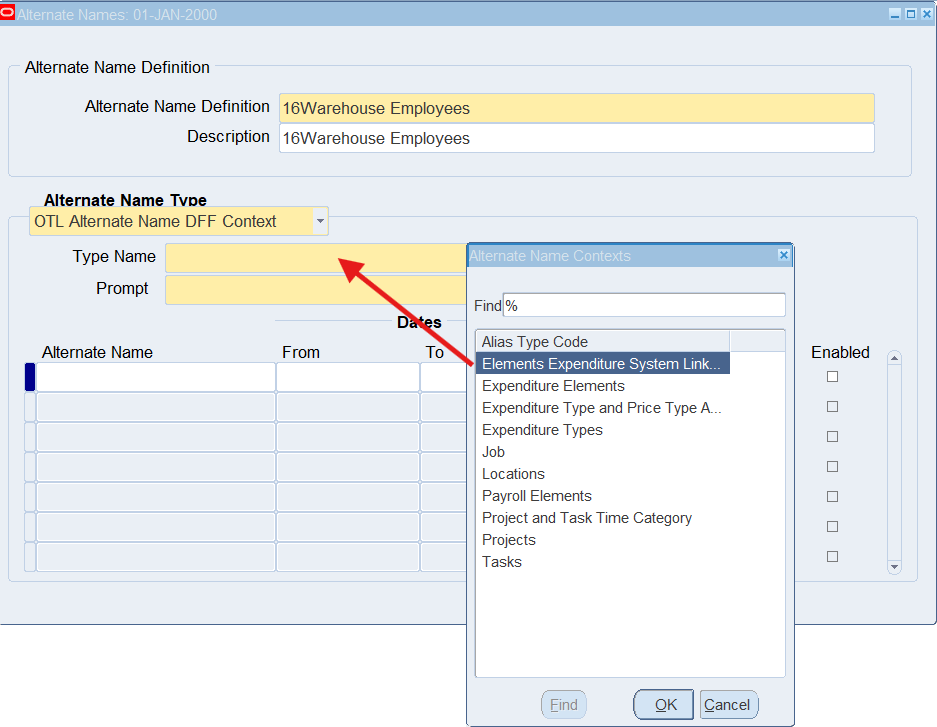

Select “Alternate Name” section
| Alternate Name | Regular Pay |
| Value | OTL Alternate Names popup |
| Payroll Element | OTL Regular Pay |
| Expenditure Type | Administrative |
| System Linkage Function | ST |
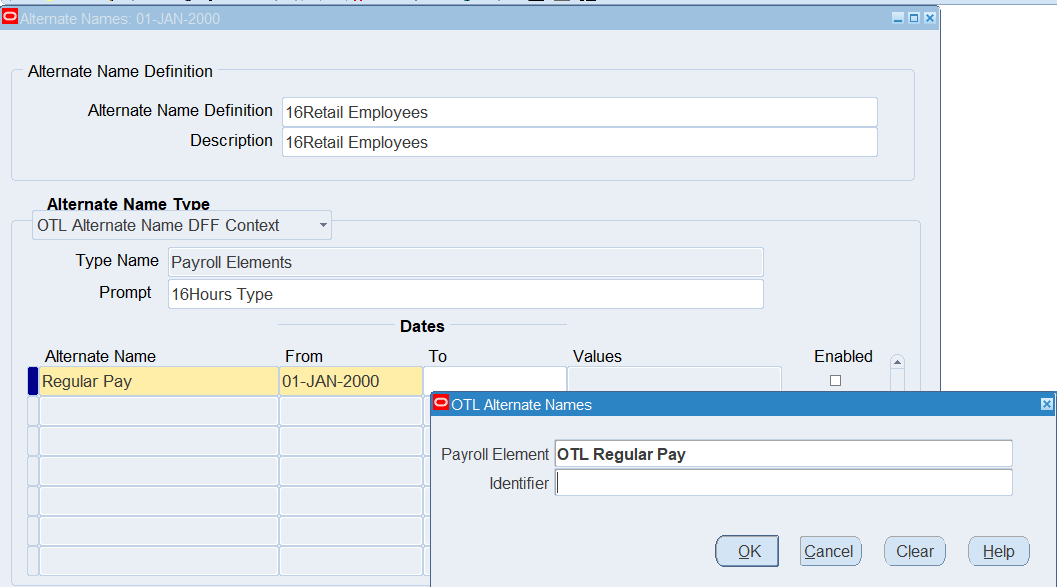
Defining Alternate Names for Retail Employees
Responsibility : US OTL Application Developer
Navigation : (N) Alternate Names 🡪 Alternate Name Definition
Date Track : 01-Jan-2000

| Alternate Definition | 16Retail Employees |
| Description | 16Retail Employees |
| Alternate Name Type | OTL Alternate Name DFF Context |
| Type Name | Payroll Elements |
| Prompt | 16Hours Type |
Select “Alternate Name” section
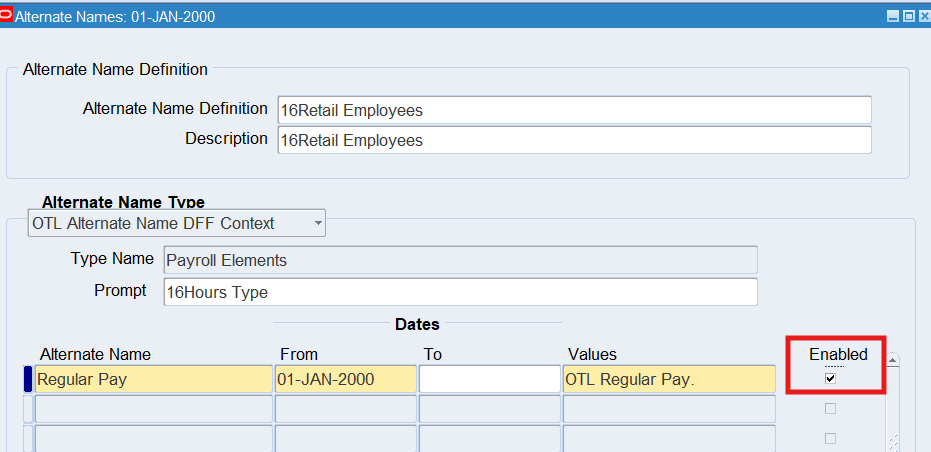
| Alternate Name | Regular Pay |
| Value | OTL Alternate Names popup |
| Payroll Element | OTL Regular Pay |
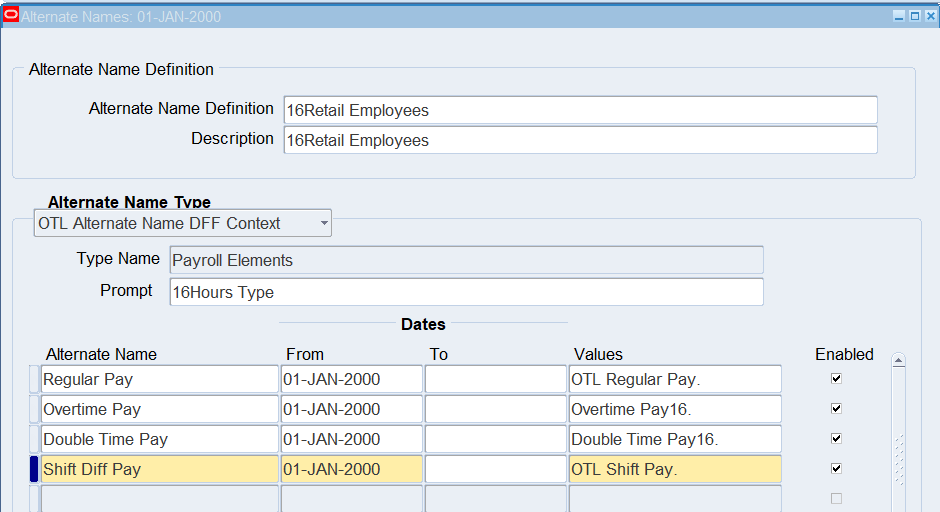
Add new record to continue enter the following information
| Alternate Name | Payroll Element | Enabled |
| Overtime Pay | Overtime Pay16 | Checked |
| Double Time Pay | Double Time Pay16 | Checked |
| Shift Diff Pay | OTL Shift Pay | Checked |
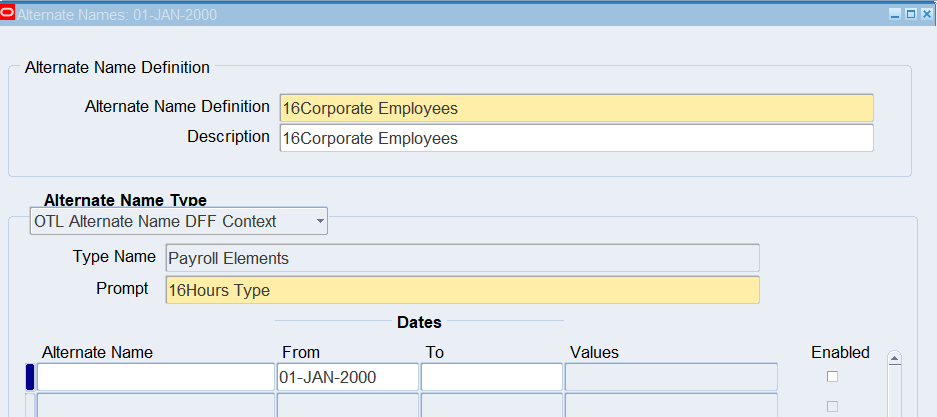
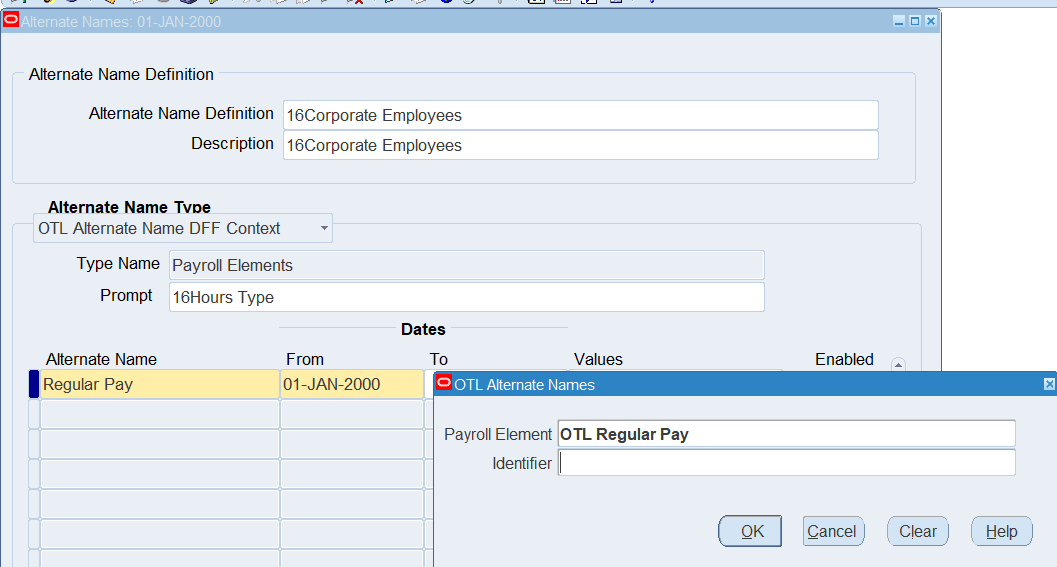
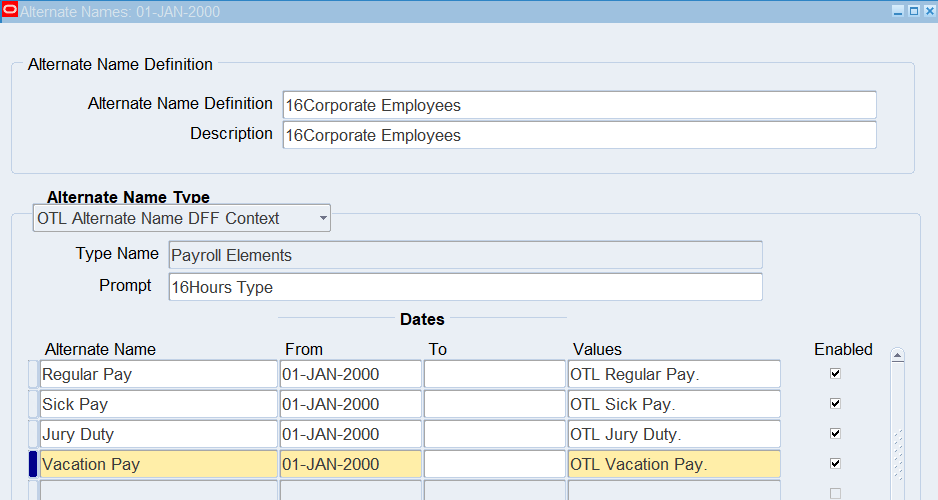
Defining Alternate Names for Corporate Employees
Responsibility : US OTL Application Developer
Navigation : (N) Alternate Names 🡪 Alternate Name Definition
Date Track : 01-Jan-2000

| Alternate Definition | 16Corporate Employees |
| Description | 16Corporate Employees |
| Alternate Name Type | OTL Alternate Name DFF Context |
| Type Name | Payroll Elements |
| Prompt | 16Hours Type |
Add new record to continue enter the following information
| Alternate Name | Payroll Element | Enabled |
| Regular Pay | OTL Regular Pay | Checked |
| Sick Pay | OTL Sick Pay | Checked |
| Jury Duty | OTL Jury Duty | Checked |
| Vacation Pay | OTL Vacation Pay | Checked |
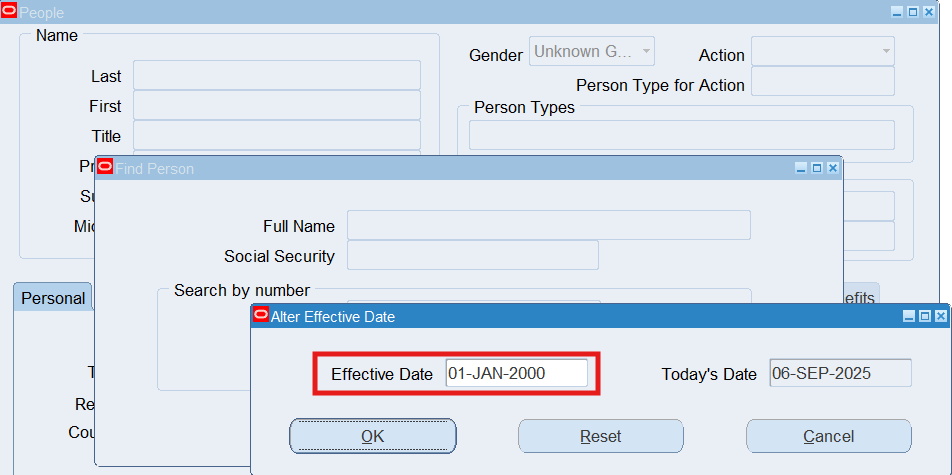
Practice 7: Defining Employees
Business Scenario
Business requirement is to define 3 employees, one as s Warehouse Employee, one as a Retail Employee and one as a Corporate Employee.
Note: Choose to make one of these employees as supervisor
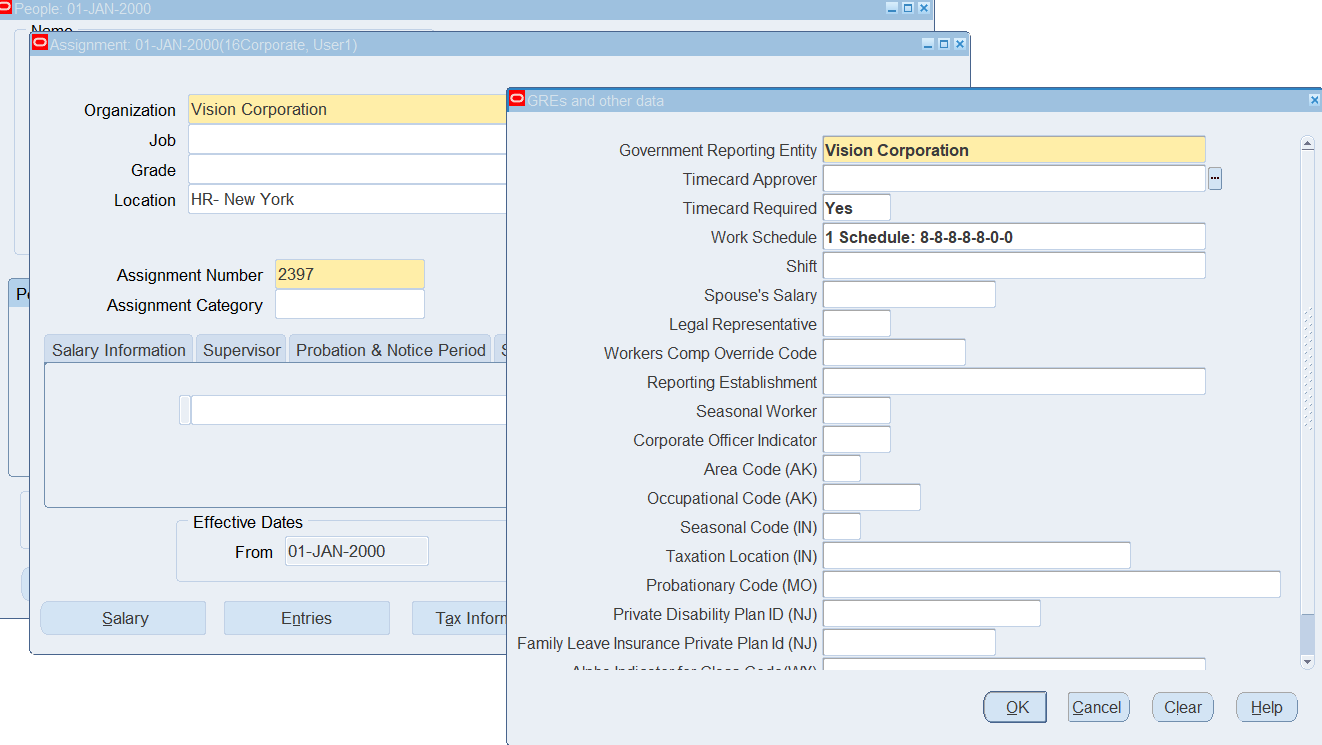
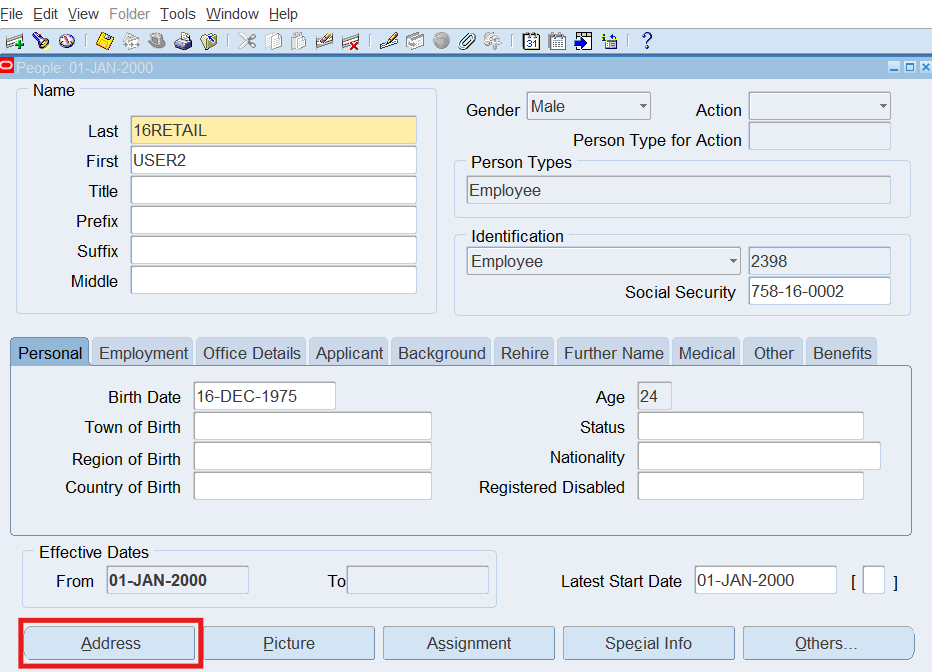
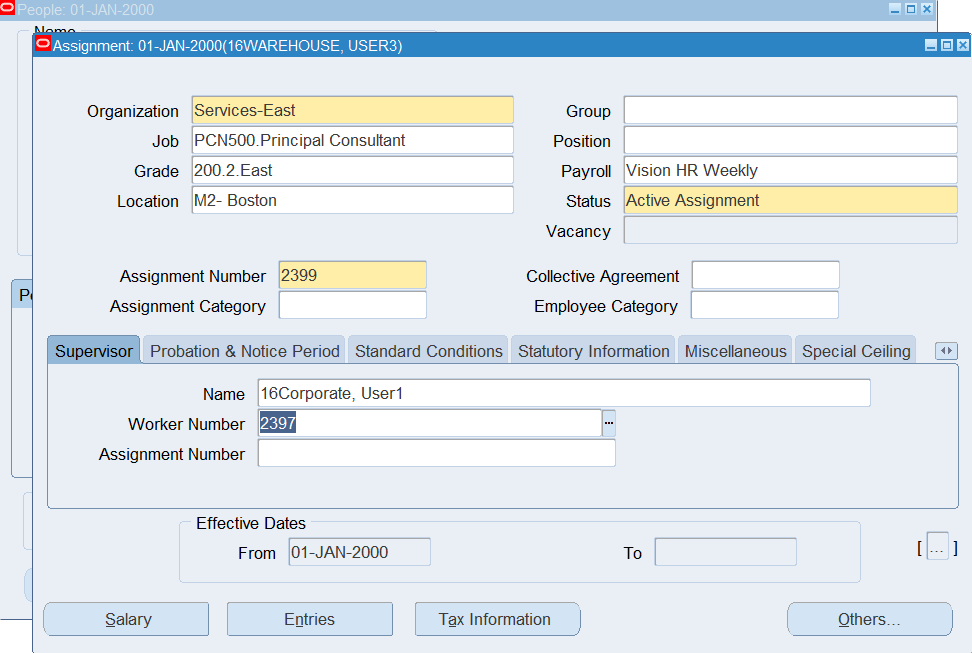
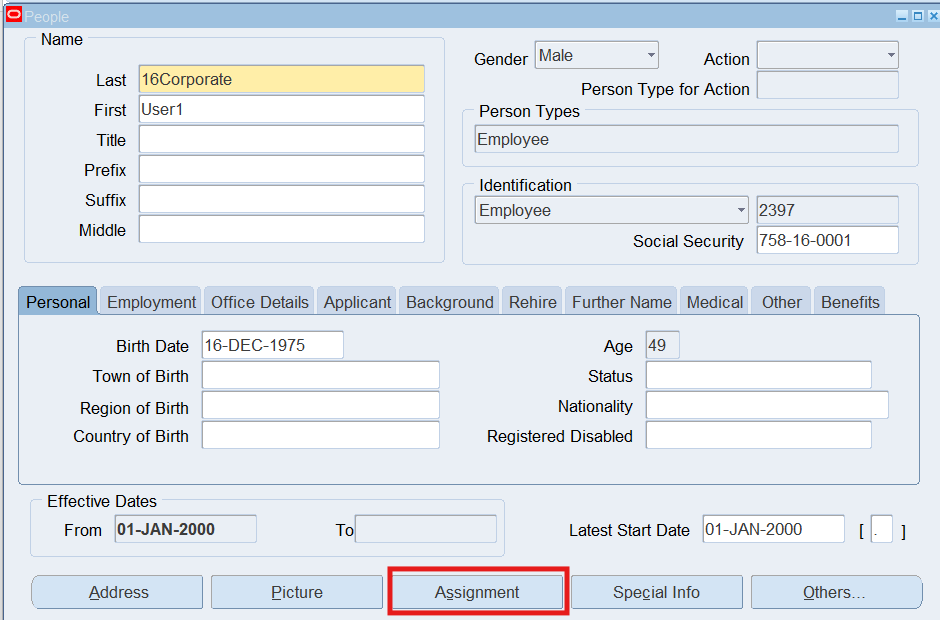
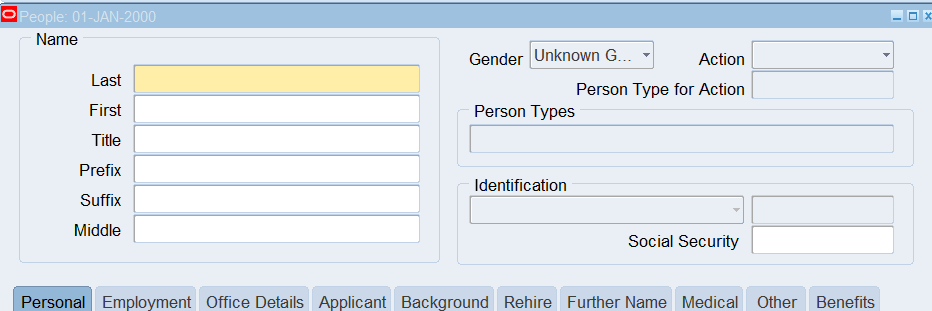
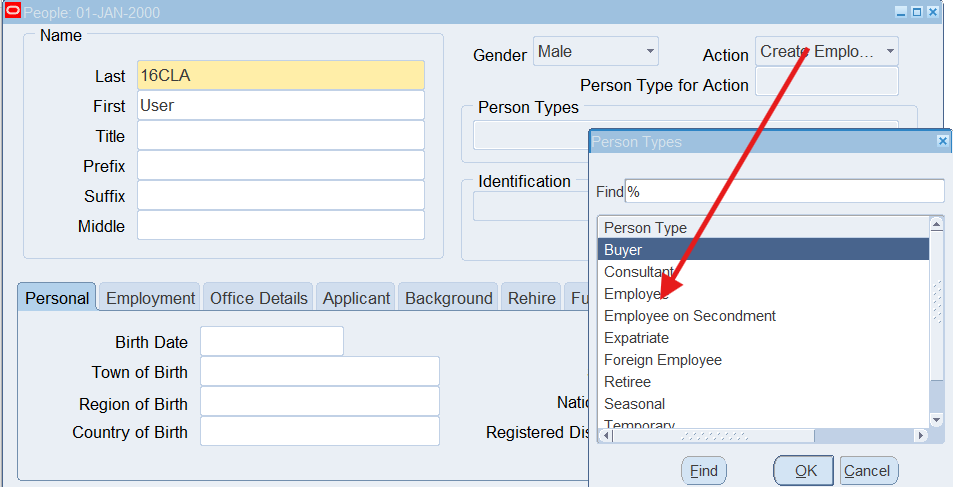
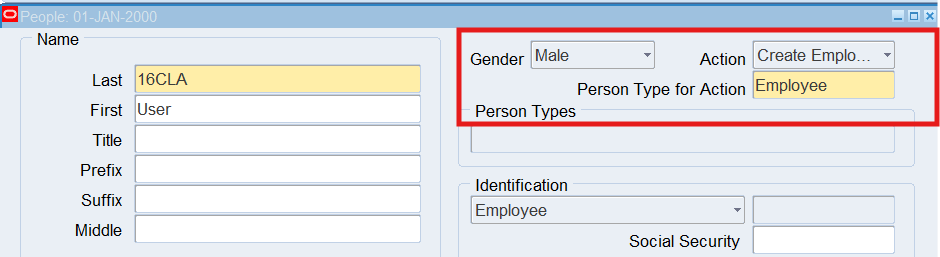
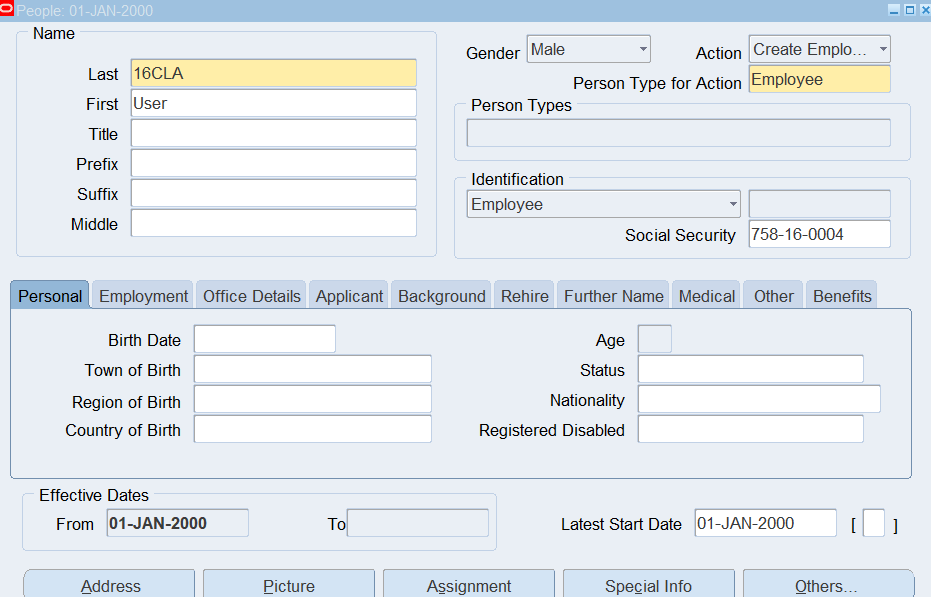
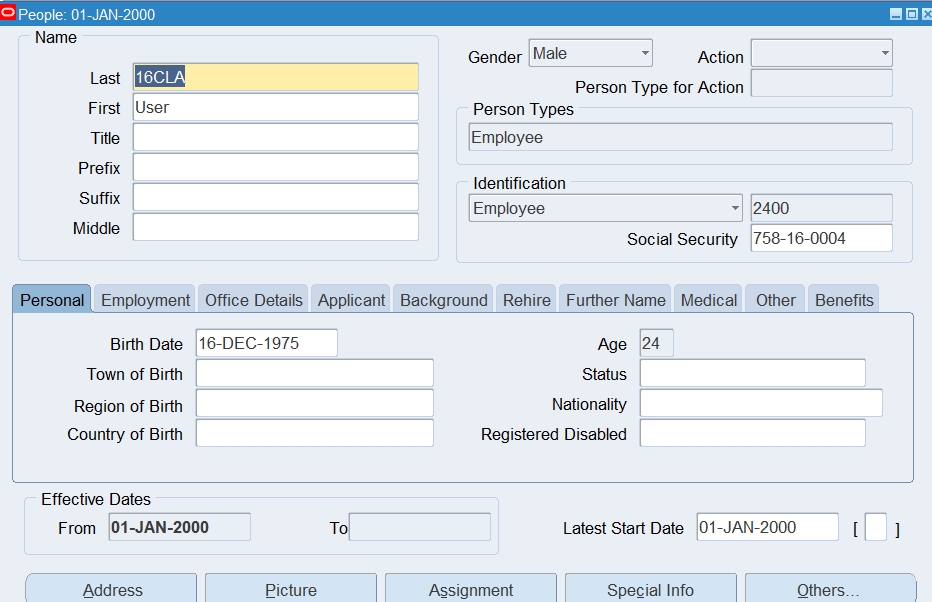
Create 16Corporate Employee
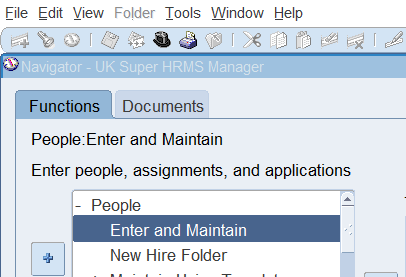
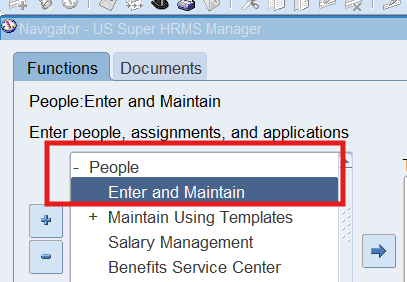
Responsibility : US Super HRMS Manager
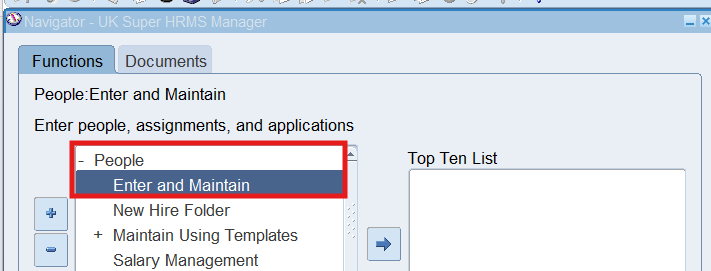
Navigation : (N) People 🡪 Enter and Maintain
Effective Date : 01-Jan-2000
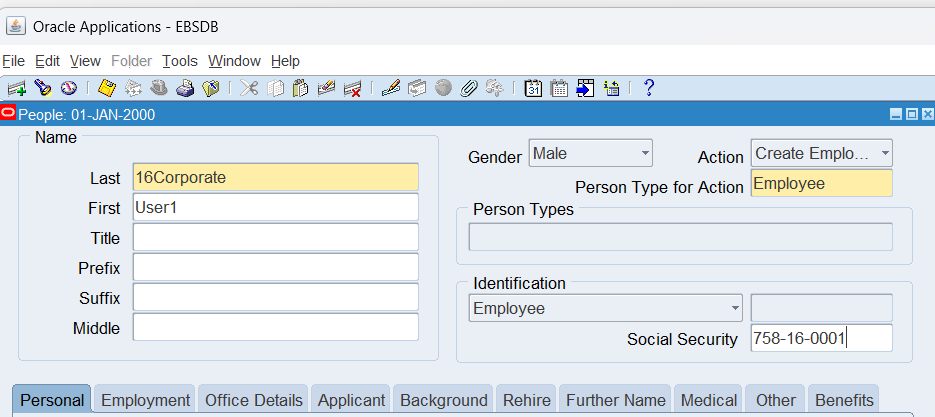
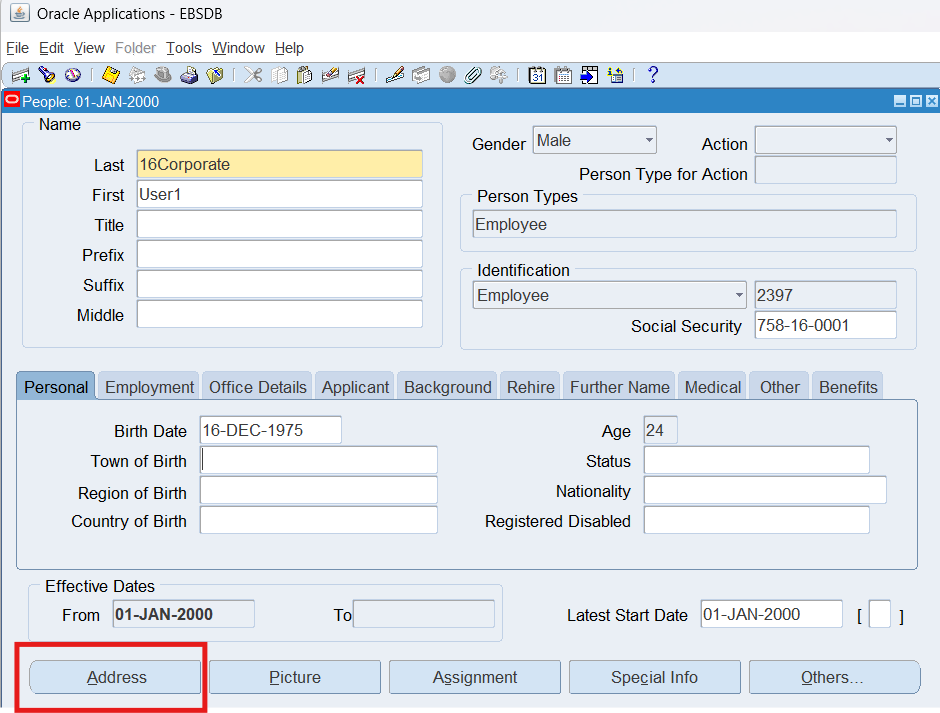
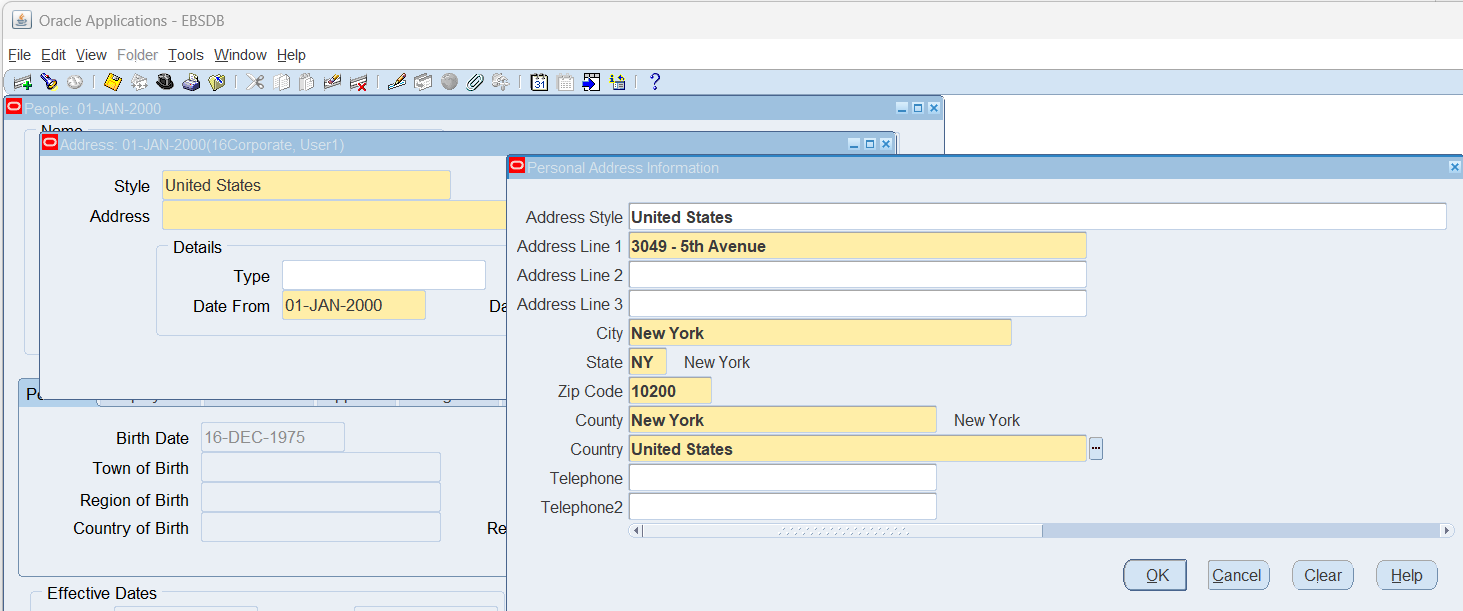
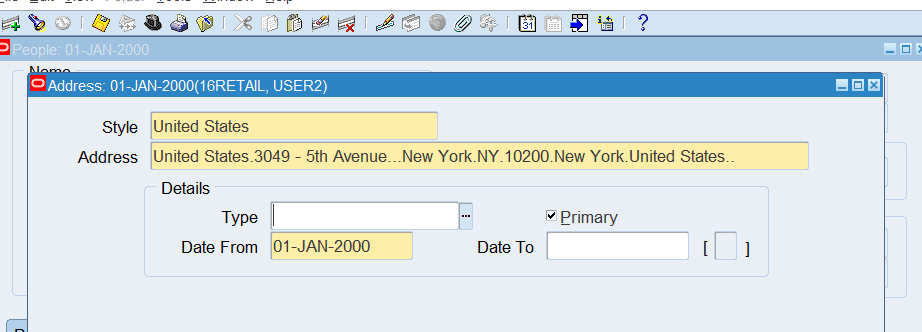
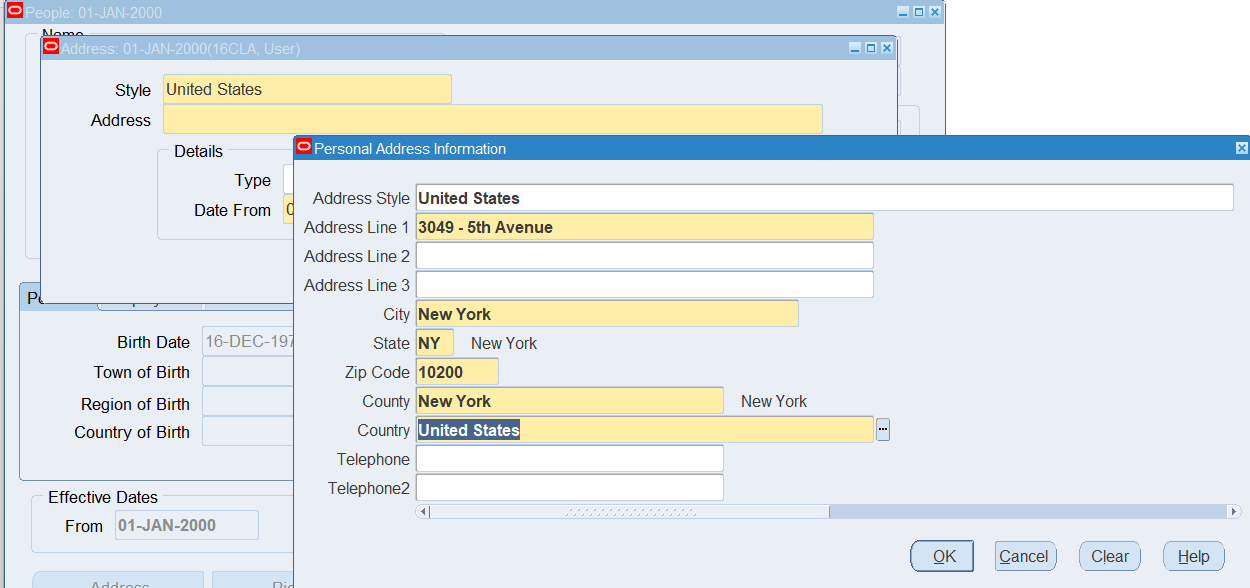
Select Address
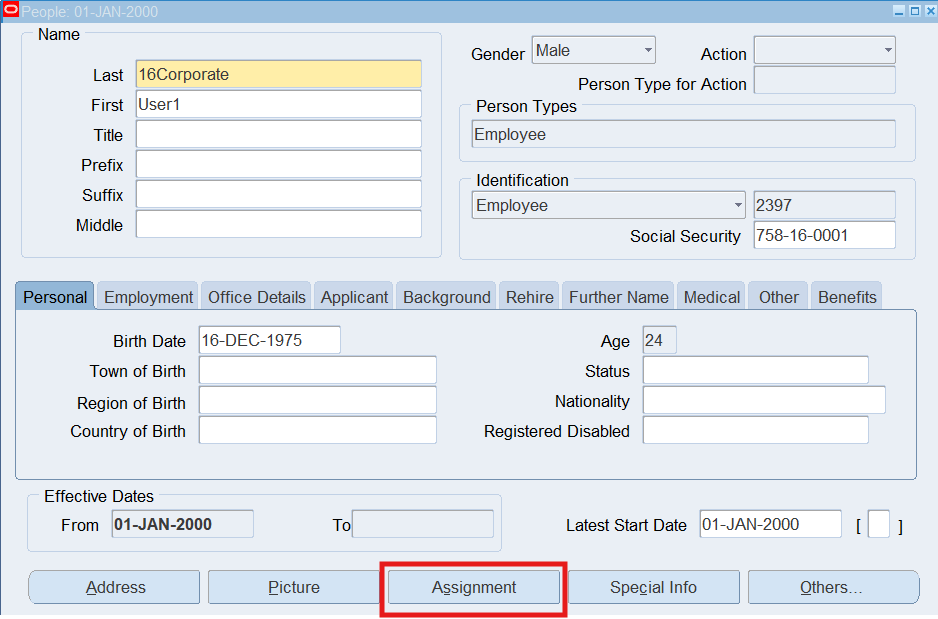
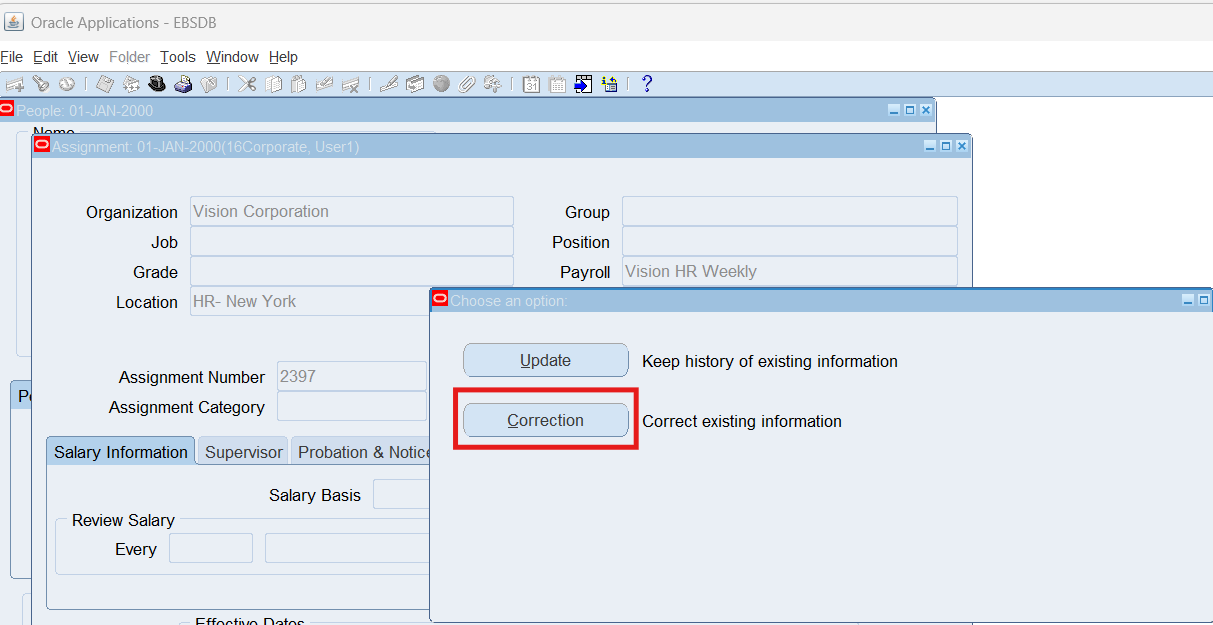
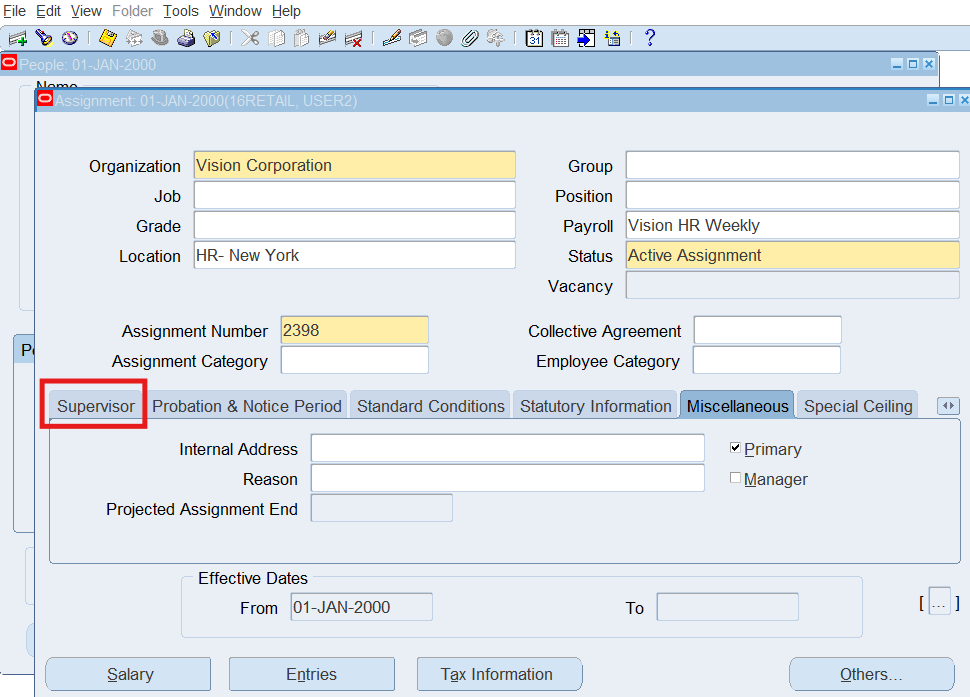
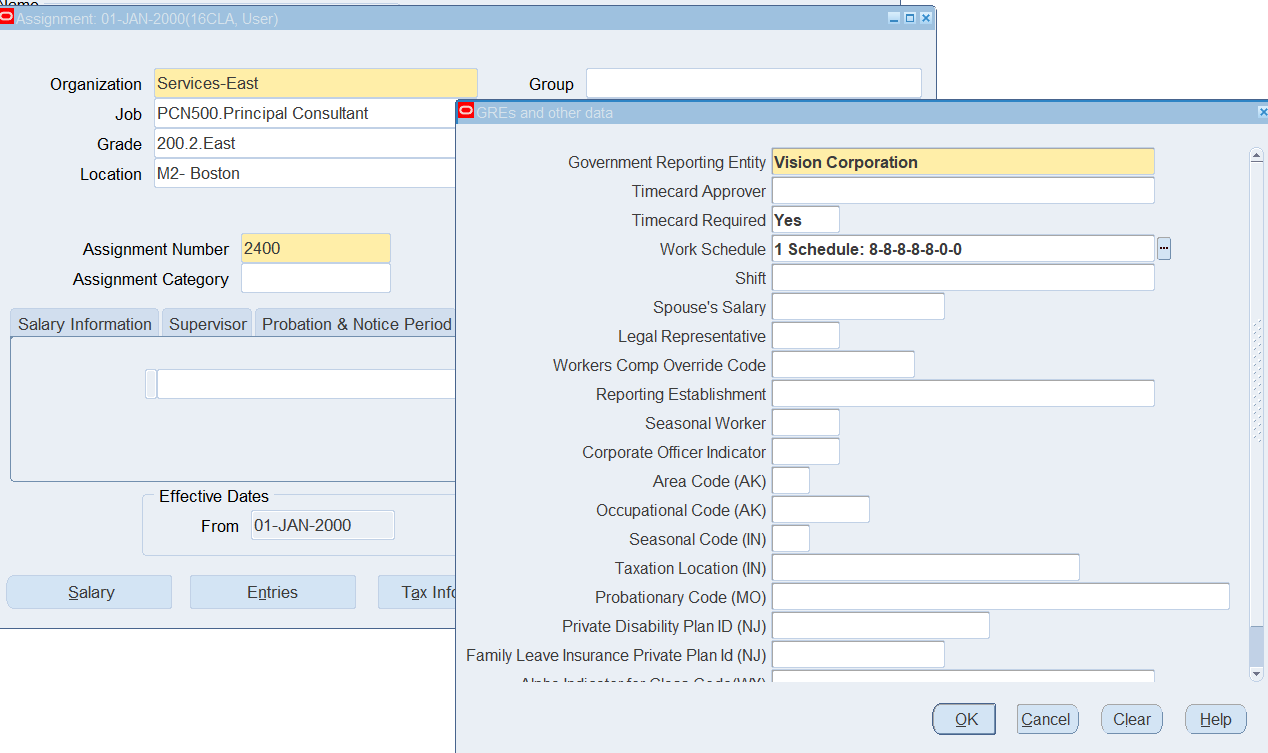
Select Assignment
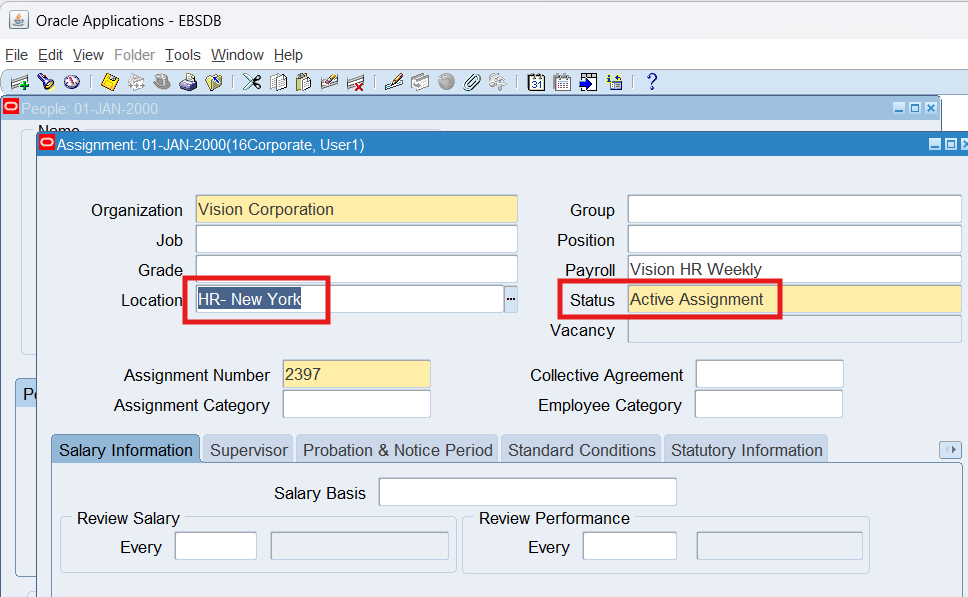
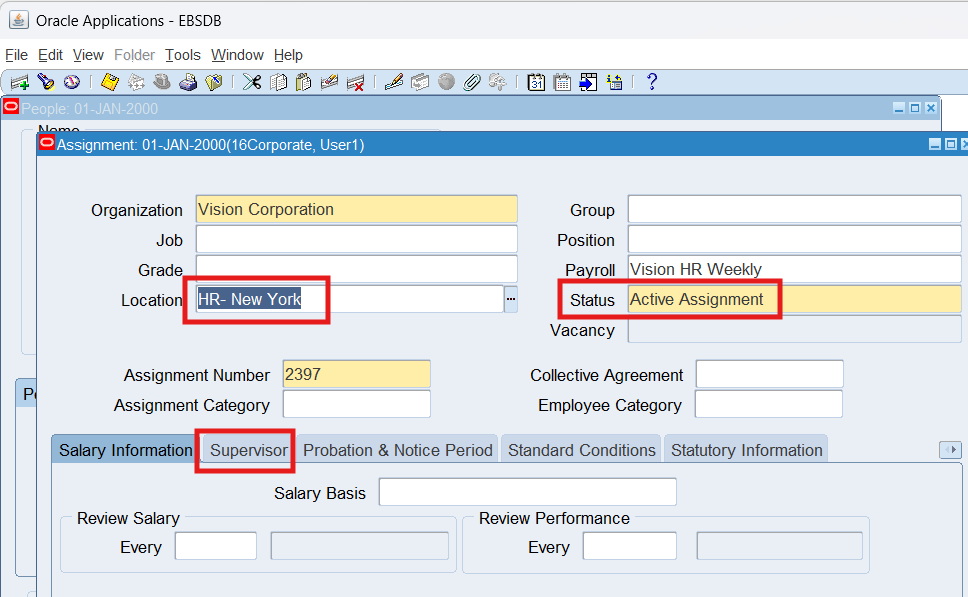
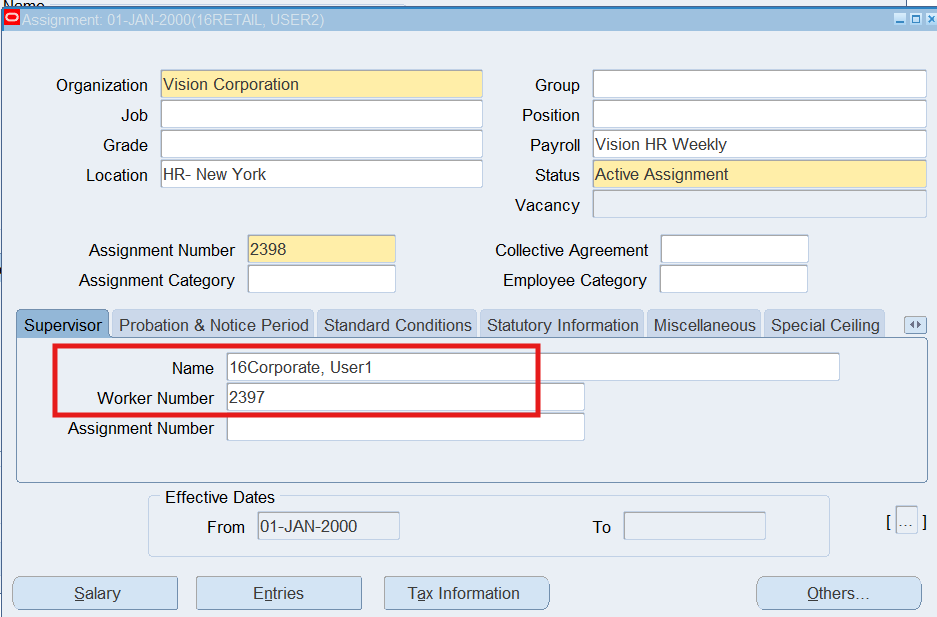
Select Supervisor Tab
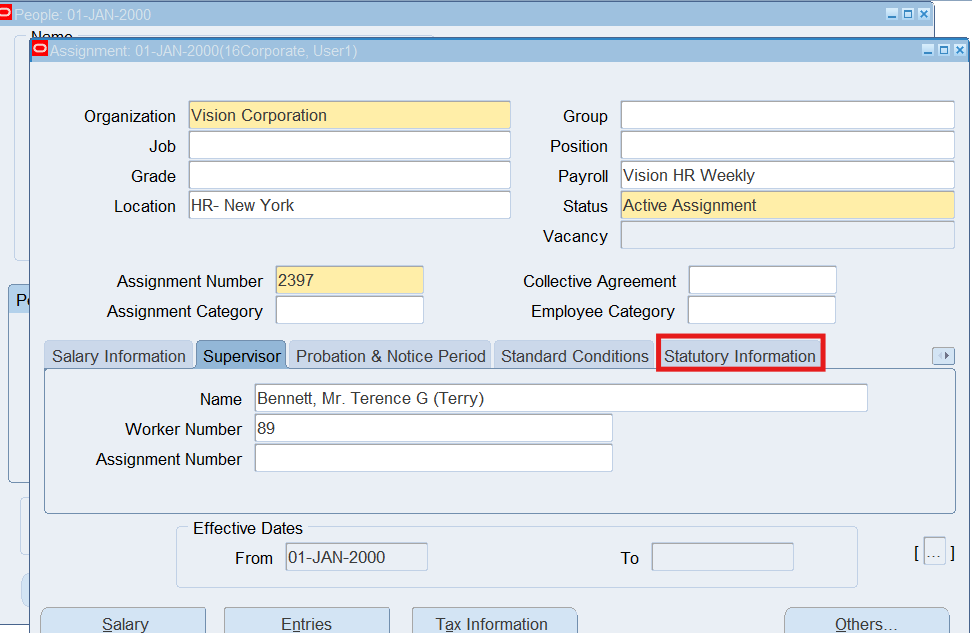
Select Statutory Information
Create 16Retail Employee
(N) People 🡪 Enter and Maintain
Select Supervisor
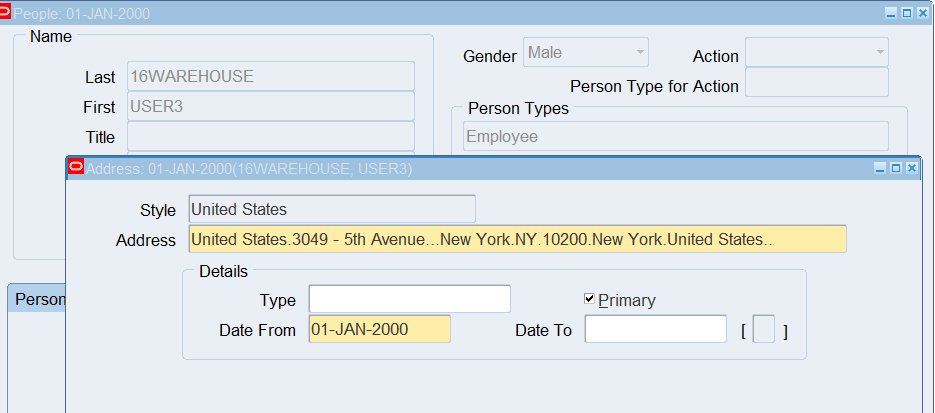
Create 16Warehouse Employee
(N) People 🡪 Enter and Maintain
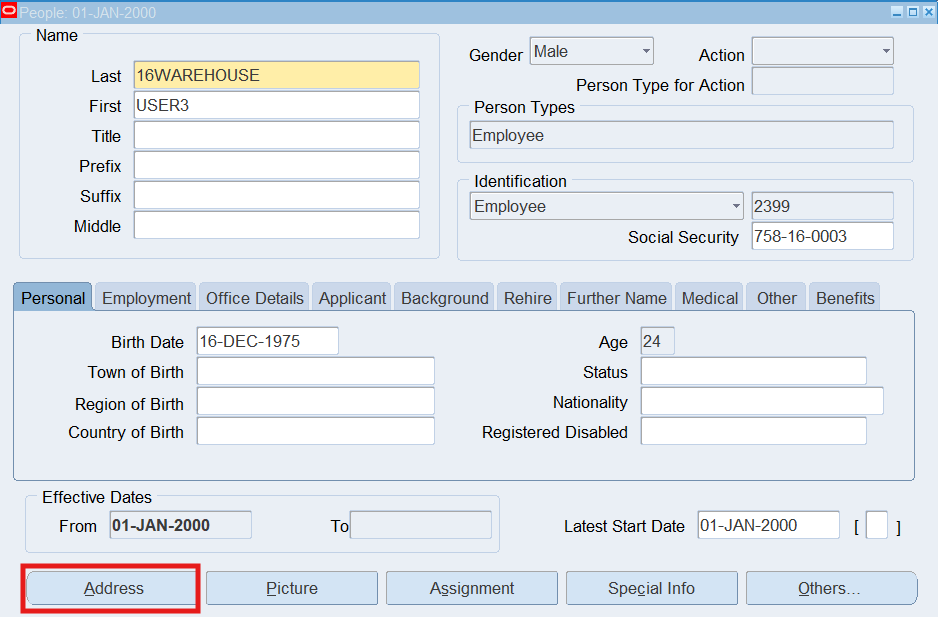
Select Address
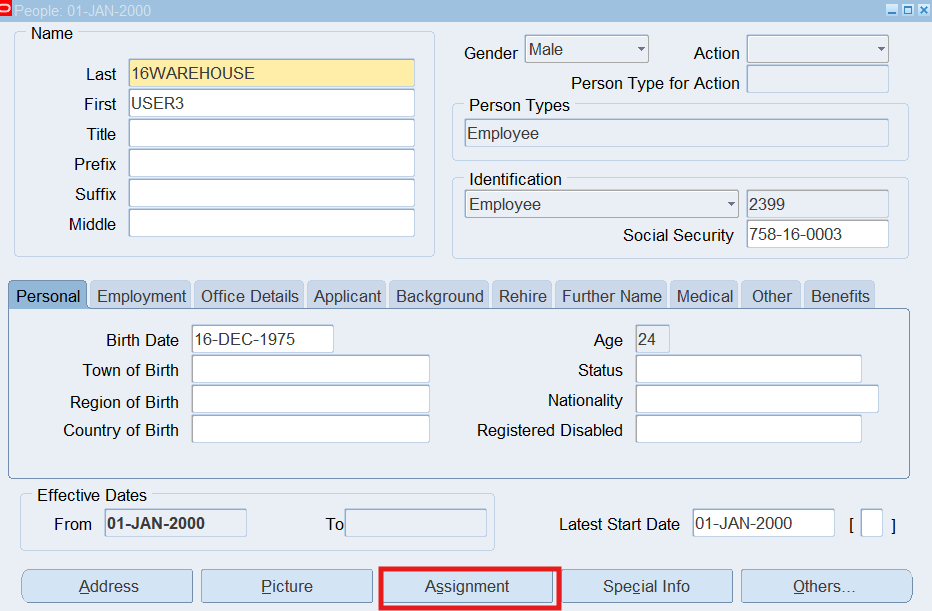
Select Assignment

Practice 7: User Preferences
Create new preferences hierarchies, linking them to people using eligibility criteria and viewing people’s preferences.
Business Scenario
Define various rules for each group of employees within the corporation. You must assign the rules to the groups of employees via Preferences. Oracle Time & Labor includes default preferences with predefined values. However created various rules for 3 groups of employees. Create a new hierarchy containing the preferences for which specify a different value.
Corporate Employees will need the following 10 preferences:
| Name in Tree | Preference | Preference Values |
| 16C-Application Set | Time Store Application Set | Application Set = Payroll |
| 16C-Approval Periods | Time Store Approval Periods | Time Store Approval Periods = 16Weekly Period – Starts Monday |
| 16C-Approval | Time Store Approval Style | Approval Style = 16Corporate |
| 16C-OTL Rules Evaluation | Self Service Preference to Allow Rule Evaluation | Evaluate OTL Rules = Yes
Approval Rules for Rules Evaluation = Payroll Overtime Recurring Period = 16Weekly Period – Start Monday |
| 16C-Retrieval Rule | Time Store Retrieval Rule Groups | Group Name = Payroll Retrieval Rule Group |
| 16C-Timecard Alternate Name | Self Service Timecard Alternate Name Set Defined for a User | Timecard Alternate Name 1 = 16Corporate Employees |
| 16C-Timecard Layout | Self Service Timecard, Review and Confirmation Layout Pages | Timecard Layout = Exception Layout – Timecard Entry Page
Review Layout = Exception OTLR Details Review Layout Confirmation Layout = Exception Layout – Timecard Confirmation Page Notification Layout = Exception OTLR Details Notification Layout |
| 16C-Timecard Periods | Self Service Timecard Period for Worker | Timecard Period = 16Weekly Period – Starts Monday |
| 16C-Timekeeper Layout | Timekeeper Layout Attributes | Timekeeper Layout Item 1 = 16Corporate Employees |
| 16C-Timekeeper Misc | Timekeeper Misc Setup Items | Display In/Out Time Entries = Yes
Display Person Name = Yes Display Person Number = Yes |
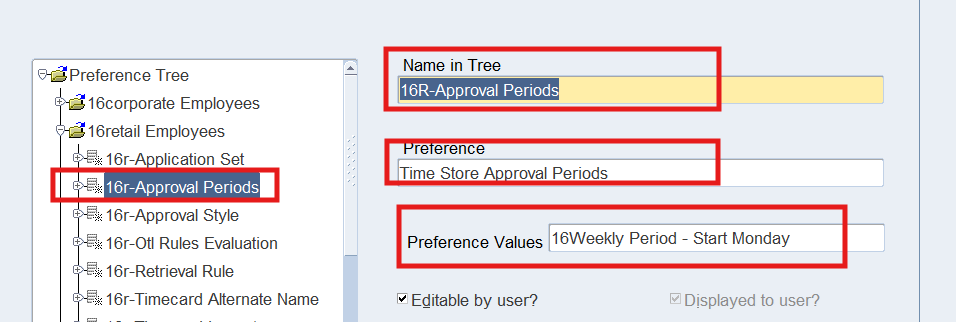
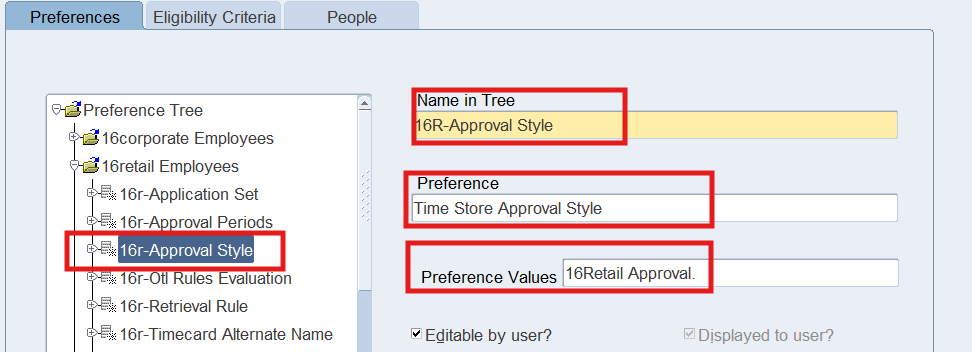
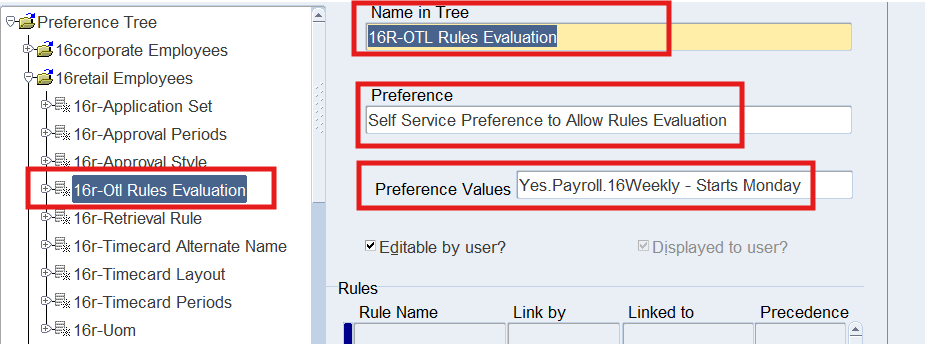
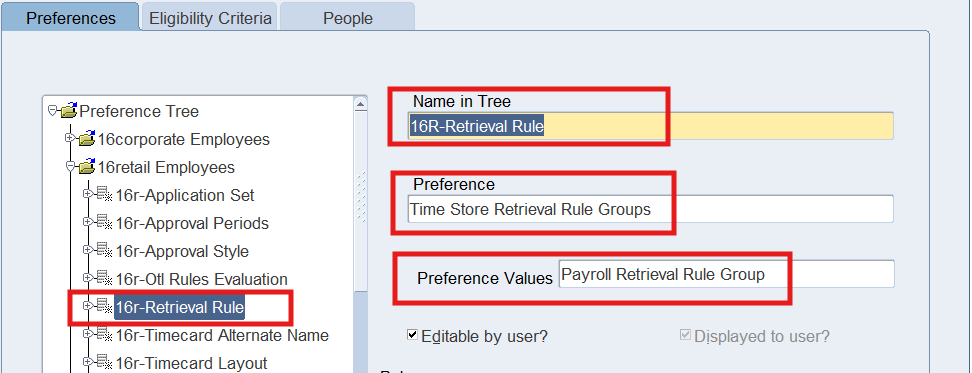
Retail Employees will need the following 9 preferences:
| Name in Tree | Preference | Preference Values |
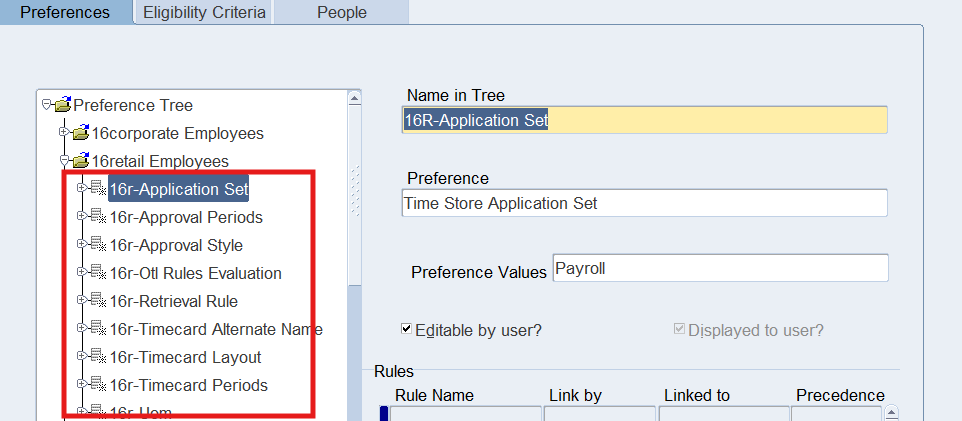
| 16R-Application Set | Time Store Application Set | Application Set = Payroll |
| 16R-Approval Periods | Time Store Approval Periods | Time Store Approval Period = 16Weekly Period – Starts Monday |
| 16R-Approval Style | Time Store Approval Style | Approval Style = 16Retail Approval |
| 16R-OTL Rules Evaluation | Self Service Preference to Allow Rules Evaluation | Evaluate OTL Rules = Yes
Approval Rules for Rules Evaluation = Payroll Overtime Recurring Period = 16Weekly Period – Starts Monday |
| 16R-Retrieval Rule | Time Store Retrieval Rule Groups | Group Name = Payroll Retrieval Rule Group |
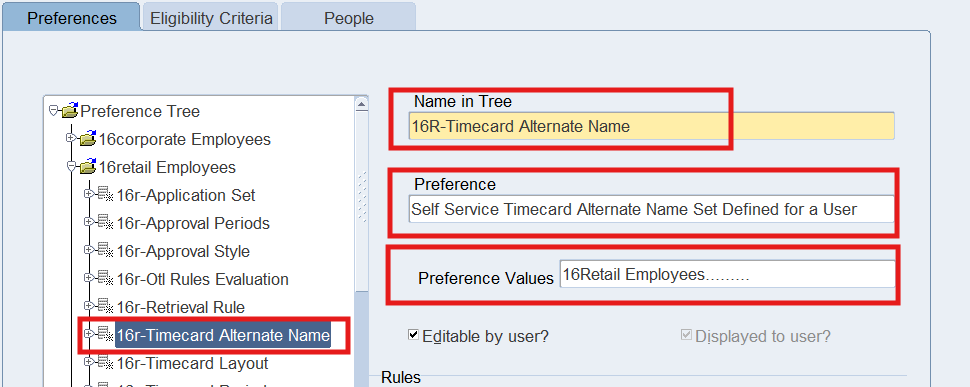
| 16R-Timecard Alternate Name | Self Service Timecard Alternate Name Set Define for a User | Timecard Alternate Name 1 = 16Retail Employees |
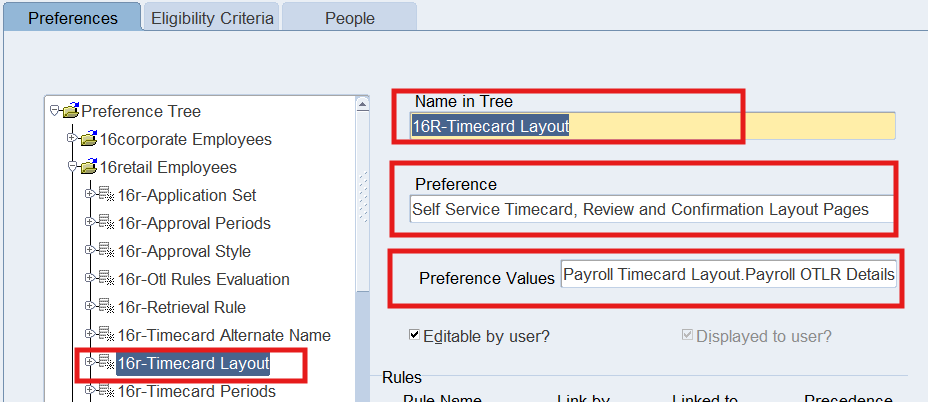
| 16R-Timecard Layout | Self Service Timecard, Review and Confirmation Layout Pages | Timecard Layout = Payroll Timecard Layout
Review Layout = Payroll OTLR Details Review Layout Confirmation Layout = Payroll Confirmation Layout Notification Layout = Payroll OTLR Details Notification Layout |
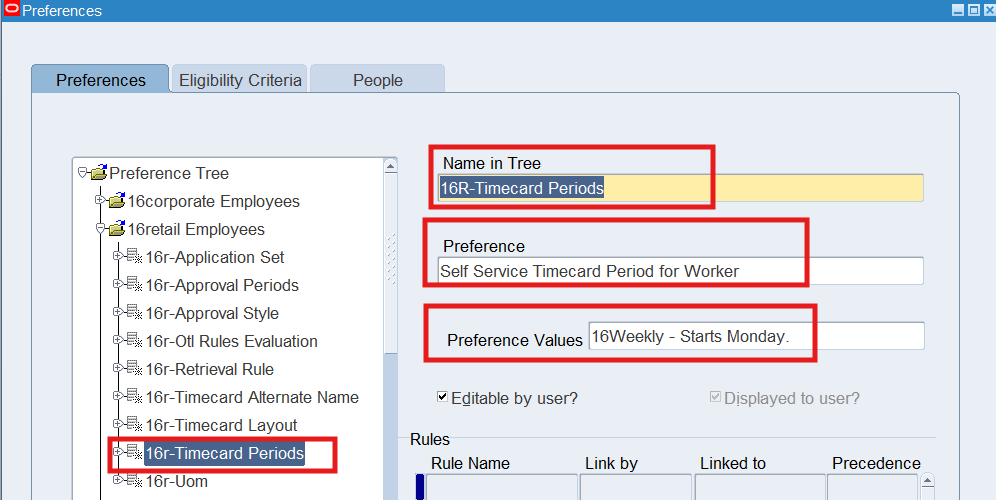
| 16R-Timecard Periods | Self Service Timecard Period for Worker | Timecard Period = 16Weekly – Starts Monday |
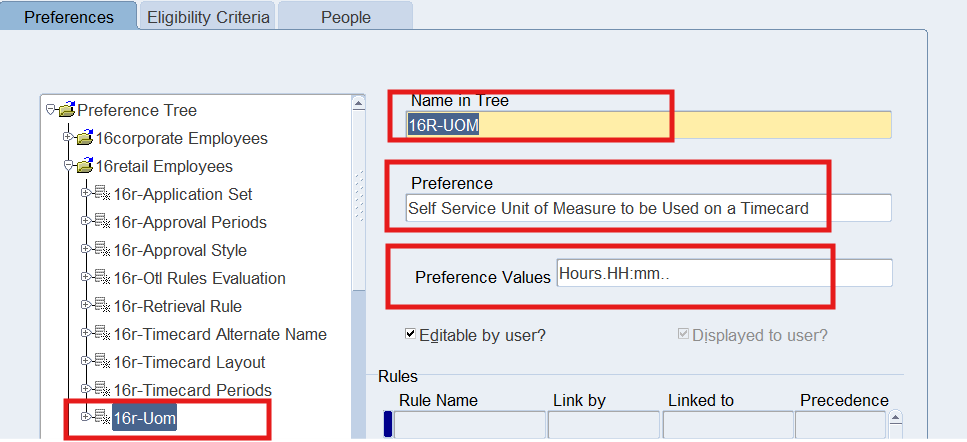
| 16R-UOM | Self Service Unit of Measure to be Used on a Timecard | Timecard Unit of Measure = Hours
Unit of Measure Format = HH:mm Note: HH:mm – display military time 13:45 Hh:mm aa – display non-military time 1:45 pm |
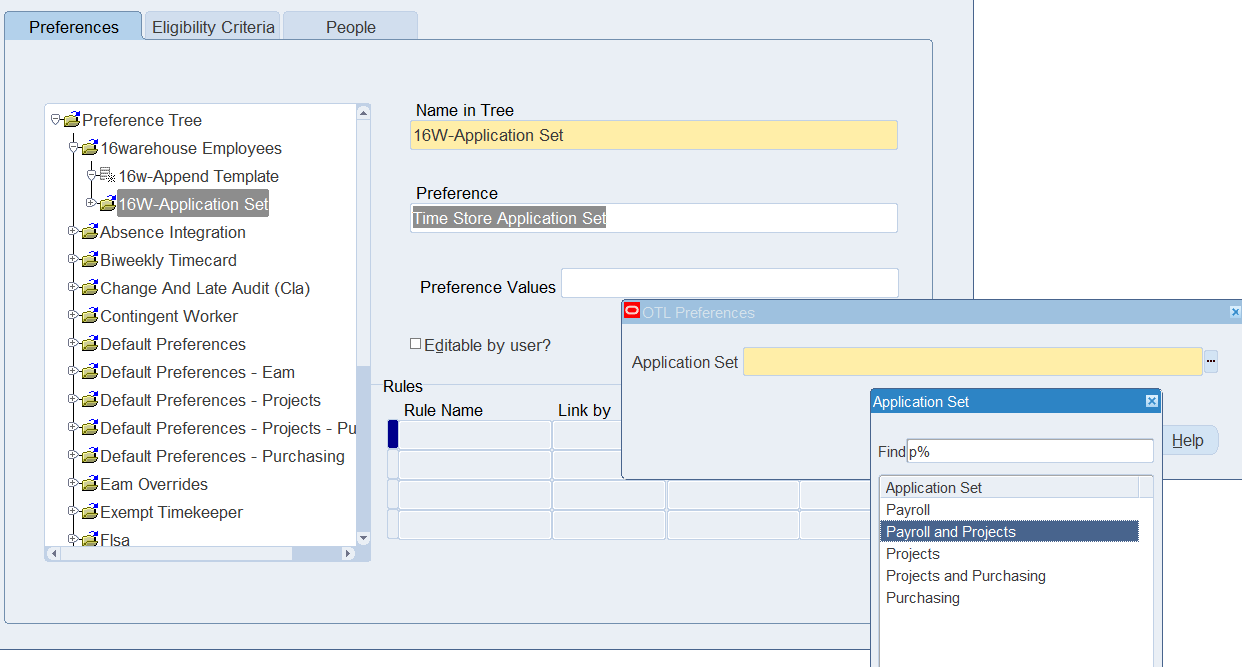
Warehouse Employees will need the following 17 preferences:
| Name in Tree | Preference | Preference Values |
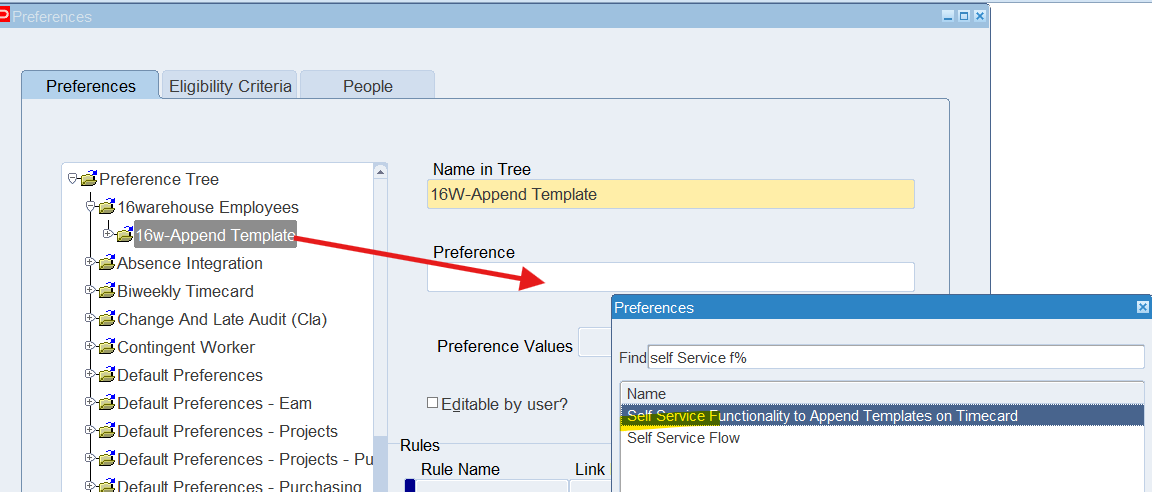
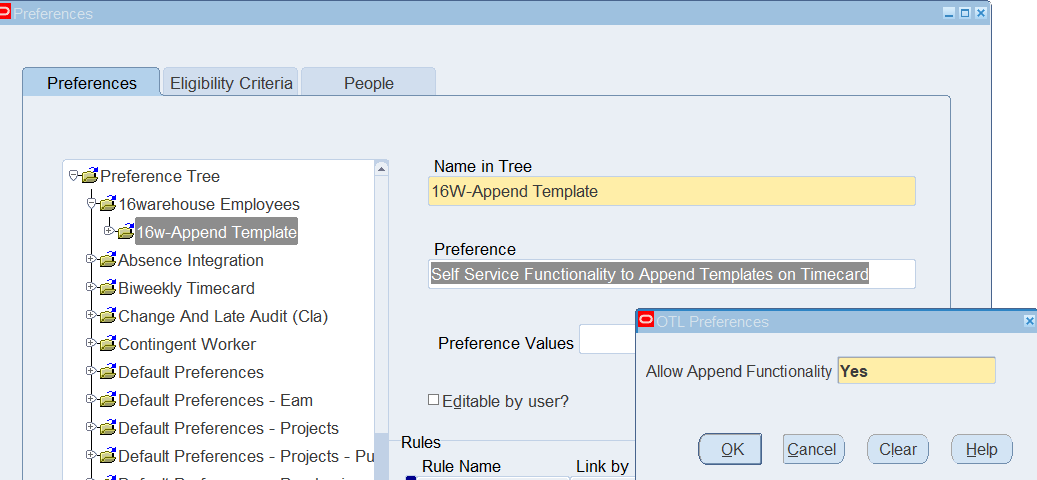
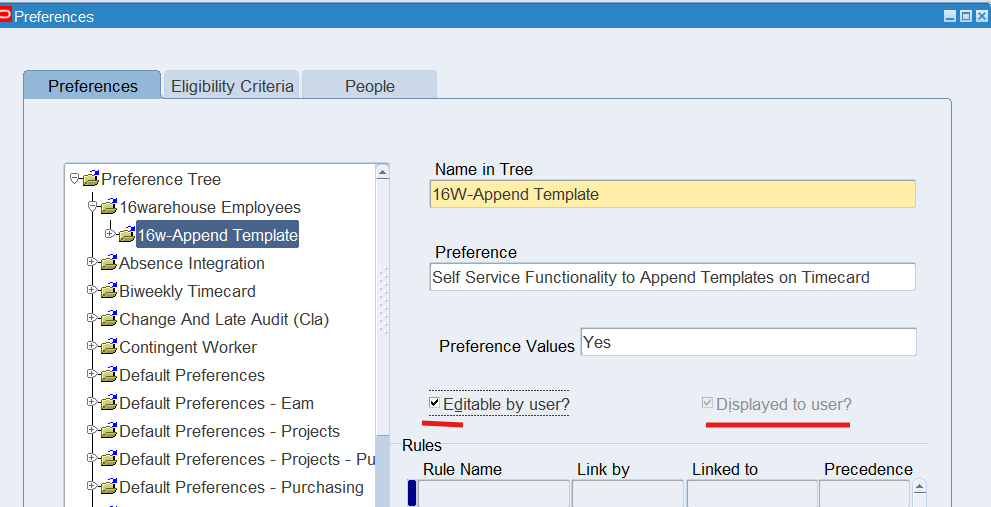
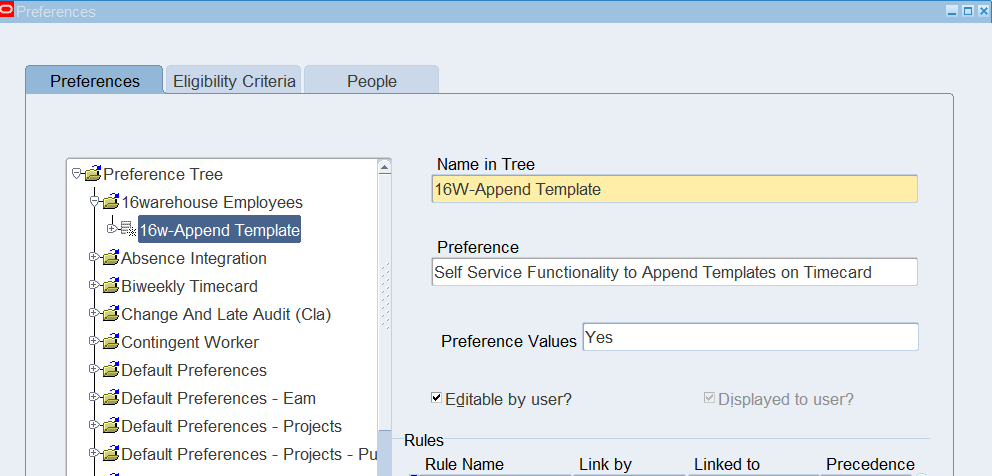
| 16W-Append Template | Self Service Functionality to Append Templates on the Timecard | Allow Append Functionality = Yes |
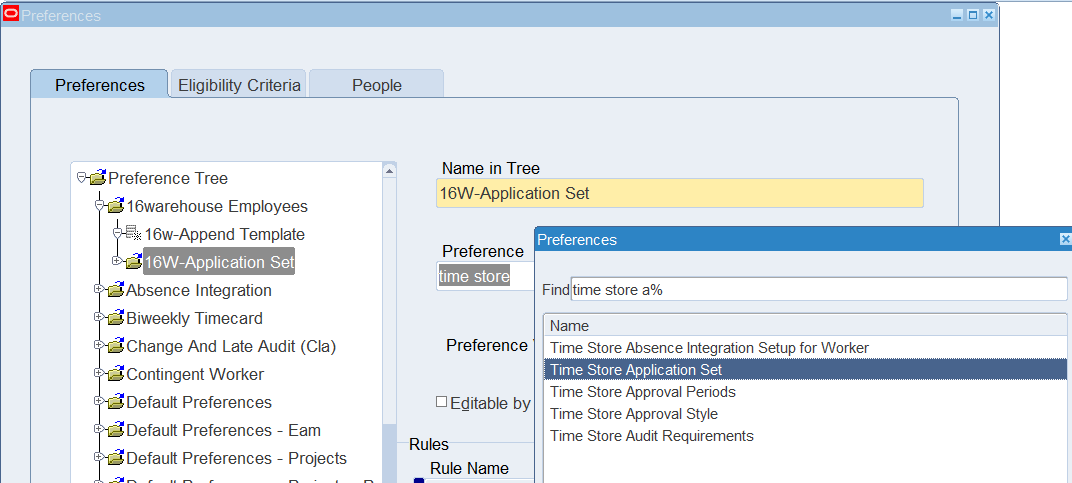
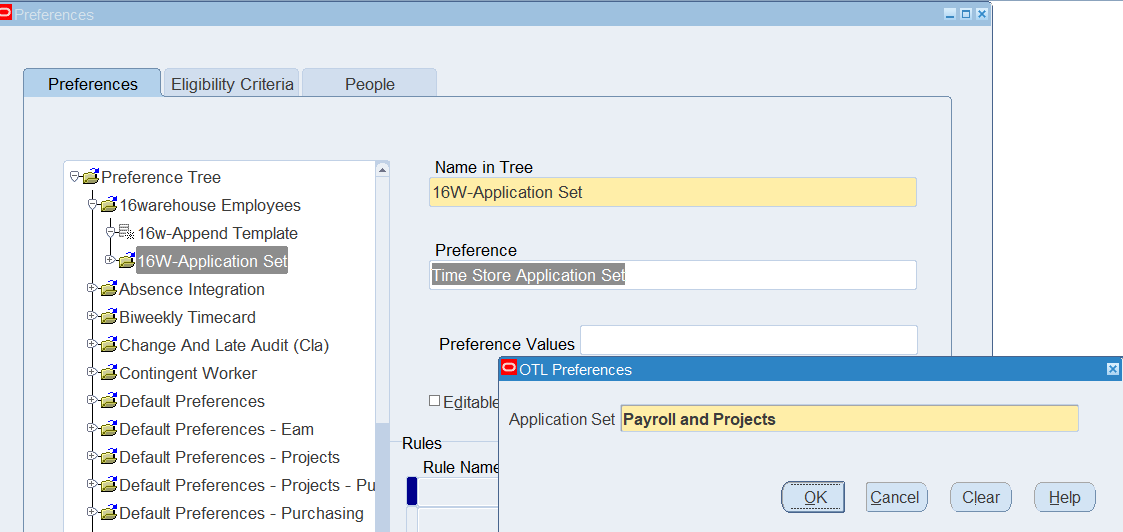
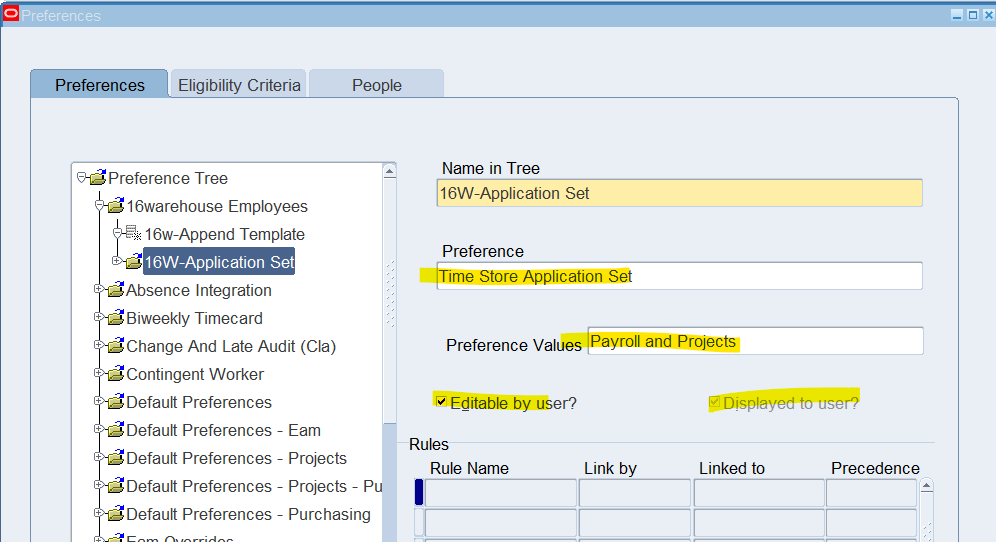
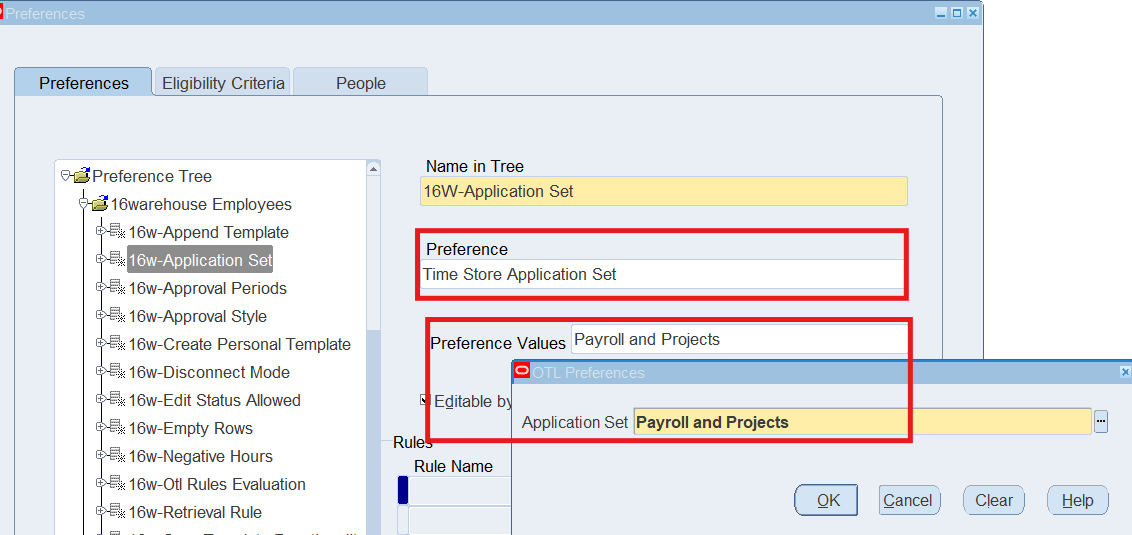
| 16W-Application Set | Time Store Application Set | Application Set = Payroll and Projects |
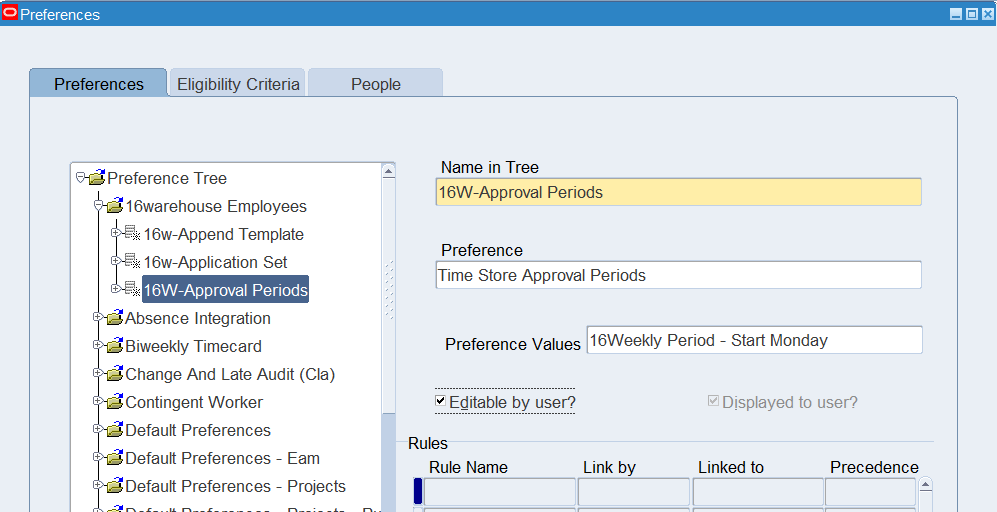
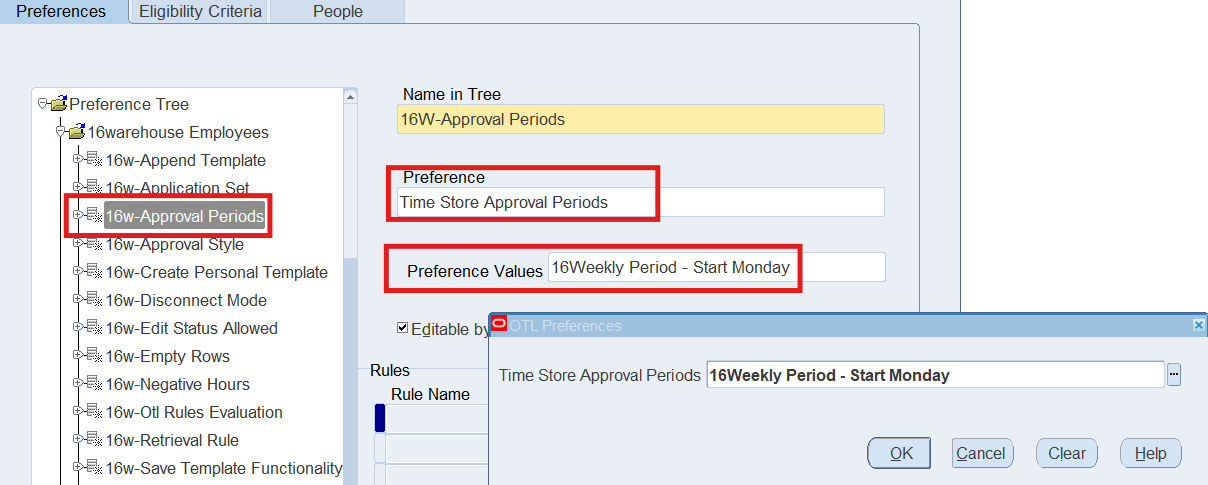
| 16W-Approval Periods | Time Store Approval Periods | Time Store Approval Periods = 16Weekly Period – Starts Monday |
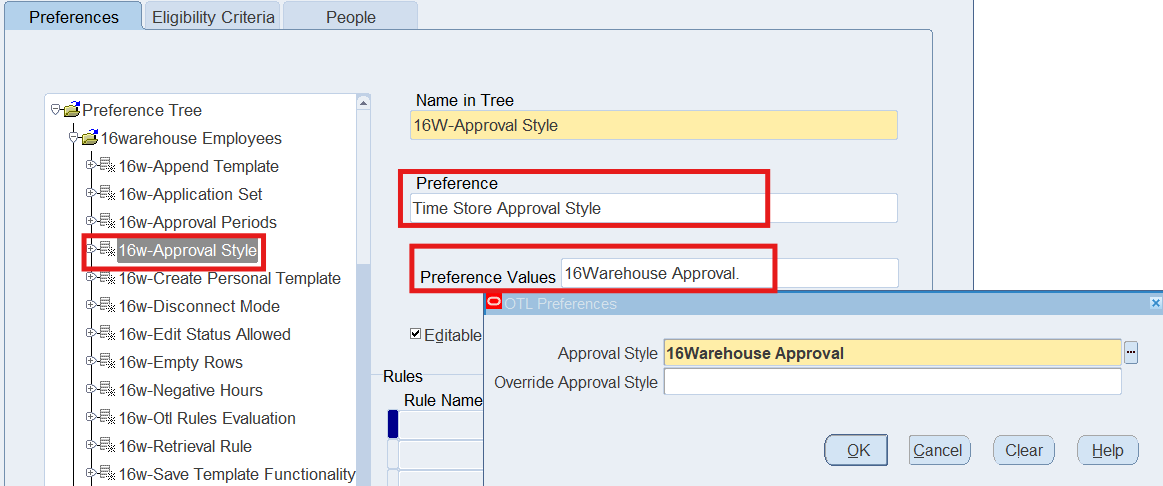
| 16W-Approval Style | Time Store Approval Style | Approval Style = 16Warehouse Approval |
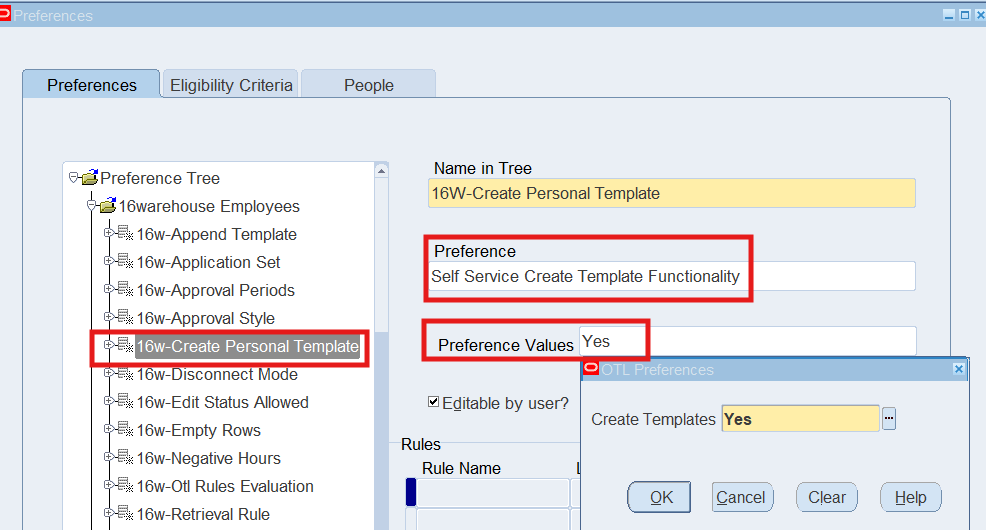
| 16W-Create Personal Template | Self Service Create Template Functionality | Create Template = Yes |
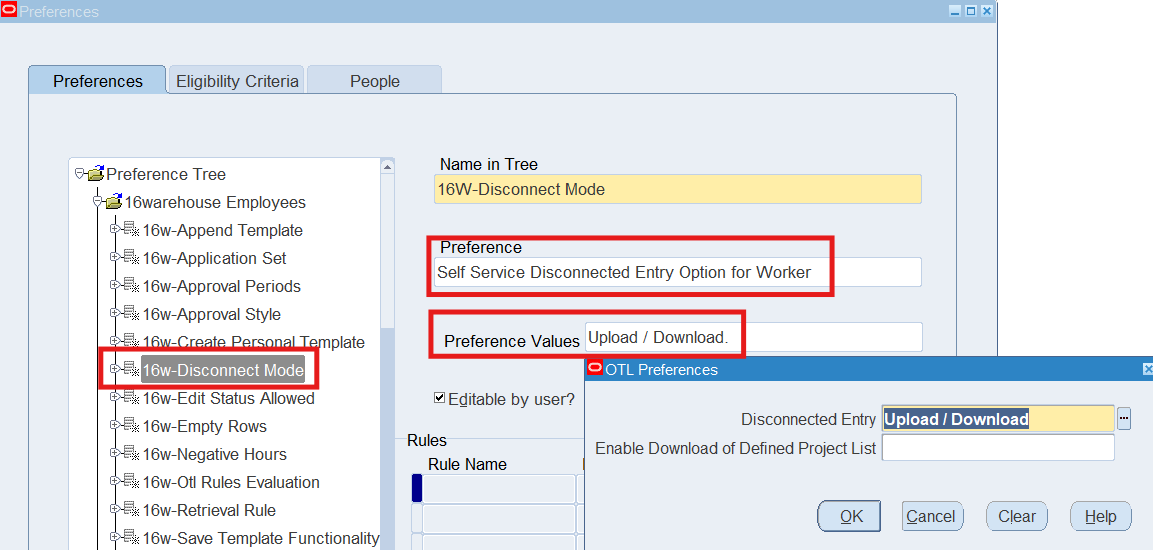
| 16W-Disconnect Mode | Self Service Disconnected Entry Option for Worker | Disconnected Entry = Upload / Download |
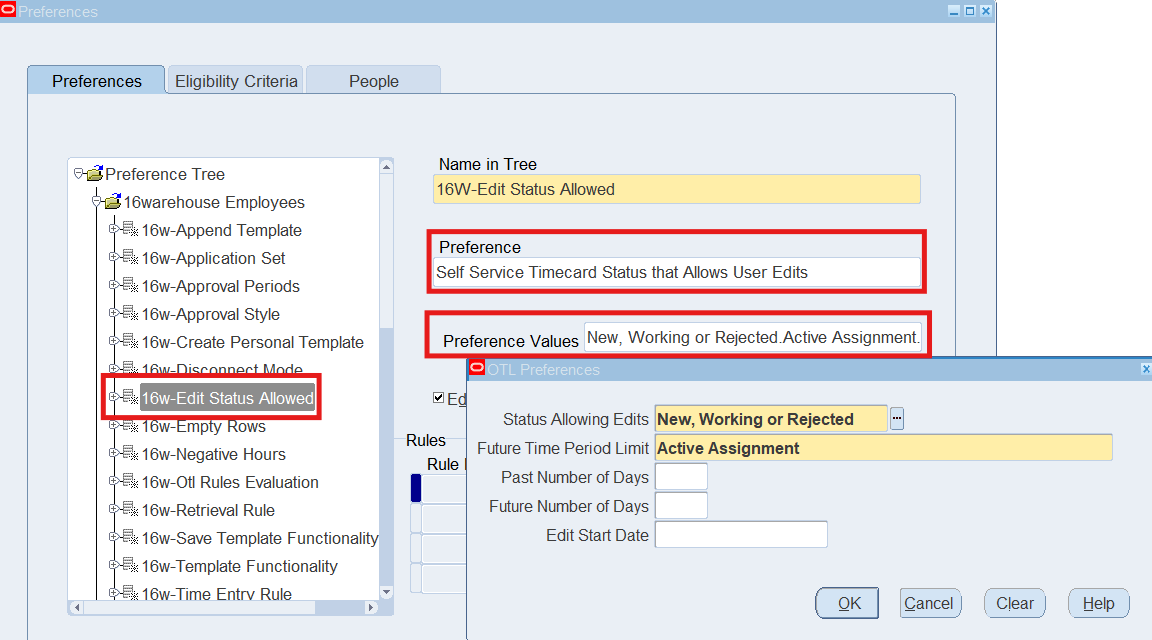
| 16W-Edit Status Allowed | Self Service Timecard Status that Allows User Edit | Status Allowing Edits = NEW WORKING REJECTED |
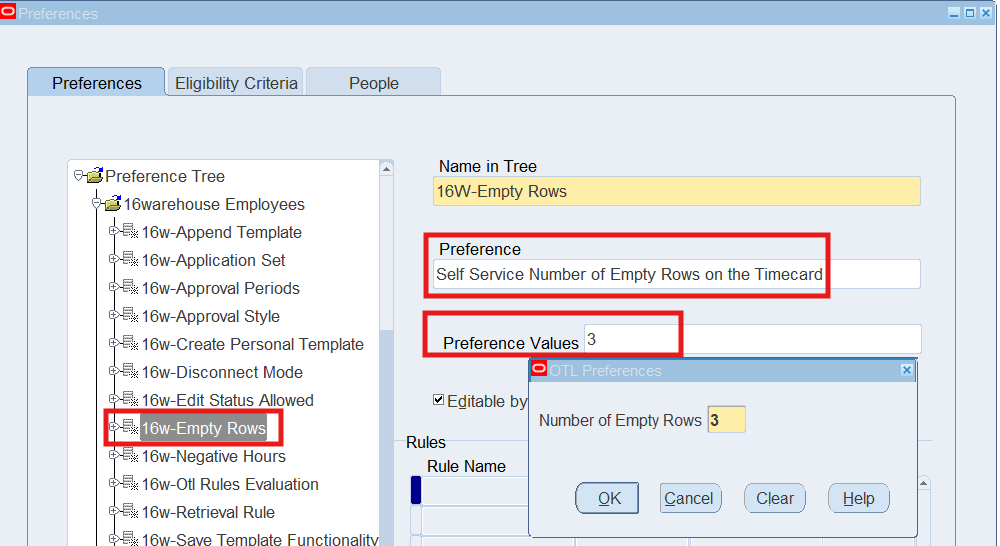
| 16W-Empty Rows | Self Service Number of Empty Rows on the Timecard | Number of Empty Rows = 3 |
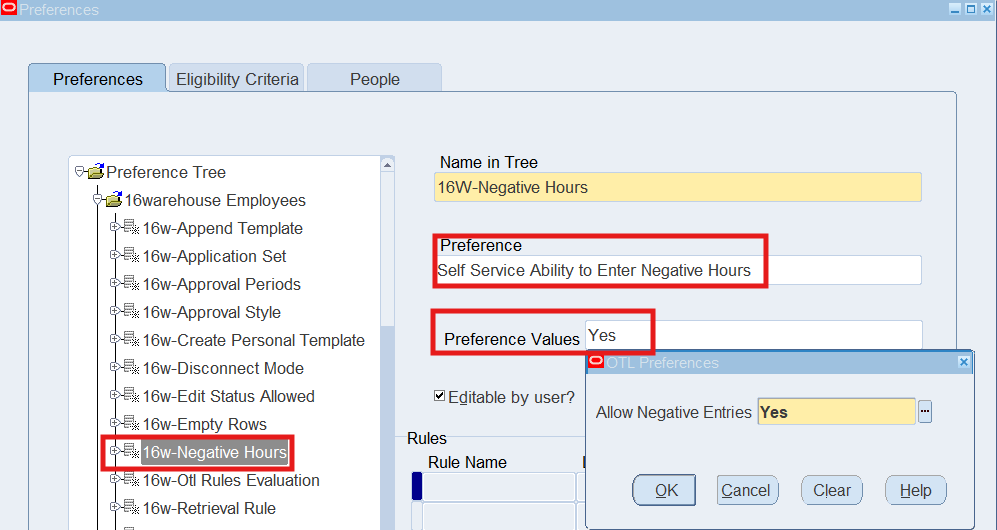
| 16W-Negative Hours | Self Service Ability to Enter Negative Hours | Allowed Negative Entries = Yes |
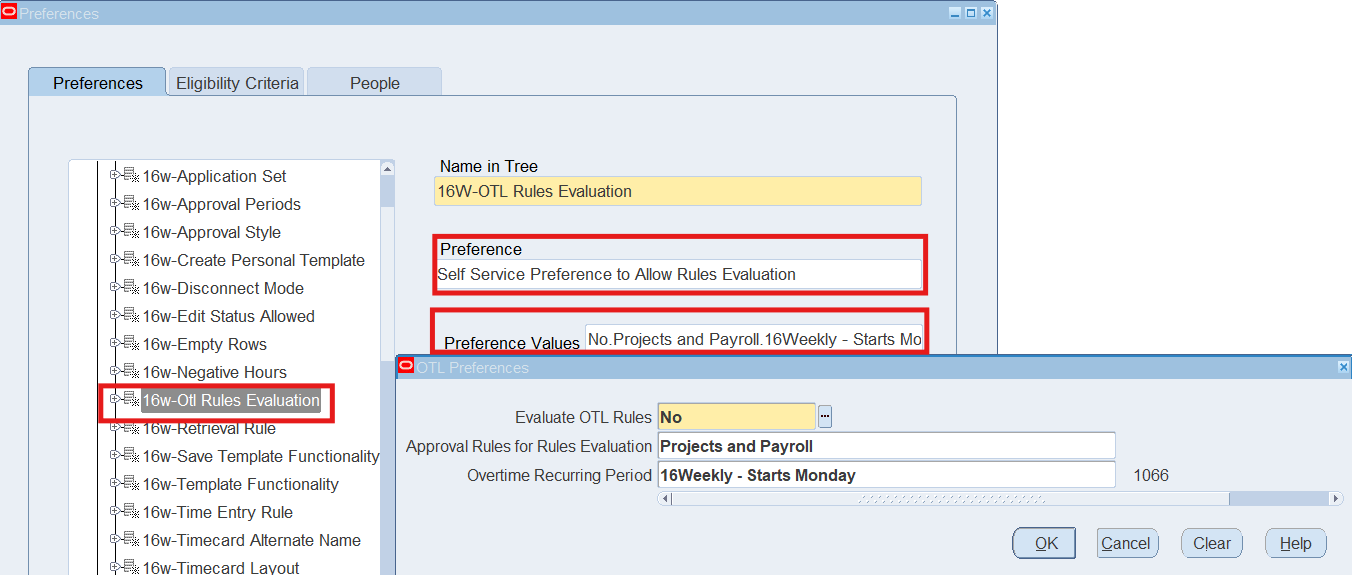
| 16W-OTL Rules Evaluation | Self Service Preference to Allow Rules Evaluation | Evaluate OTL Rule = No
Approval Rules for Rules Evaluation = Projects and Payroll Overtime Recurring Period = 16Weekly Period – Starts Monday |
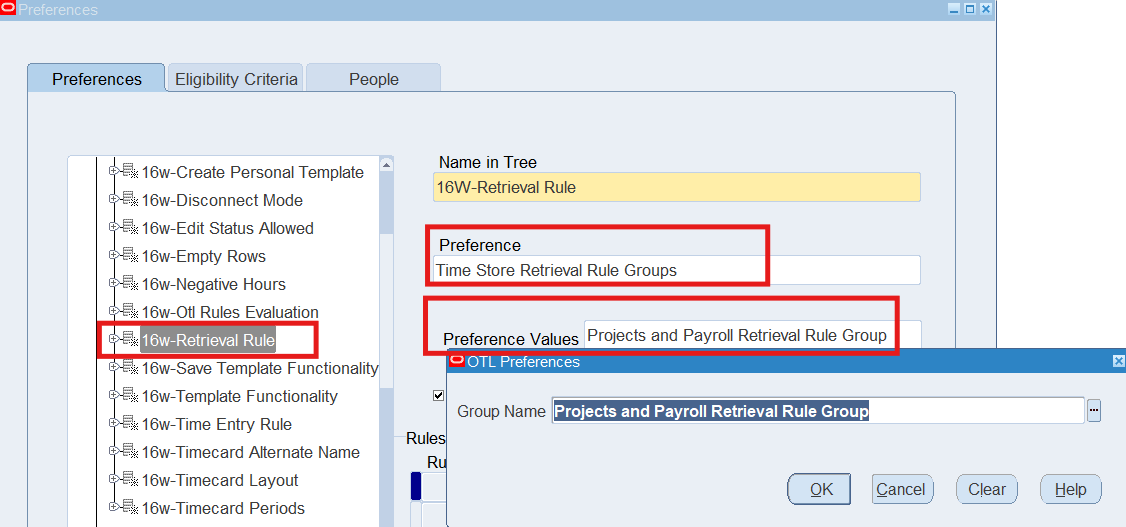
| 16W-Retrieval Rule | Time Store Retrieval Rule Groups | Group Name = Projects and Payroll Retrieval Rule Group |
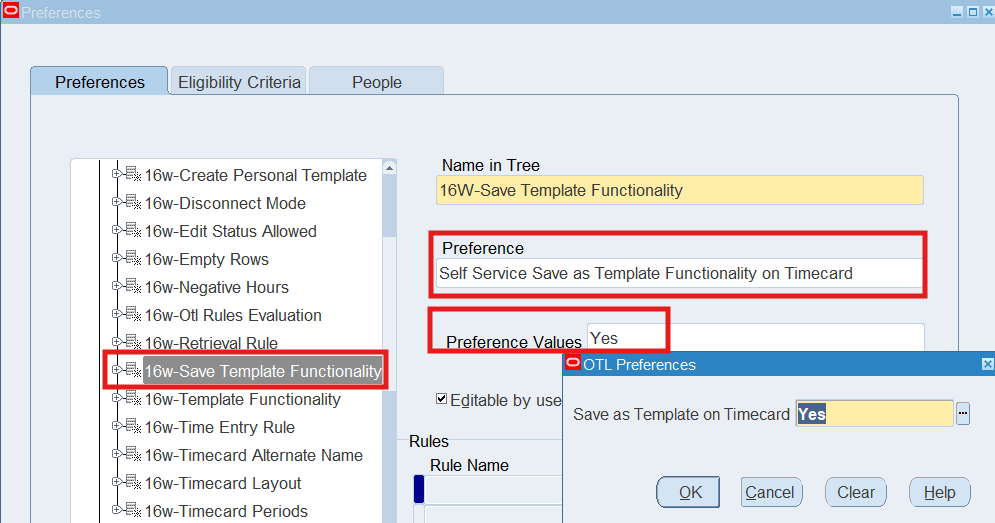
| 16W-Save Template Functionality | Self Service Save as Template Functionality on Timecard | Save as Template on Timecard = Yes |
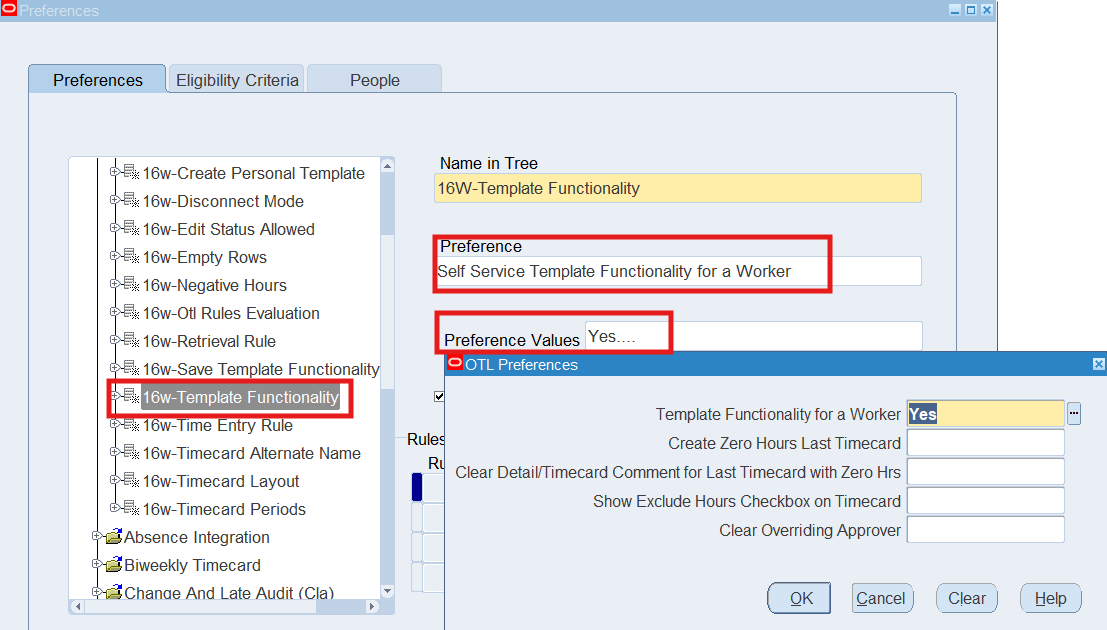
| 16W-Template Functionality | Self Service Template Functionality for a Worker | Template Functionality for a Worker = Yes |
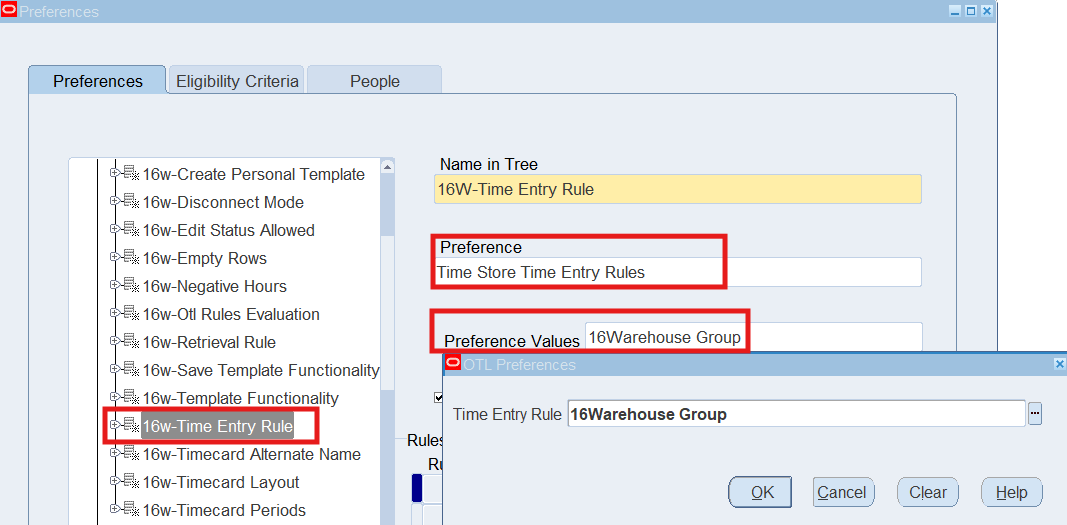
| 16W-Time Entry Rule | Time Store Time Entry Rules | Time Entry Rule = 16Warehouse Group |
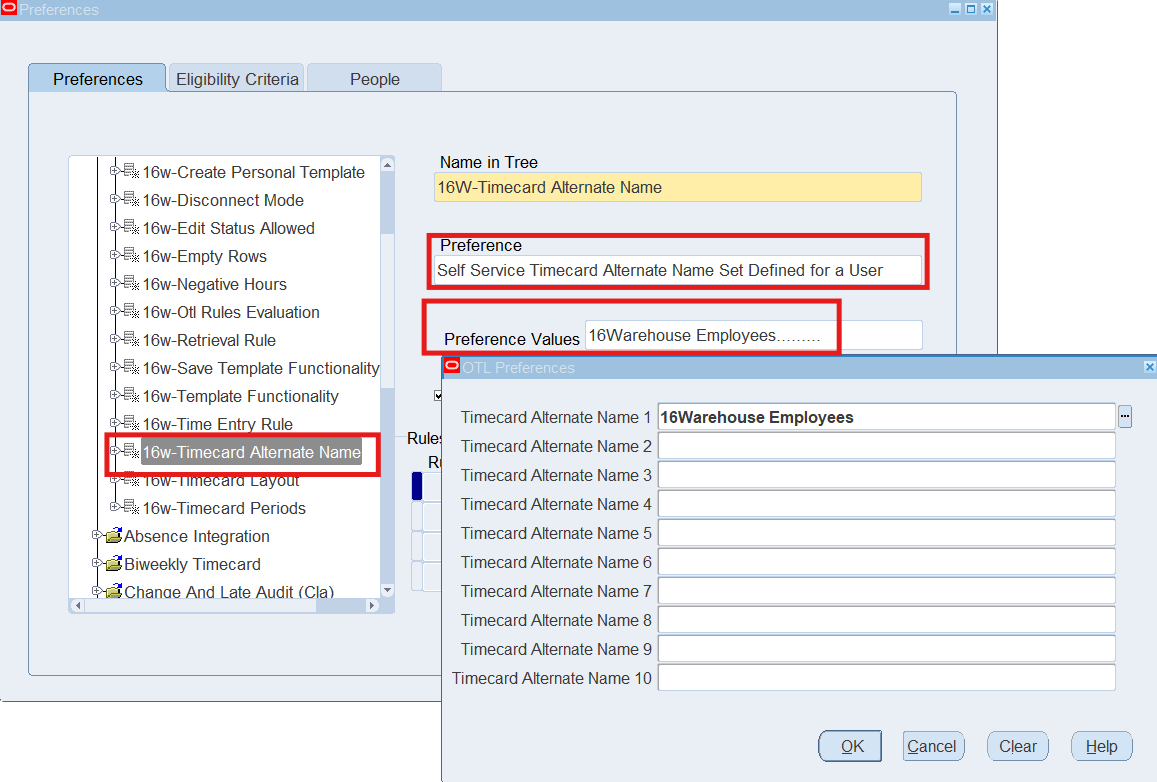
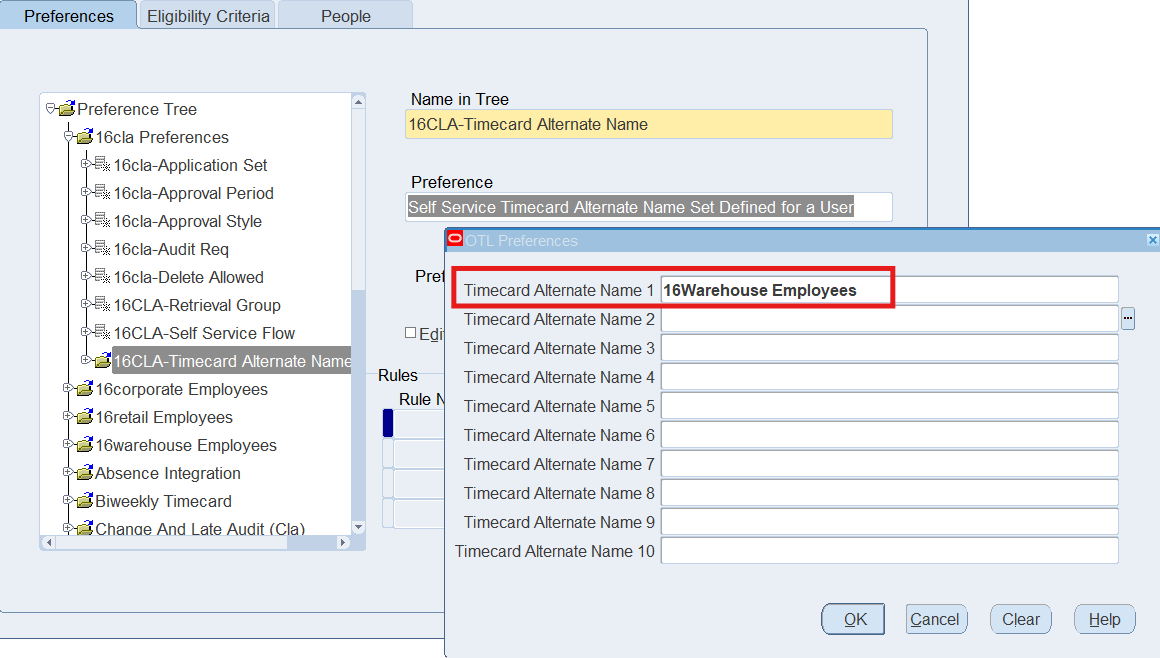
| 16W-Timecard Alternate Name | Self Service Timecard Alternate Name Set Defined for a User | Timecard Alternate Name 1 = 16Warehouse Employees |
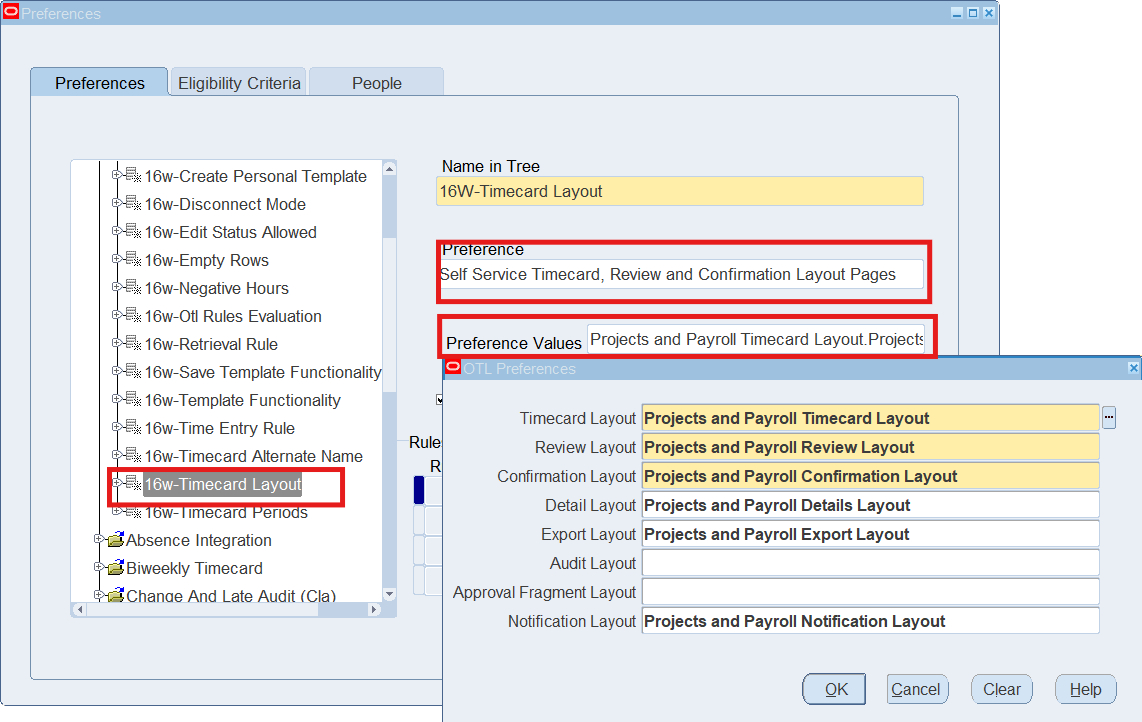
| 16W-Timecard Layout | Self Service Timecard, Review and Confirmation Layout Pages | Timecard Layout = Projects and Payroll Timecard Layout
Review Layout = Projects and Payroll Review Layout Confirmation Layout = Projects and Payroll Confirmation Layout Detail Layout = Projects and Payroll Details Layout Export Layout = Projects and Payroll Export Layout Notification Layout = Projects and Payroll Notification Layout |
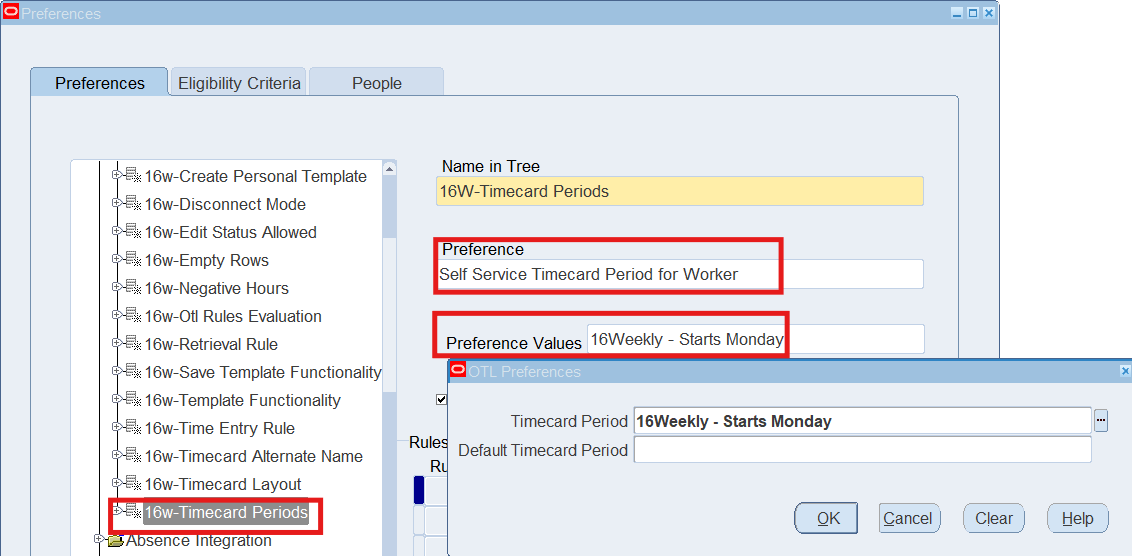
| 16W-Timecard Periods | Self Service Timecard Period for Worker | Timecard Period = 16Weekly – Starts Monday |
Solution
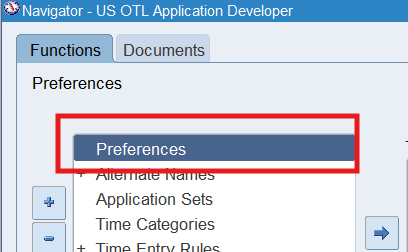
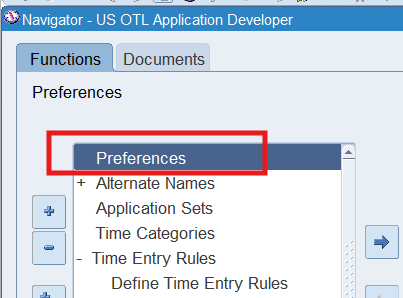
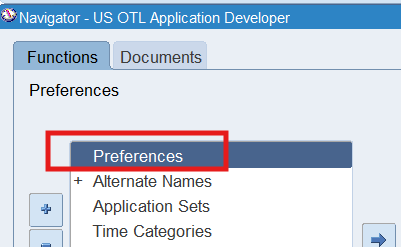
Responsibility : US OTL Application Developer
Navigation : (N) Preferences

Note: Click on the + sign to open the Preference Tree note.
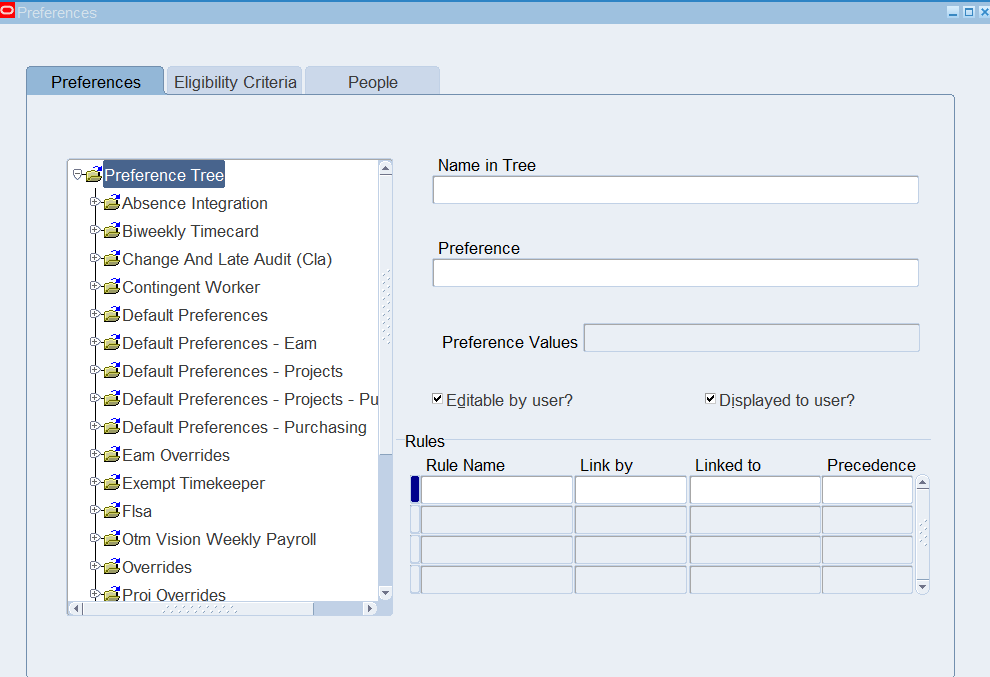
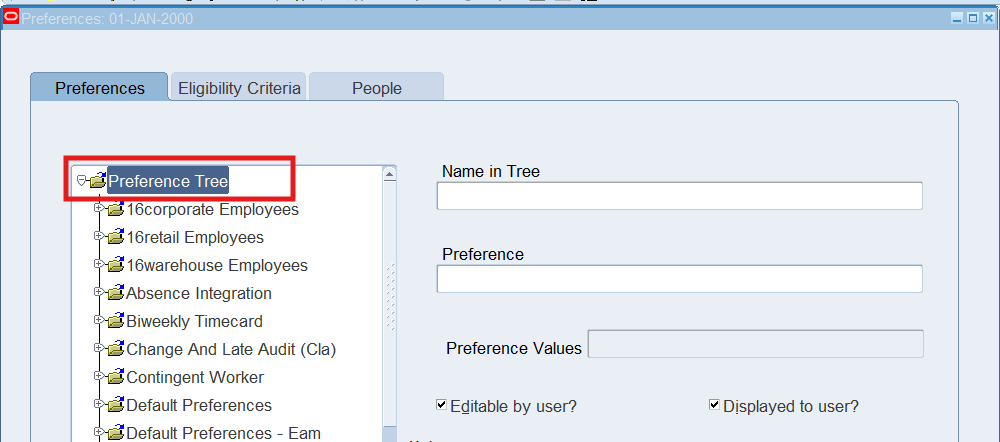
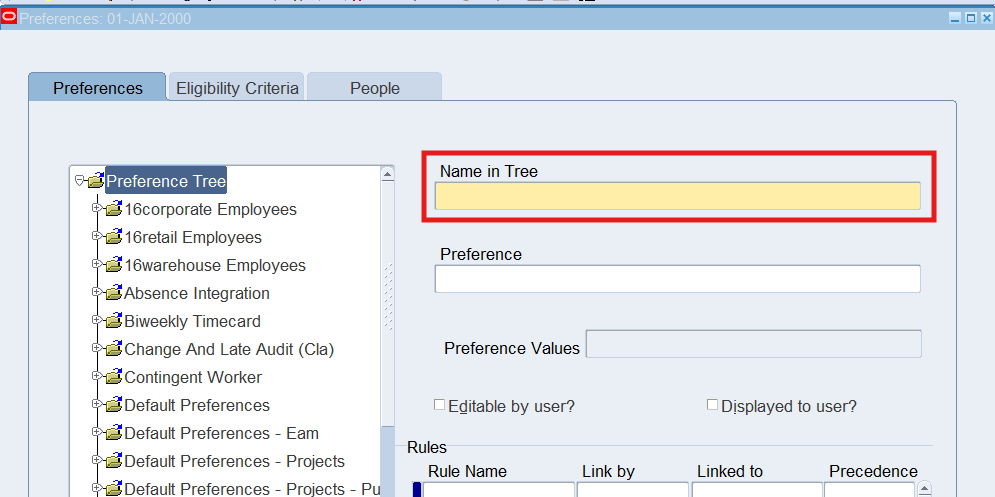
Highlight (or select) the Preference Tree node, then right mouse click on the Preference Tree node and select New

Enter 16Warehouse Employees in the name in Tree field and save
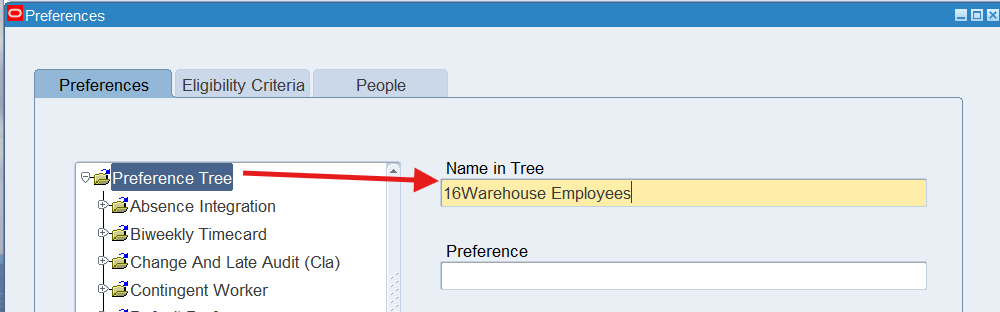
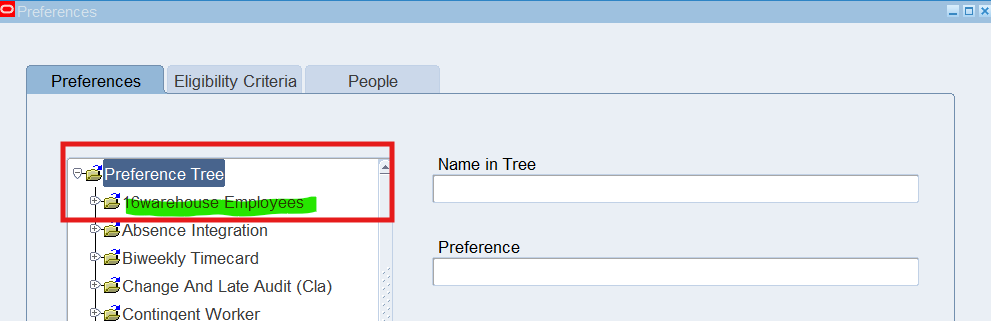
Collapse the Preference Tree node and select +sign to re-open the Preference Tree node, view new branch, 16Warehouse Employees
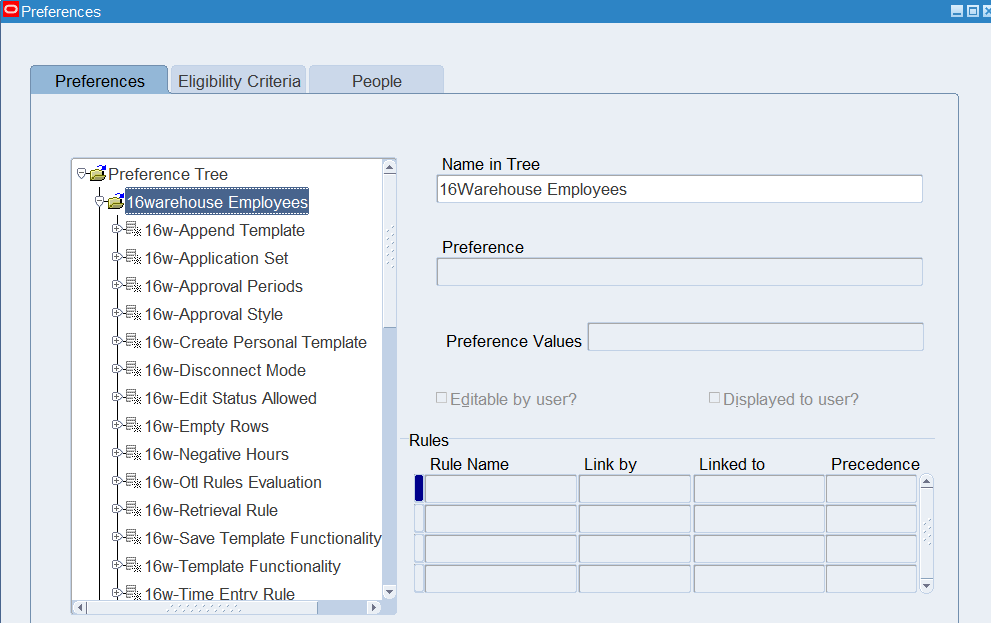
Adding Preferences to a branch
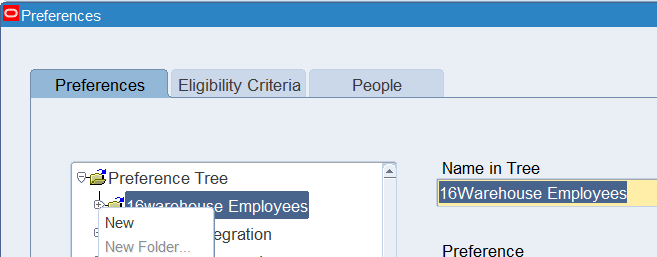
- Select + sign to open the 16Warehouse Employee node
- Highlight or select the 16Warehouse Employees node, Make sure 16Warehouse Employees is defaulted in the “Name in Tree” field.
- Right click on 16Warehouse Employees node and select New.
- In the Name in Tree field, enter 16W-Append Template for the preference. At this time, the Preference filed is not data-enterable
- Save and verify the results as follows:
- Preference Tree
- 16Warehouse Employees
- +16W-Append Template
- 16Warehouse Employees
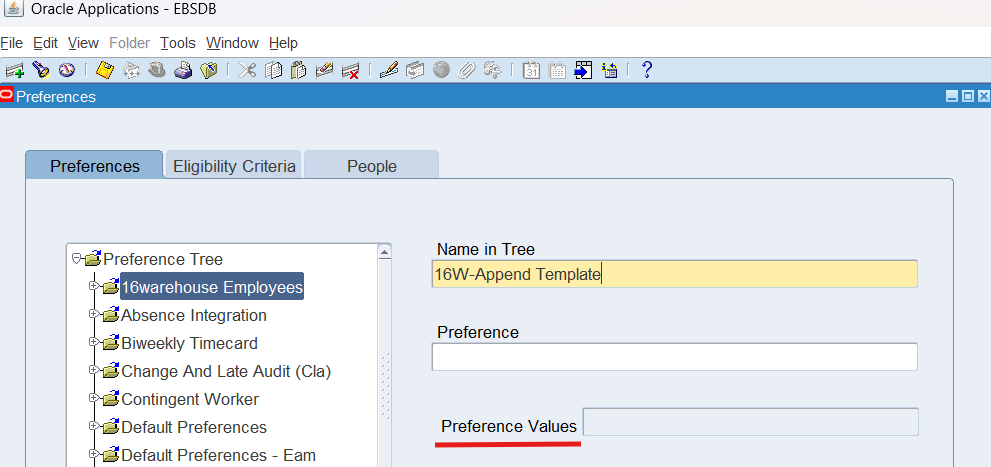
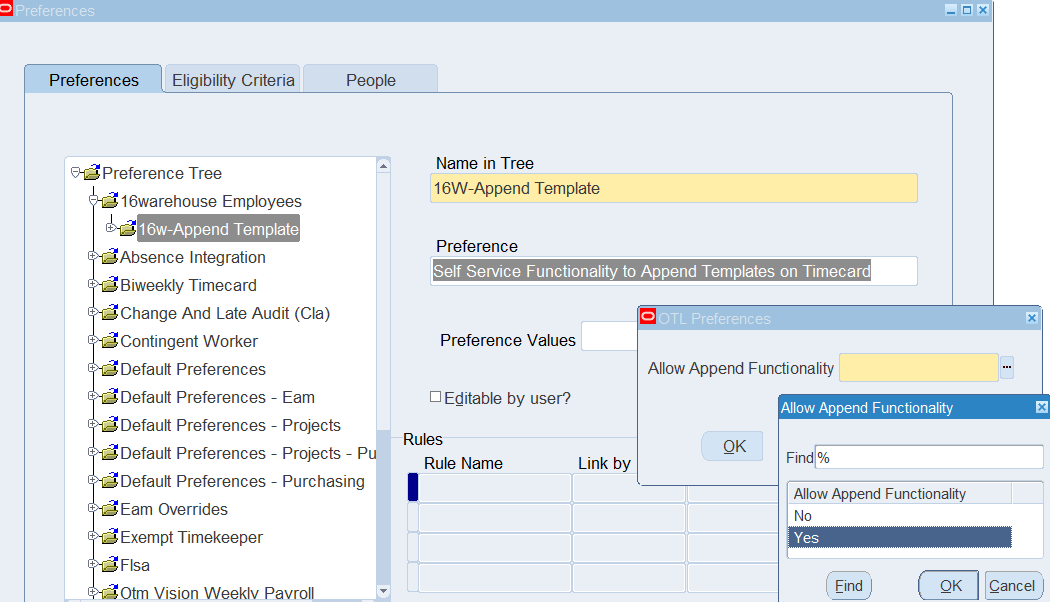
Allow Append Functionality = Yes
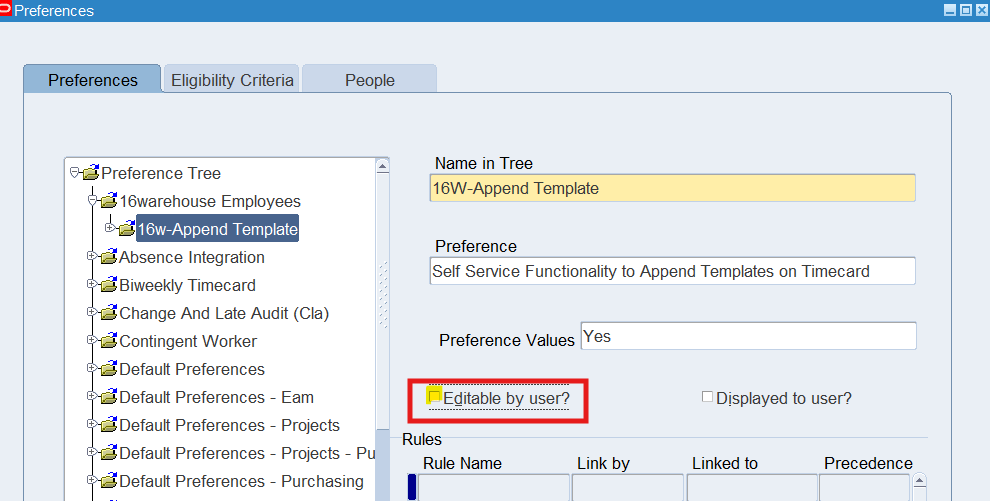
Note: Check “Editable by user” if you wish to allow employees to edit the preferences
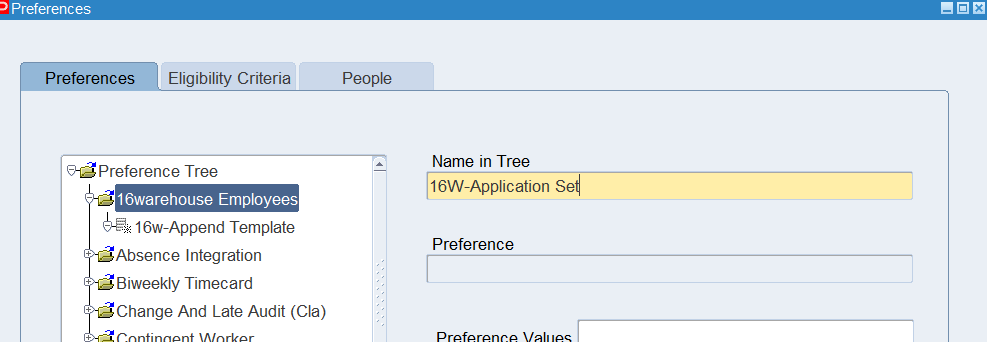
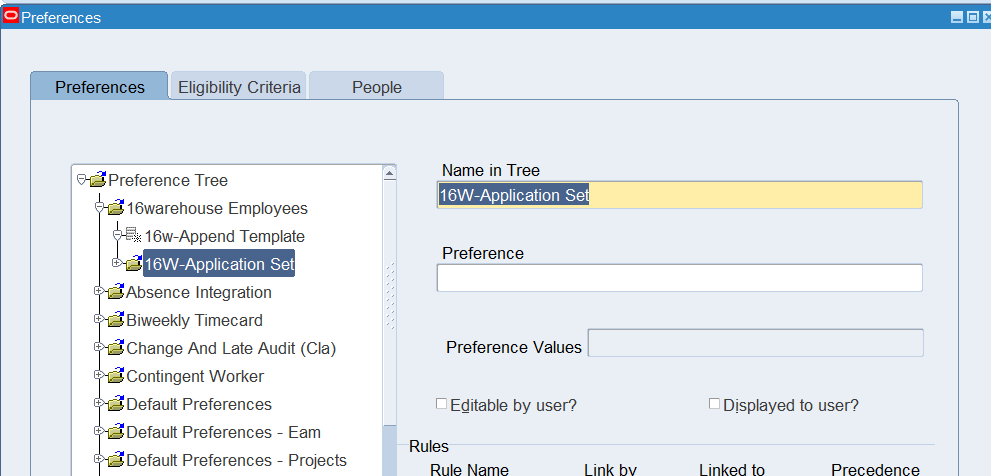
To create the next preference for the 16Warehouse Employees branch, highlight (or select) the 16Warehouse Employees node. Make sure 16Warehouse Employee is default in the “Name in Tree” field. Right click and select New.
In the Name in Tree field, enter 16W-Applicatoin Set for the preference. At this time, the Preference field is not data-enterable.
Save and verify results
Preferences for Warehouse Employees
Note: Setup all preferences for Warehouse employees
Preferences for Retail Employees
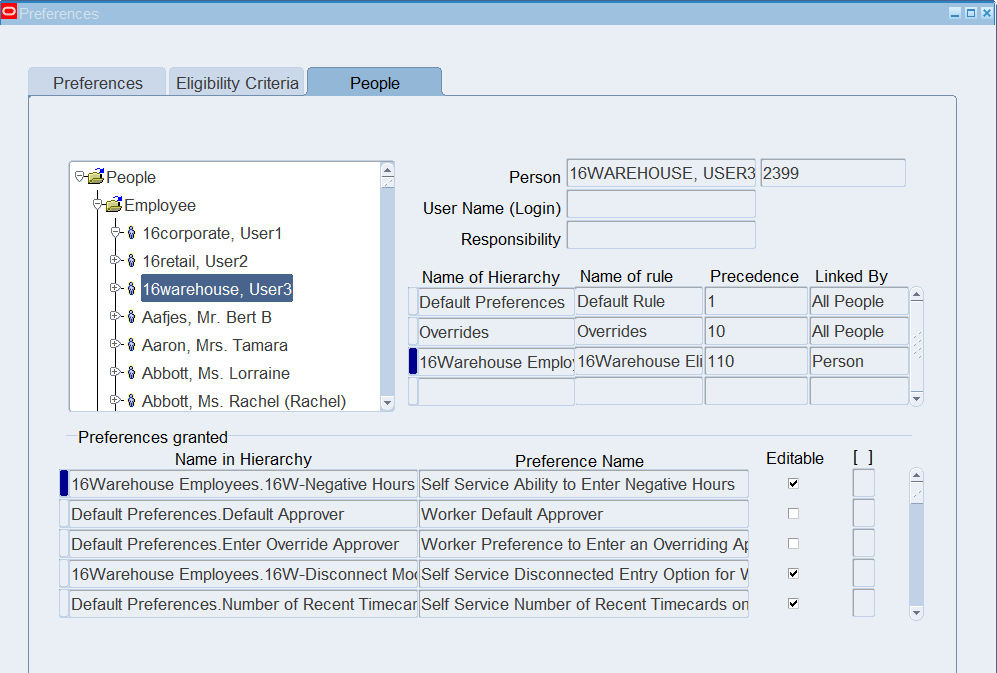
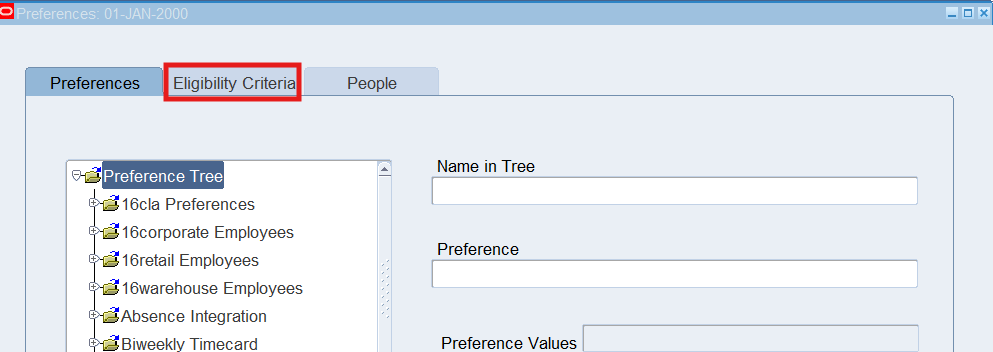
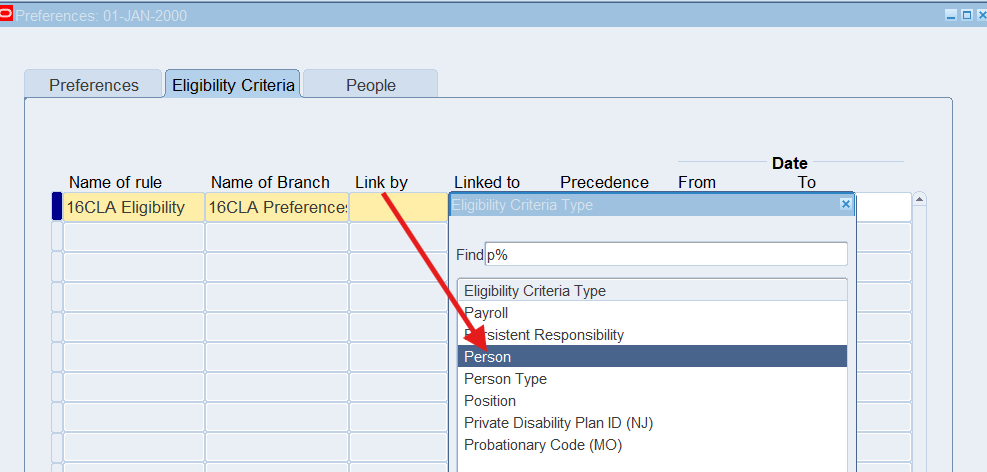
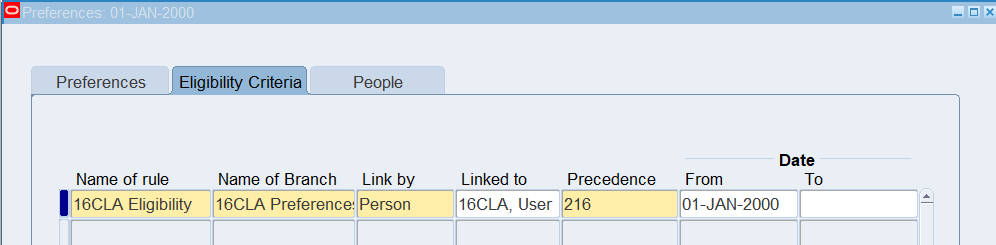
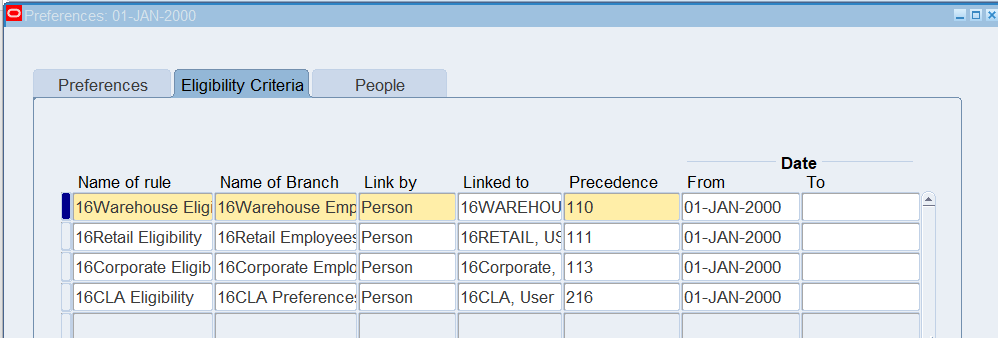
Defining Eligibility Criteria – For Warehouse, Retail, Corporate
- Choose the Eligibility Criteria TAB.
- Enter the following Information:
| Name of Rule | Name of Branch | Link By | Linked To | Precedence | Start Date |
| 16Warehouse Eligibility | 16Warehouse Employees | Person | 16Warehouse employee name | 01-Jan-2000 | |
| 16Retail Eligibility | 16Retail Employees | Person | 16Retail employee name | 01-Jan-2000 | |
| 16Corporate Eligibility | 16Corporate Employees | Person | 16Corporate employee name | 01-Jan-2000 |
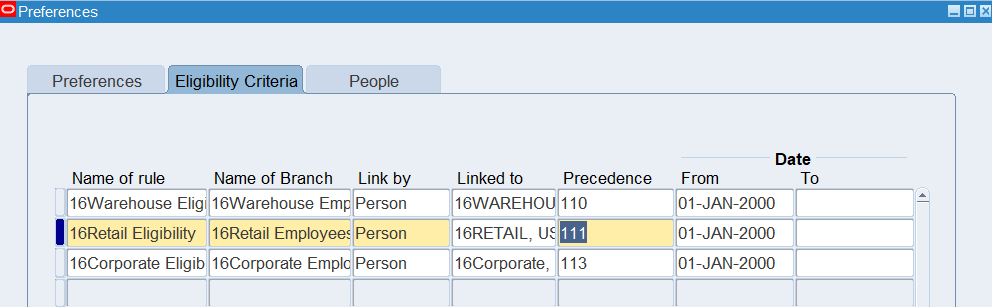
The Precedence field determines which hierarchy the application uses when a person is eligible for more than one set of Preferences
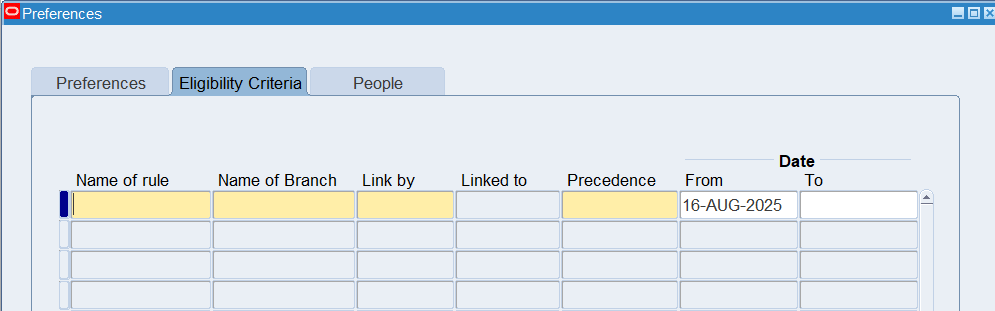
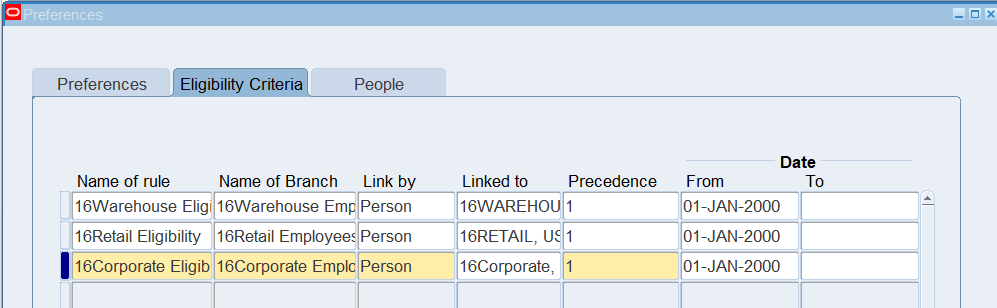
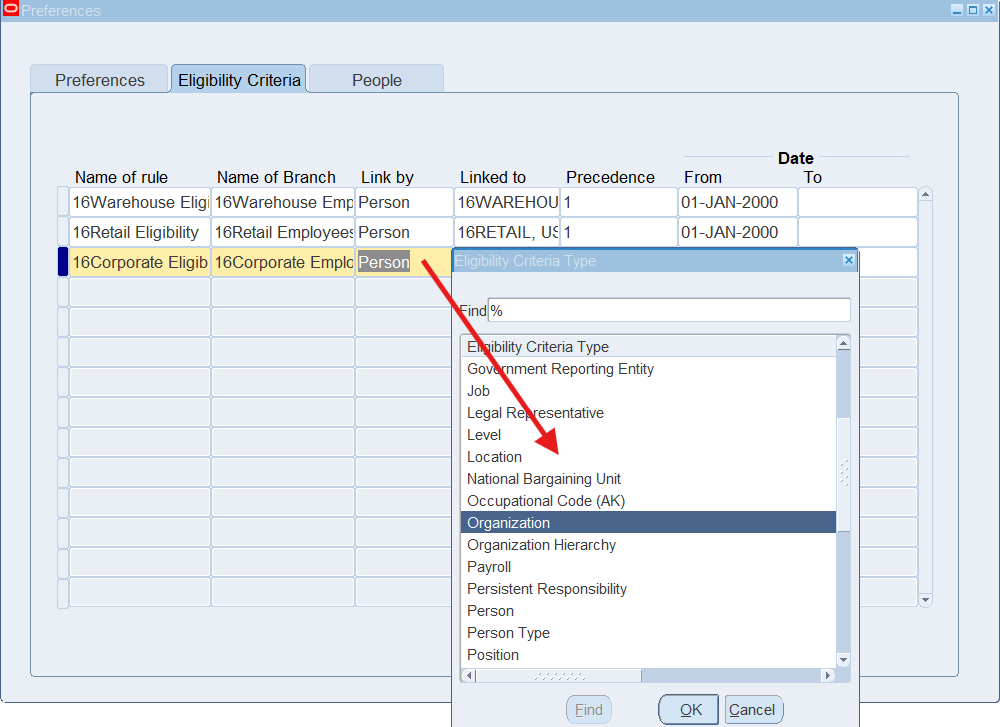
Note: Link by has multiple options
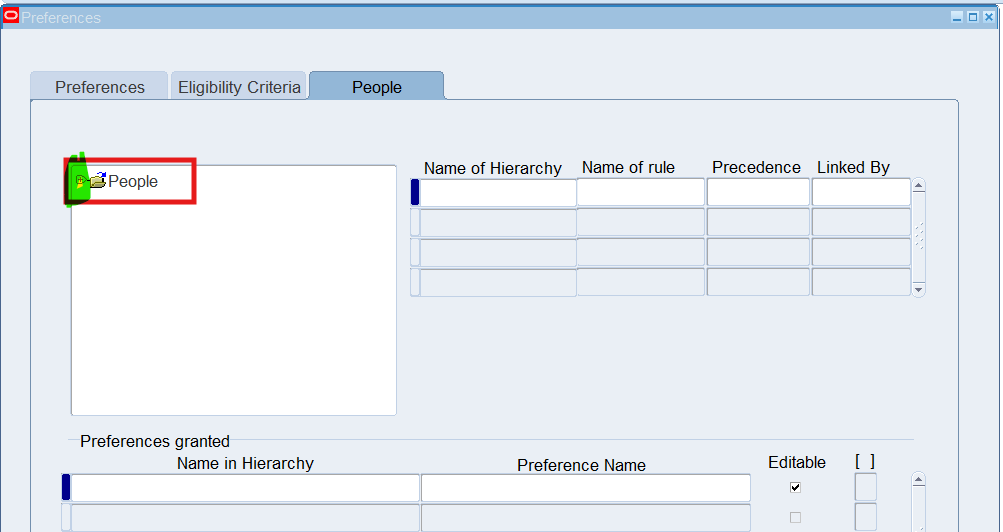
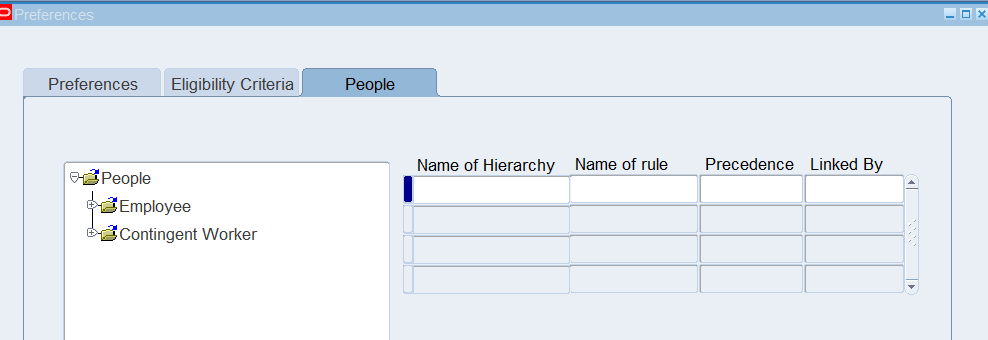
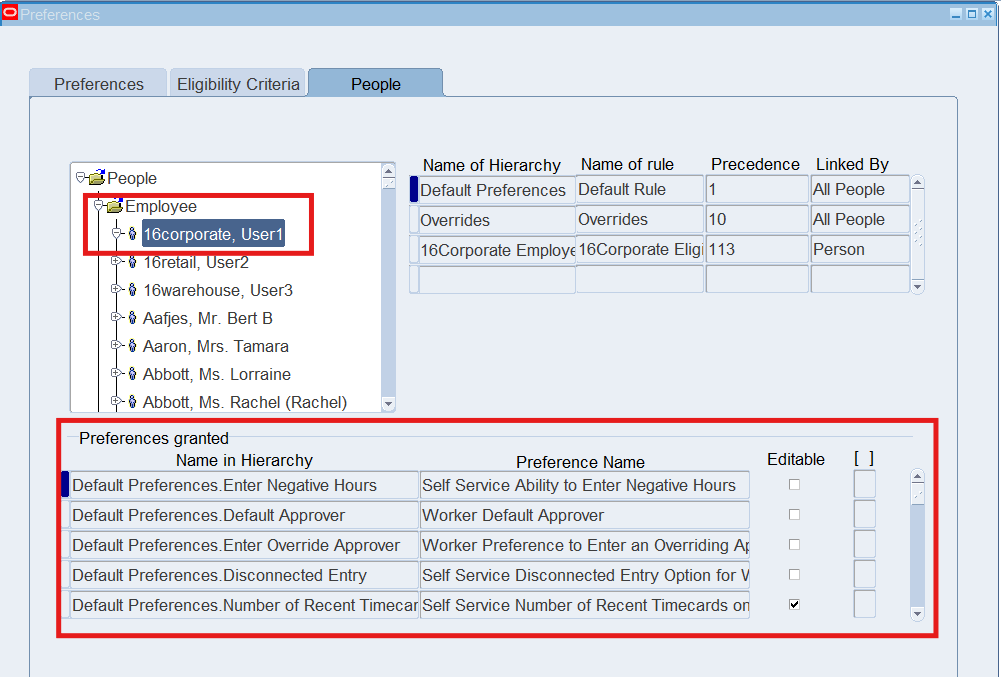
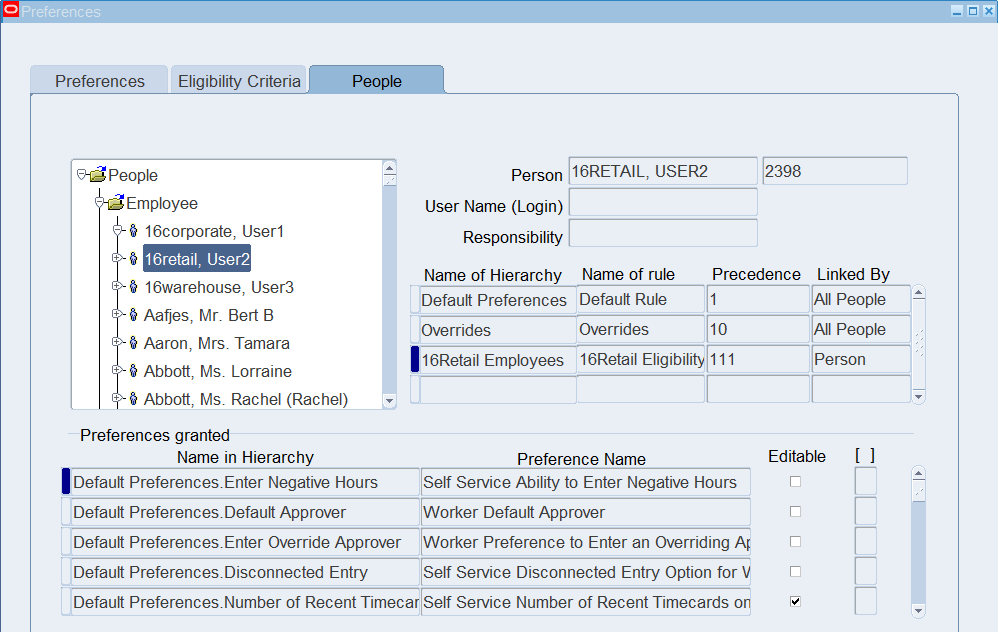
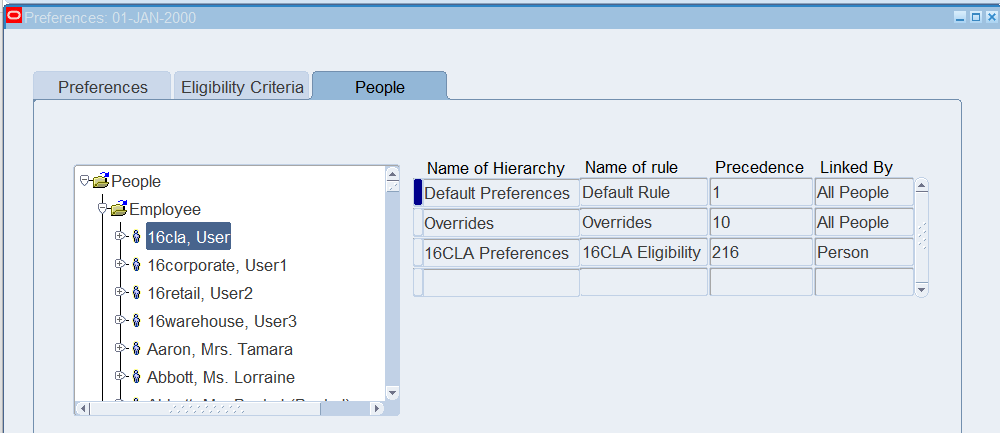
Viewing People Preferences
- Select People Tab
- Expand the Employees Tree by clicking on the + icon
- Use the Find icon to select your employees to view
Practice 8: Defining Holiday Calendars
Holiday Calendars as a reference tool to determine paid and unpaid holidays, as well as the automatically generate a detail time entry line item with the correct number of hours. Holiday Calendars also validate that the hours taken for a specific holiday are correct.
Business Scenario
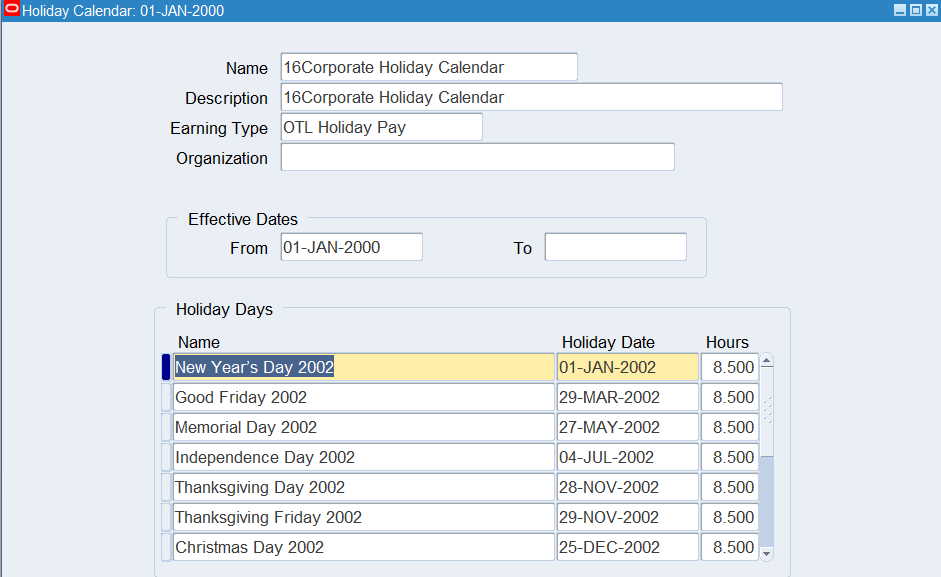
Corporate employees are paid for Public Holidays. To accomplish this, create a holiday calendar and define the public holidays observed. The observed holidays for demo are:
| Corporate Employee Holiday Calendar | ||
| Holiday Name | Holiday Date | Number of Hours |
| New Year’s Day 2002 | 01-Jan-2002 | 8.5 |
| Good Friday 2002 | 29-Mar-2002 | 8.5 |
| Memorial Day 2002 | 27-May-2002 | 8.5 |
| Independence Day 2002 | 04-Jul-2002 | 8.5 |
| Thanksgiving Day 2002 | 28-Nov-2002 | 8.5 |
| Thanksgiving Friday 2002 | 29-Nov-2002 | 8.5 |
| Christmas Day 2002 | 25-Dec-2002 | 8.5 |
| New Year’s Day 2003 | 01-Jan-2003 | 8.5 |
| Good Friday 2003 | 28-Mar-2003 | 8.5 |
| Memorial Day 2003 | 26-May-2003 | 8.5 |
| Independence Day 2003 | 04-Jul-2004 | 8.5 |
| Thanksgiving Day 2003 | 27-Nov-2003 | 8.5 |
| Thanksgiving Friday 2003 | 28-Nov-2003 | 8.5 |
| Christmas Day 2003 | 25-Dec-2003 | 8.5 |
Solution
Defining a Holiday Calendar for Corporate Employees
Responsibility : US OTL Application Developer
Navigation : (N) OTL Time Accounting 🡪 Table Setup and Maintenance 🡪 Holiday Calendar
Date Track : 01-Jan-2000
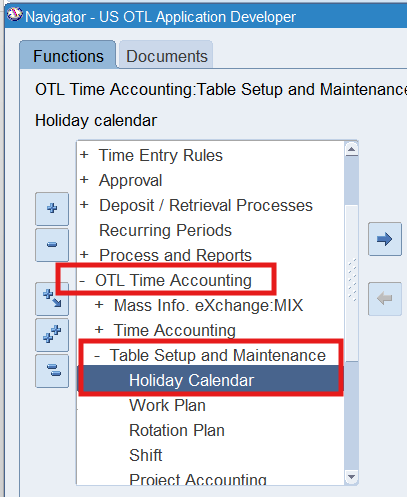
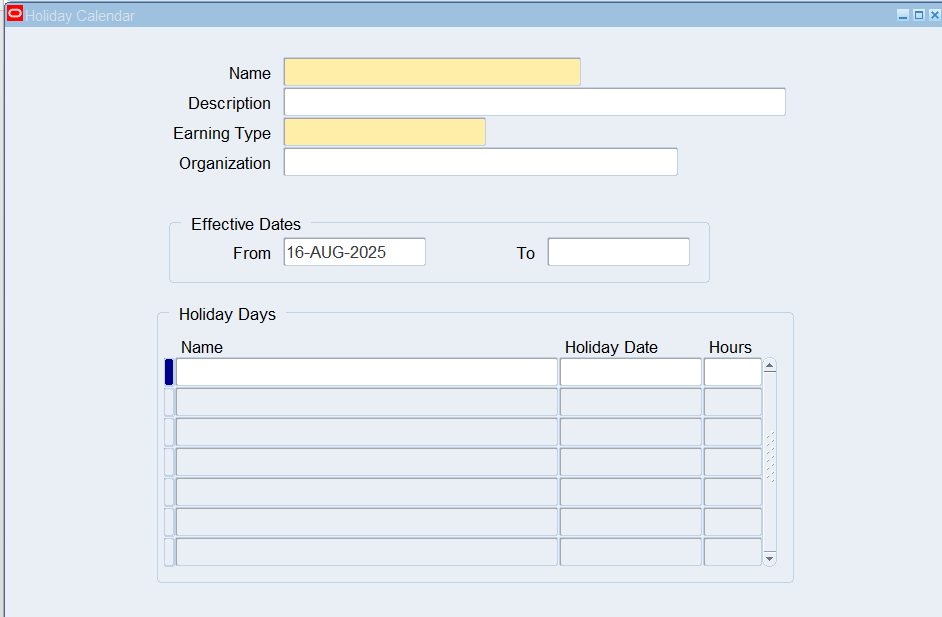
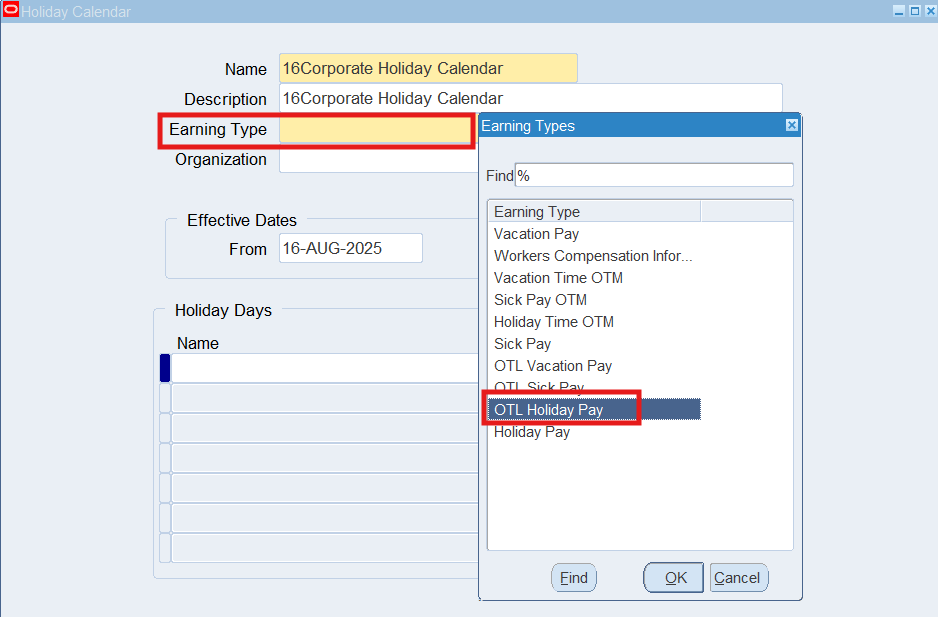
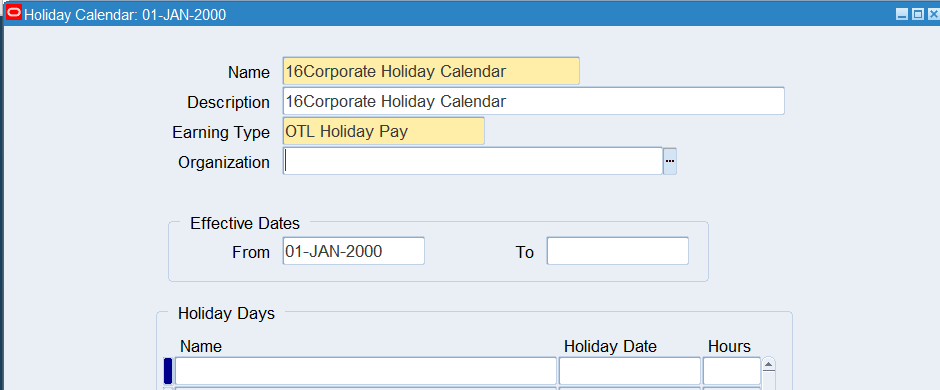
Note: Organization is optional. Calendars can be associated with organizations. If this field is left blank, the entire business group can use the calendar.
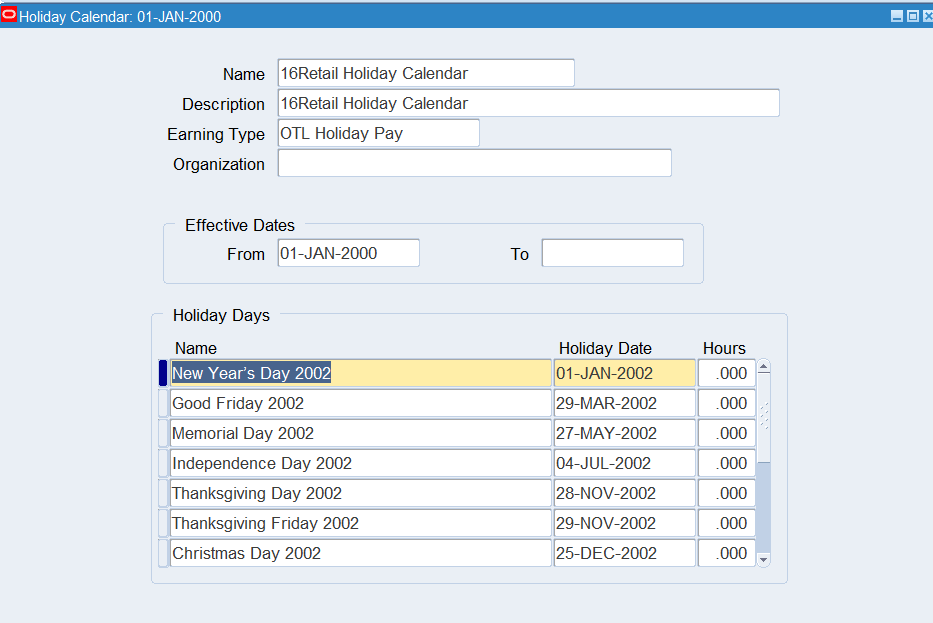
Defining a Holiday Calendar for Retail Employees
Retail employees do not receive holiday pay for public holidays. However, you will need to create a holiday calendar with zero hours for all retail employees. Create the holiday calendar for retail employees as follows:
Responsibility : US OTL Application Developer
Navigation : (N) OTL Time Accounting 🡪 Table Setup and Maintenance 🡪 Holiday Calendar
Date Track : 01-Jan-2000
| Retail Employee Holiday Calendar | ||
| Holiday Name | Holiday Date | Number of Hours |
| New Year’s Day 2002 | 01-Jan-2002 | 0 |
| Good Friday 2002 | 29-Mar-2002 | 0 |
| Memorial Day 2002 | 27-May-2002 | 0 |
| Independence Day 2002 | 04-Jul-2002 | 0 |
| Thanksgiving Day 2002 | 28-Nov-2002 | 0 |
| Thanksgiving Friday 2002 | 29-Nov-2002 | 0 |
| Christmas Day 2002 | 25-Dec-2002 | 0 |
| New Year’s Day 2003 | 01-Jan-2003 | 0 |
| Good Friday 2003 | 28-Mar-2003 | 0 |
| Memorial Day 2003 | 26-May-2003 | 0 |
| Independence Day 2003 | 04-Jul-2004 | 0 |
| Thanksgiving Day 2003 | 27-Nov-2003 | 0 |
| Thanksgiving Friday 2003 | 28-Nov-2003 | 0 |
| Christmas Day 2003 | 25-Dec-2003 | 0 |
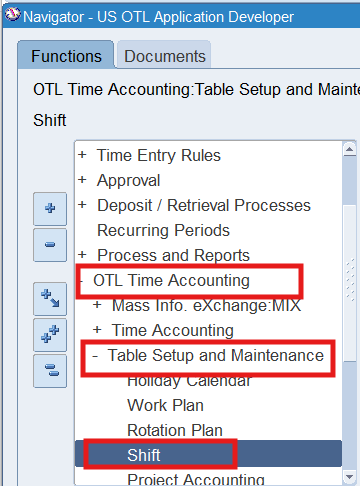
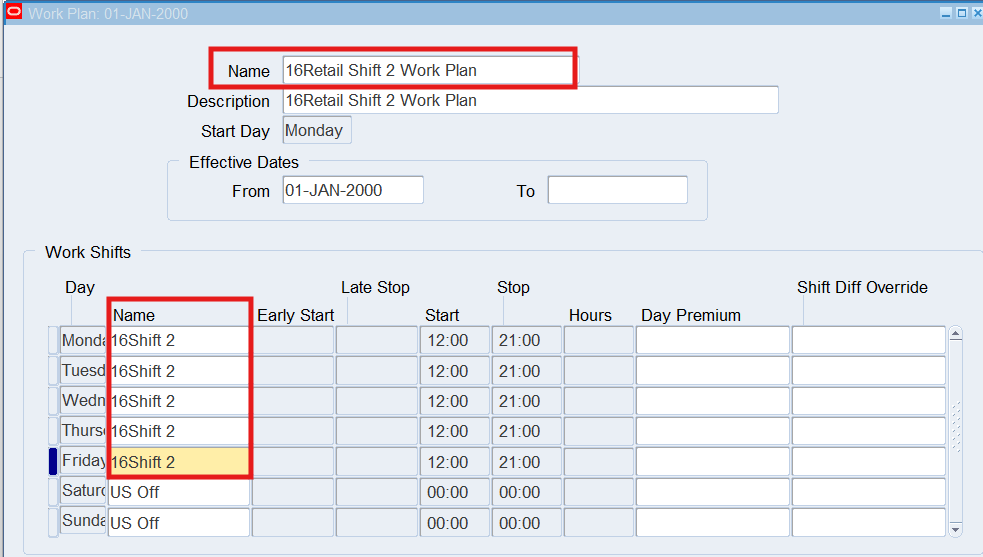
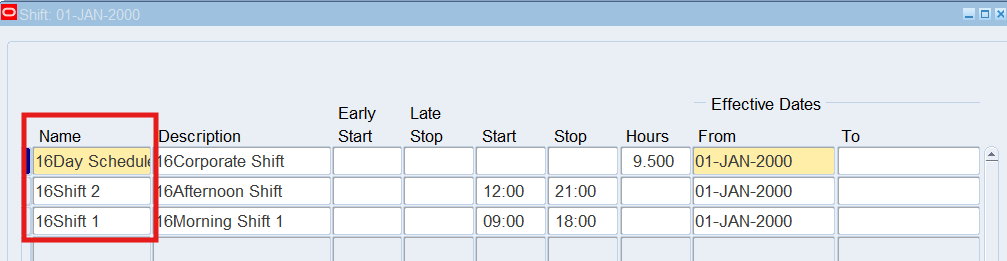
Practice 9: Defining Shifts / Work Plans / Rotation Plans
Setup Shifts, Work Plans, and Rotation Plans for time and labor entry. Shifts define periodic work schedule based upon schedule start and stop times or a specific number of hours. We can define shifts before define work plans and rotation plans
Work plans are used in the auto-generation of hours for employees and for the calculation of Day Premium and Shift Differential Premium overrides. Once your shifts have been defined, you can use them to define a work plan for each group of employees.
Rotation plans link various Work Plans together on a rotating basis. We can schedule dates when a person moves from one work plan to another. With the shifts assigned to a work plan, we can create rotation plans.
Business Scenario
Retail employees can work one of two shifts. Corporate employees are scheduled to work from 8:00AM to 5:30PM, it will need 9.5 hour work day for all corporate employees. The shift should be defined as follows:
| Shift Name | Start Time | Stop Time | Hours |
| Shift 1 | 0900 | 1800 | |
| Shift 2 | 1200 | 2100 | |
| Day Schedule | 9.5 |
For Retail employees we need to define 2 work plans. One work plan will be for Shift 1 and the second is for Shift 2. Retail employees will rotate between the shifts every 2 weeks.
The Corporate employees will have only one work plan and will not need to rotate their work schedule.
Solution
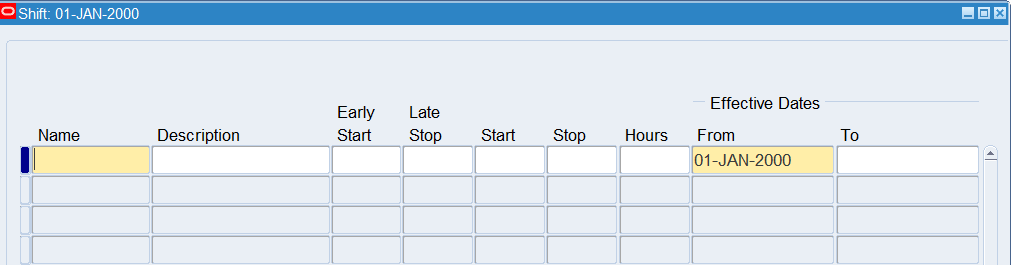
Defining Shifts
Responsibility : US OTL Application Developer
Navigation : (N) OTL Time Accounting 🡪 Table Setup and Maintenance 🡪 Shift
Date Track : 01-Jan-2000
| Name | Description | Start | Stop | Hours |
| 16Shift 1 | 16Morning Shift 1 | 0900 | 1800 | |
| 16Shift 2 | 16Afternoon Shift | 1200 | 2100 | |
| 16Day Schedule | 16Corporate Shift | 9.5 |
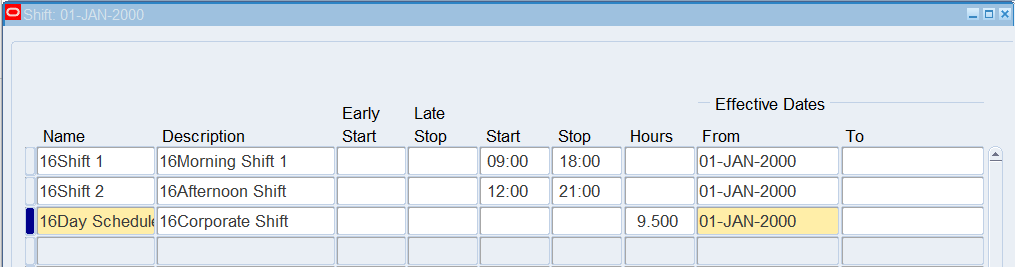
The Early Start and Late Stop fields are optional. These fields are generally entered if you wish recognize a period prior to and after the start and stop times to allow all people working that shift to clock in and clock out with no additional time being generated
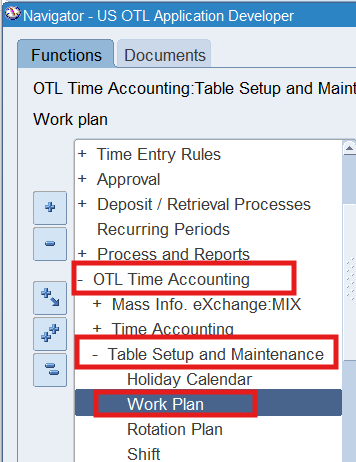
Defining a Work Plan for Retail Employees
Responsibility : US OTL Application Developer
Navigation : (N) OTL Time Accounting 🡪 Table Setup and Maintenance 🡪 Work Plan
Date Track : 01-Jan-2000
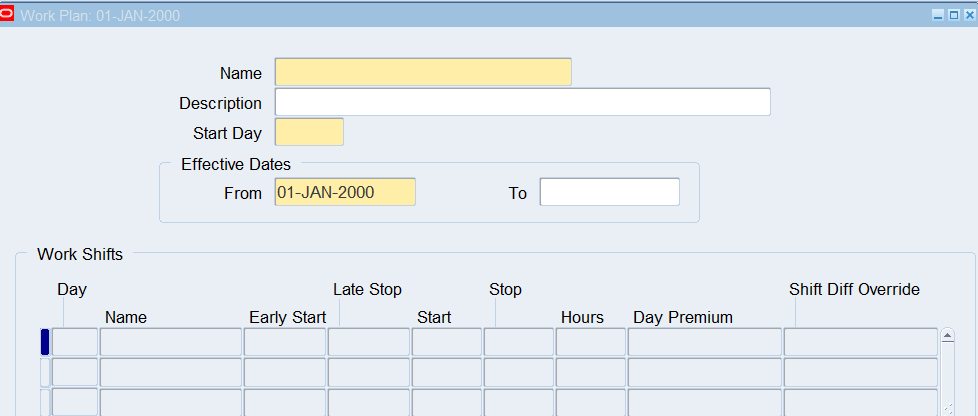
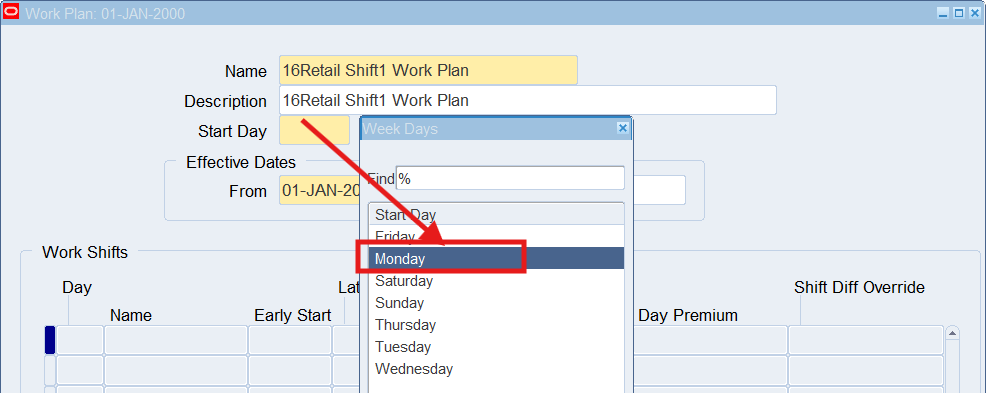
The Work Shifts region of the forms will automatically be populated within the 7 days of the wrrk with US OFF as the Shift
Replace the Values of US OFF for Monday to Friday:
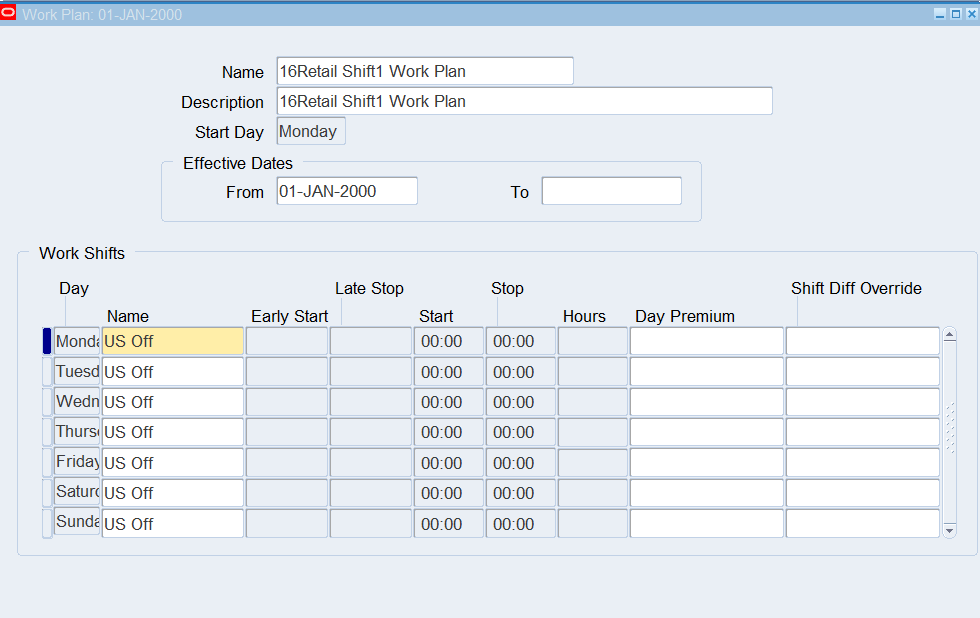
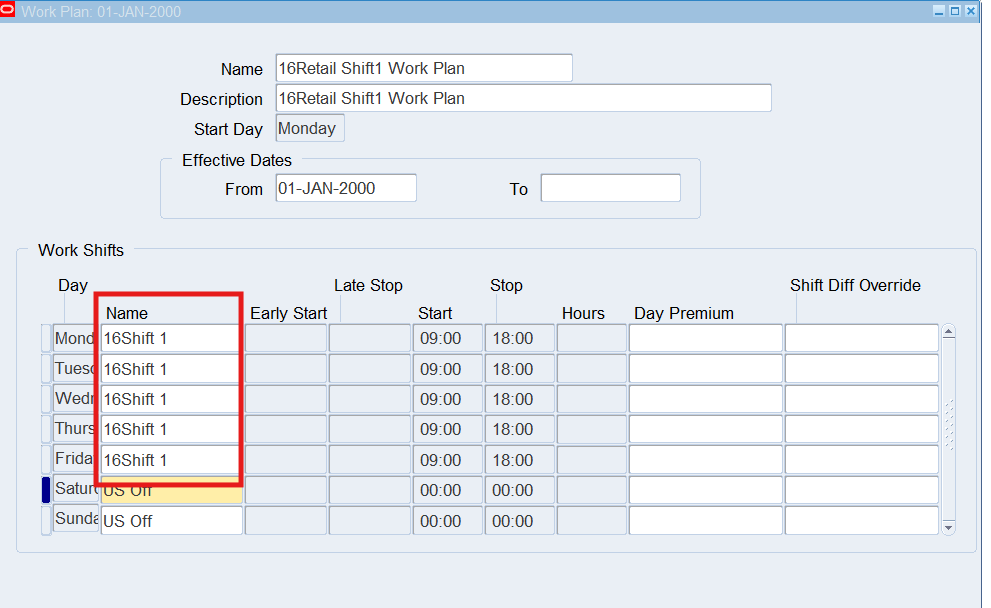
Note: The Day Premium and Shift Diff Override fields are optional. The Day Premium is used if your company pays a premium to persons working on a specific day. The Shift Diff Override is used to pay premiums for working hours other than the regular assigned shift. If you enter a policy in this field, it will override the shift differential policy assigned to the person at the assignment level.
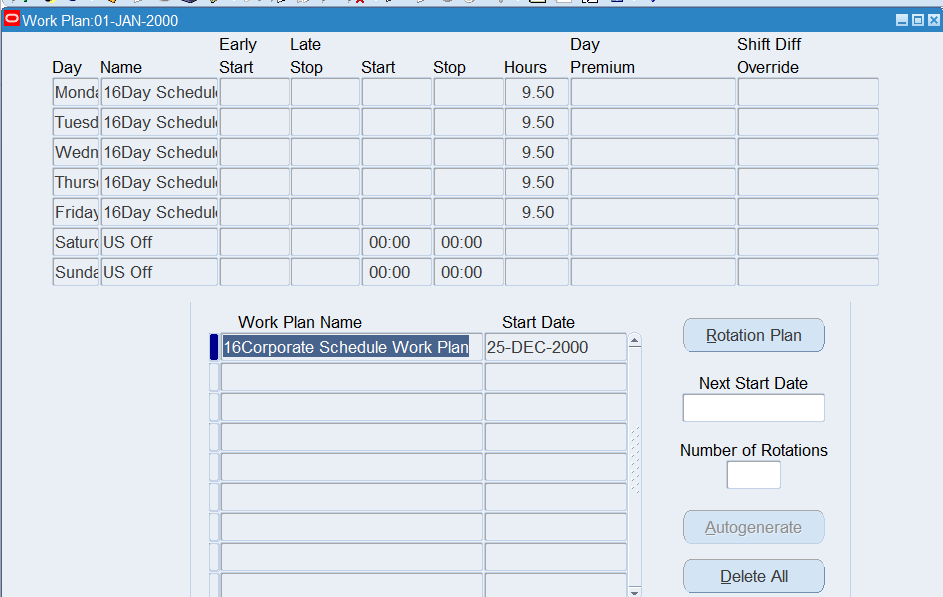
Defining a Work Plan for Corporate Employees
Responsibility : US OTL Application Developer
Navigation : (N) OTL Time Accounting 🡪 Table Setup and Maintenance 🡪 Work Plan
Date Track : 01-Jan-2000
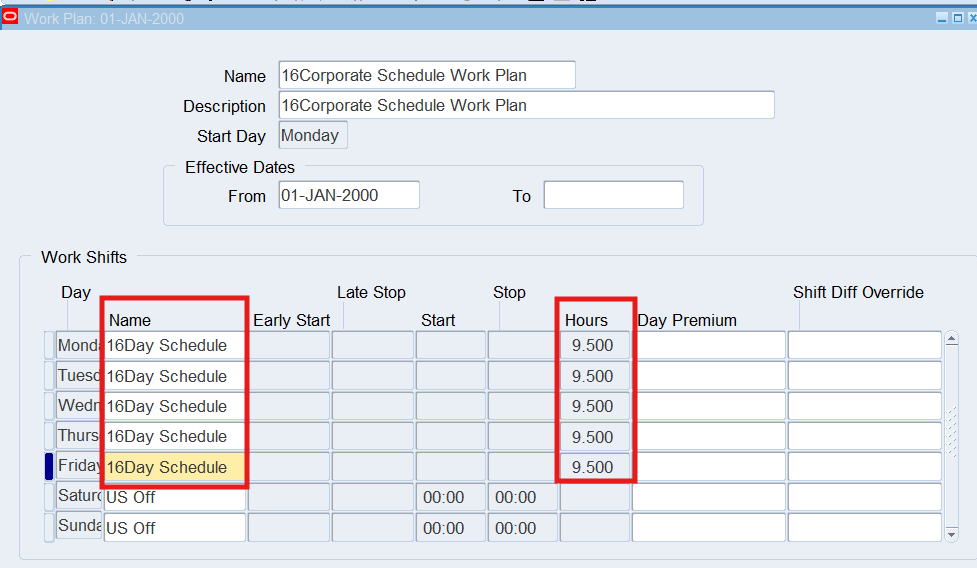
Note: Work Shifts Name define as per “Shifts”
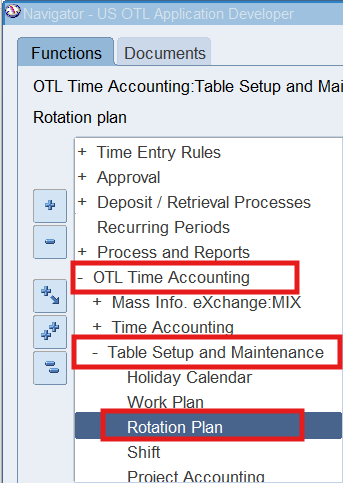
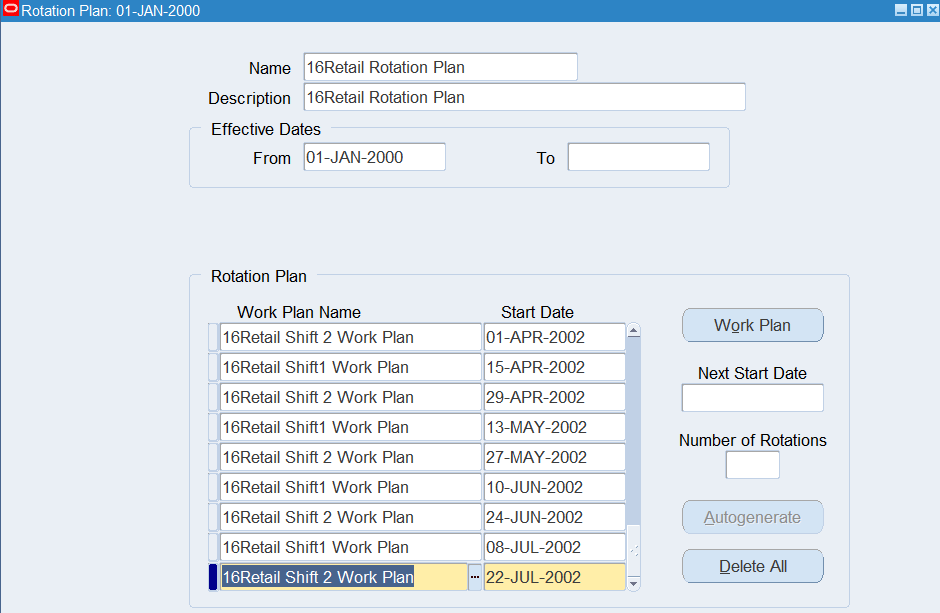
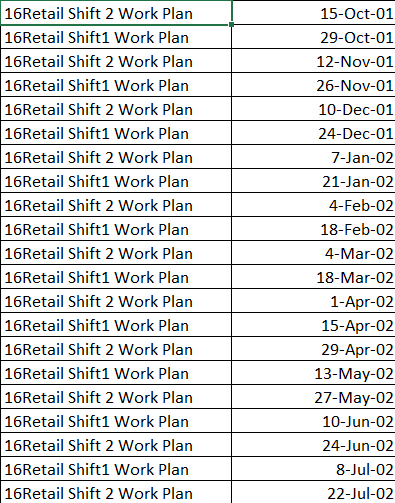
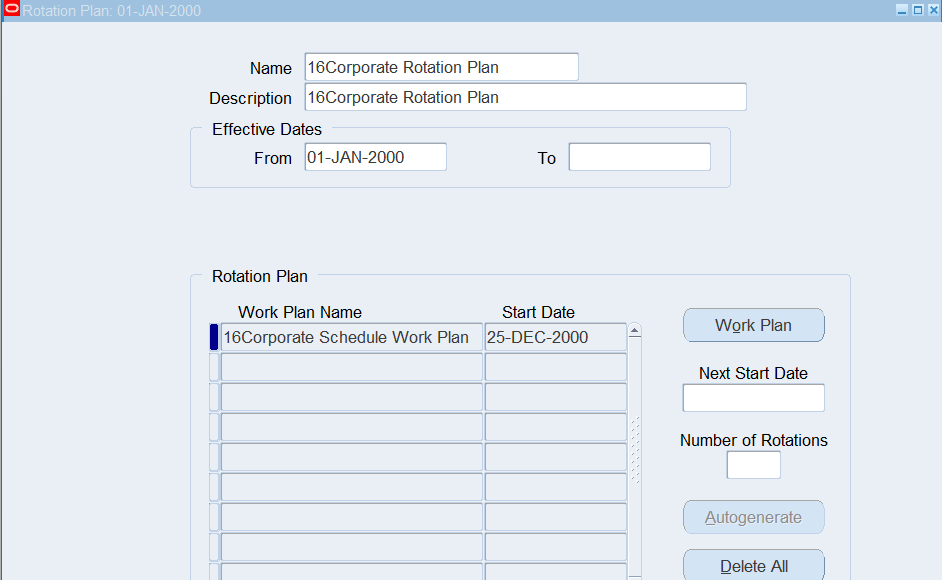
Defining a Rotation Plan for Retail Employees
Responsibility : US OTL Application Developer
Navigation : (N) OTL Time Accounting 🡪 Table Setup and Maintenance 🡪 Rotation Plan
Date Track : 01-Jan-2000
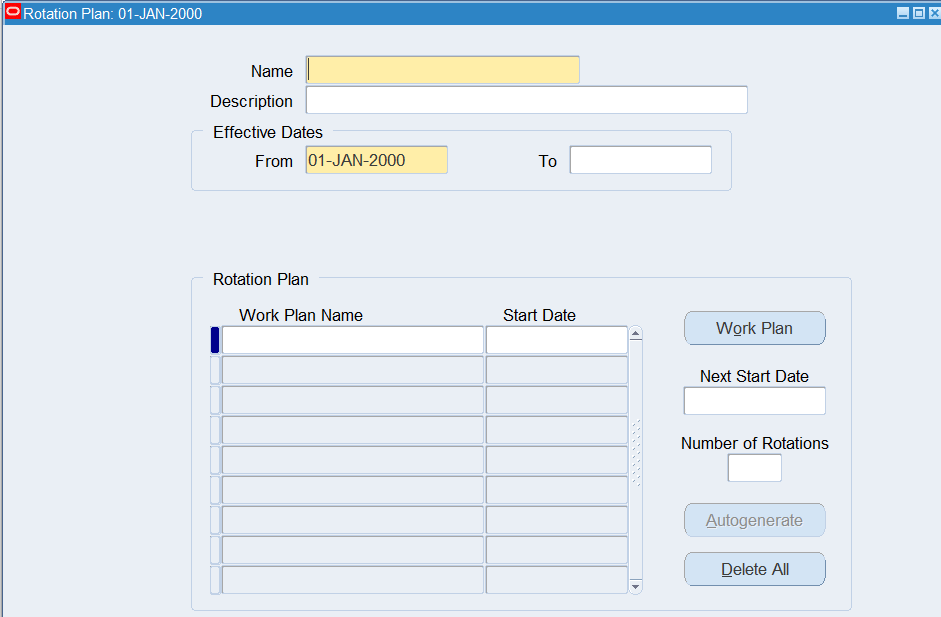
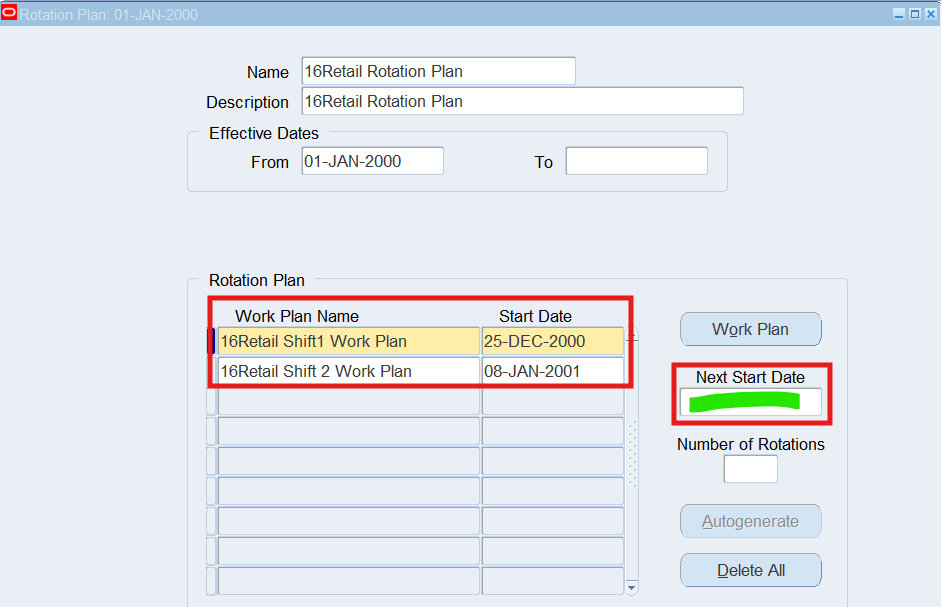
In the Next Start Date field, enter 22-Jan-2001
- This field determines when you wish to begin the next rotation between the work plans
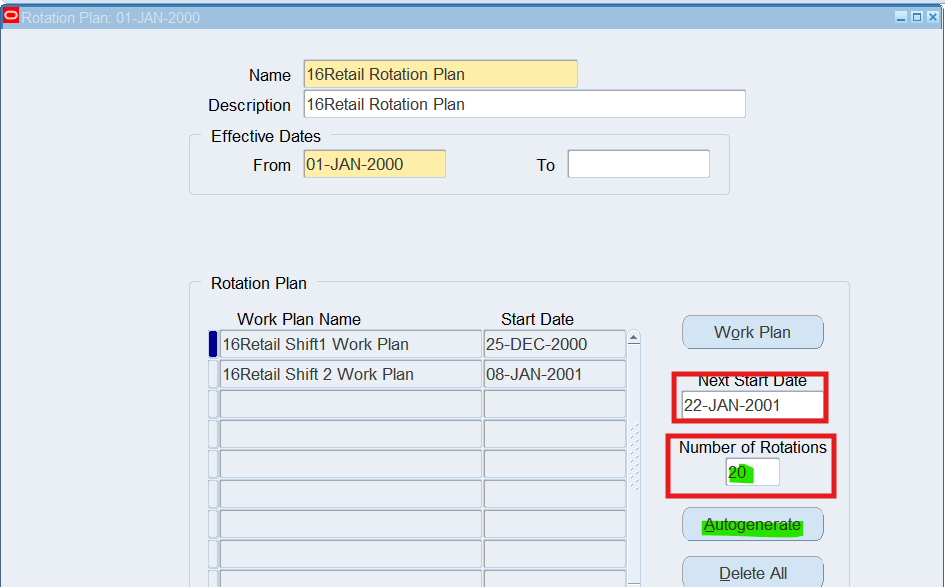
Number of Rotations determines the number of rotations to calculate for the rotating work plans.
Select “Autogenerate” to calculate rotation plans based upon the 2 work plans entered, and the number of rotations.
 |
 |
Defining a Rotation Plan for Corporate Employees
Responsibility : US OTL Application Developer
Navigation : (N) OTL Time Accounting 🡪 Table Setup and Maintenance 🡪 Rotation Plan
Date Track : 01-Jan-2000
You can review the work plans assigned to the rotation plan by placing the cursor in the Work Plan Name field and choosing the Work Plan button. To return the focus to the Rotation Plan region, choose the Rotation Plan button.
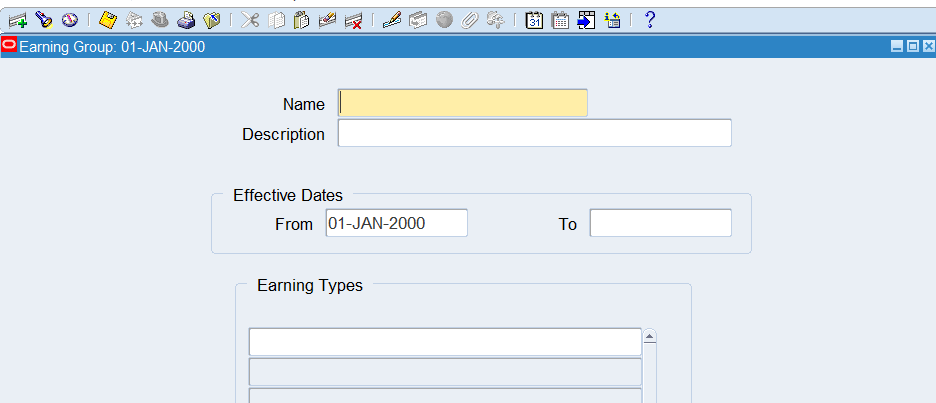
Practice 10: Defining Earnings Group
Earning groups identify various earning types that are included in accumulation of hours used for calculating week overtime limits defined on the Earning Policy. When a defined number of hours is met for an earning group, overtime hours will be created.
Business Scenario
Create a one Earning Groups have only regular pay as the earnings.
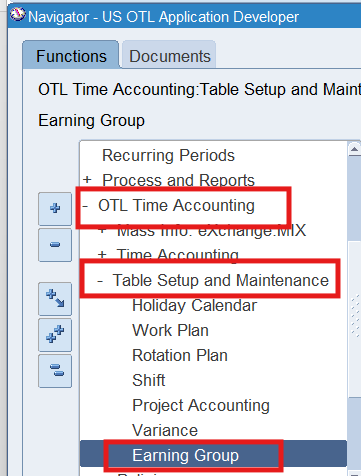
Responsibility : US OTL Application Developer
Navigation : (N) OTL Time Accounting 🡪 Table Setup and Maintenance 🡪 Earning Group
Date Track : 01-Jan-2000
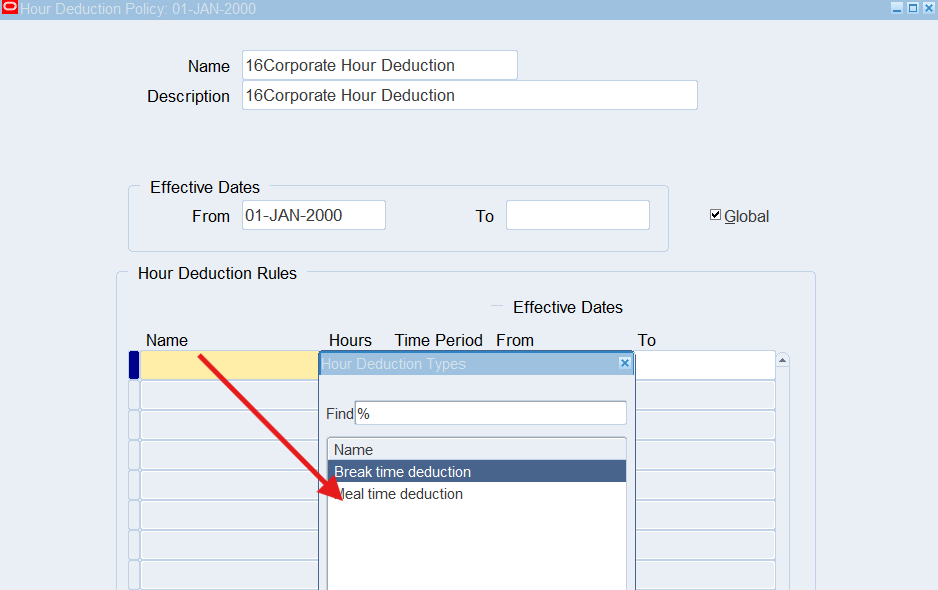
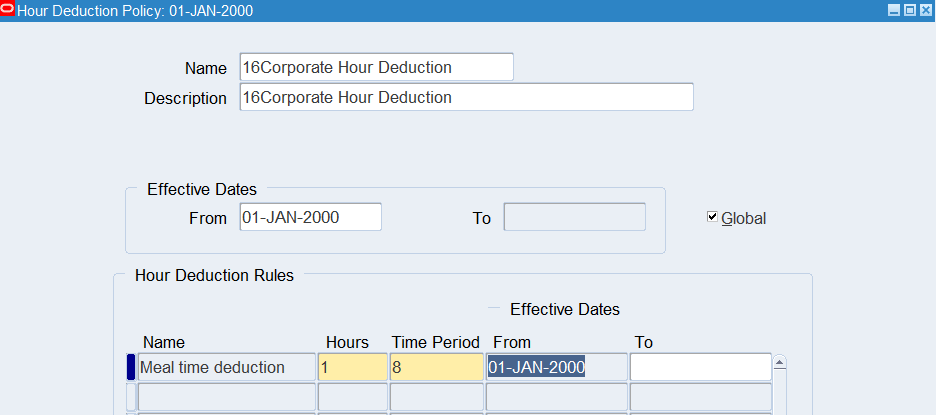
Practice 11: Defining an Hour Deduction Policy
Defining an Hour Deduction Policy for Time and Labor Entry define hour deduction policies establish how much time, if any should be automatically deducted as unpaid time from employees recorded hours. We can identify criteria of specific hours worked that must be met before the deduction is taken.
Business Scenario
Retail Employees clock in and out for meals, there is no need to create an hour deduction policy for this group of employees.
Corporate Employees get a one-hour break without clocking in and out during the day. To achieve this, we can create an Hour Deduction Policy for all Corporate Employees.
Define the hour deduction policy to deduct 1 hour for a meal after 8 hours have elapsed.
Responsibility : US OTL Application Developer
Navigation : (N) OTL Time Accounting 🡪 Policies 🡪 Hour Deduction
Date Track : 01-Jan-2000
Select “Global” so this policy may be used across all business groups
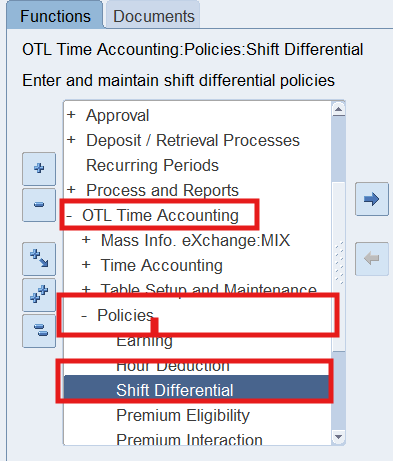
Practice 12: Defining Shift Differential, Premium Eligibility and Premium Interaction Policies
Setup Shift Differential, Premium Eligibility and Premium Interaction Policies. Shift Differential policies identify when a shift premium is calculated and what premiums are to be paid based upon shift start and stop times.
Premium Eligibility policies list all premiums associated with the base hours that specific employees or groups of employees are eligible to receive. Calculations are based upon time ranges, actual time worked and applicable pay rules.
Premium Interaction policies define sequencing rules when calculation of one type of premium is based upon results of a previously calculated premium.
Business Scenario
Retail employees may be eligible for shift differential premium when they work the second shift and all type of overtime. We can create a shift differential policy to pay this premium for this group of employees.
As we create a shift differential policy for retail employees, we need to create a premium eligibility policy to determine when these employees are eligible to receive this pay.
With the creation of the shift differential policy and premium eligibility policy for retail employees, we must also create a premium interaction policy to determine the calculation of pay between the Shift Diff Pay and all types of overtime premium.
Solution
Defining Shift Differentials
Responsibility : US OTL Application Developer
Navigation : (N) OTL Time Accounting 🡪 Policies 🡪 Shift Differential
Date Track : 01-Jan-2000
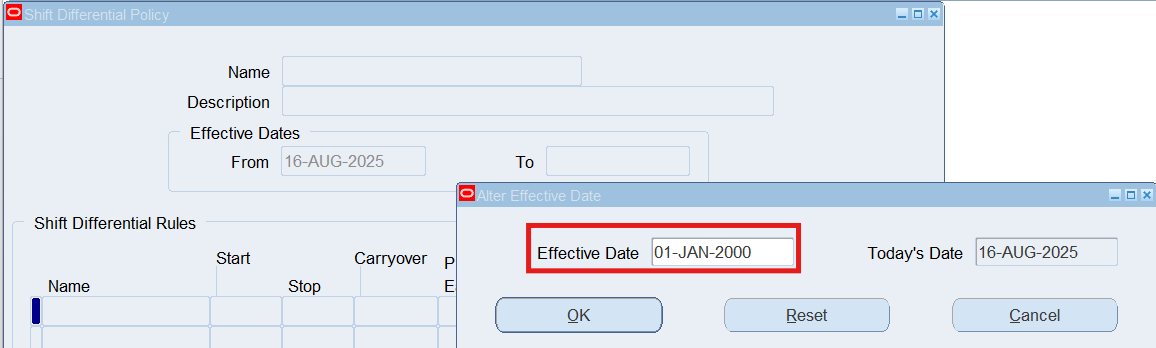
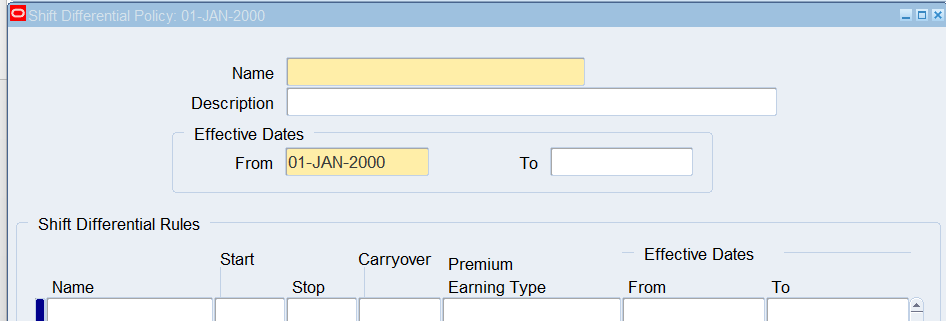
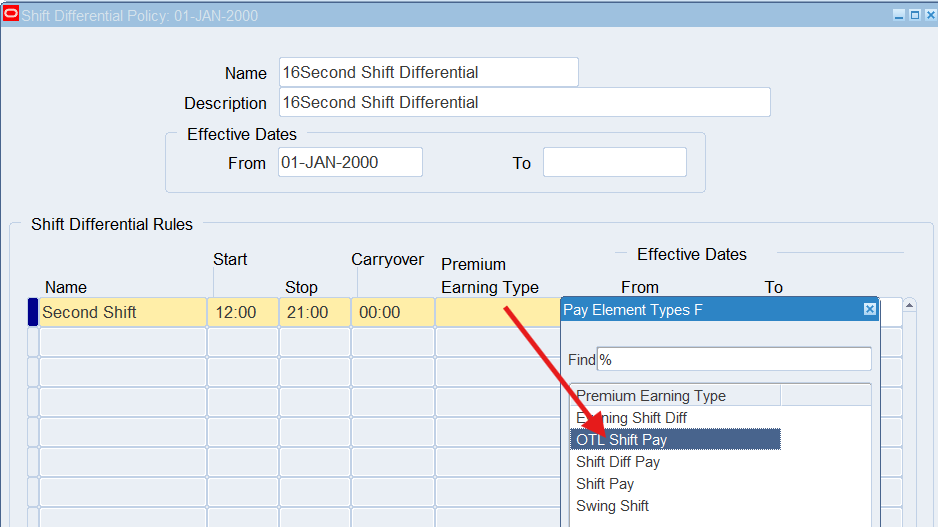
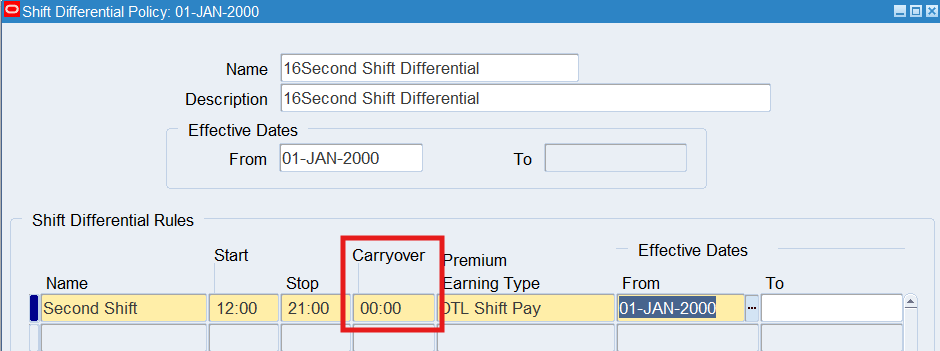
Note: If time is entered in the Carryover field, it is an indication that the assigned shift differential premium is to be paid for the carryover time when an employee continues to work.
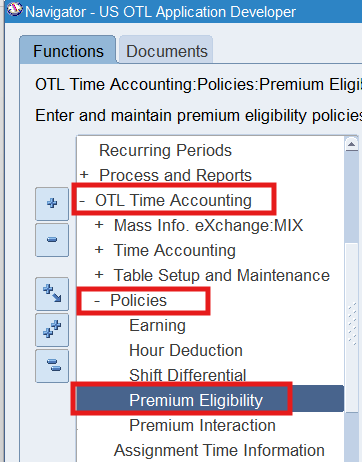
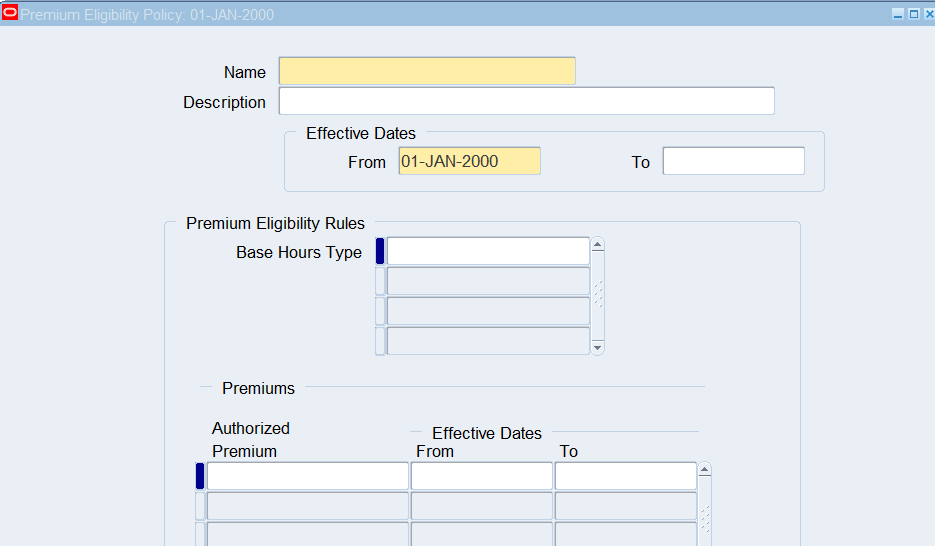
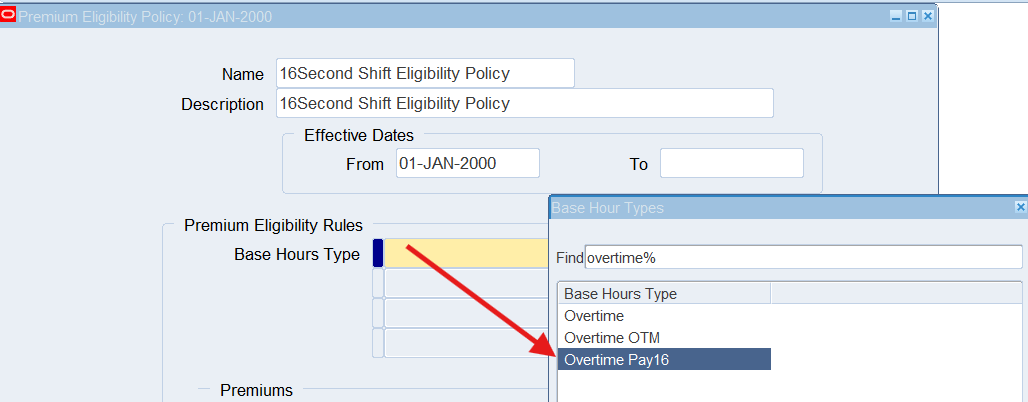
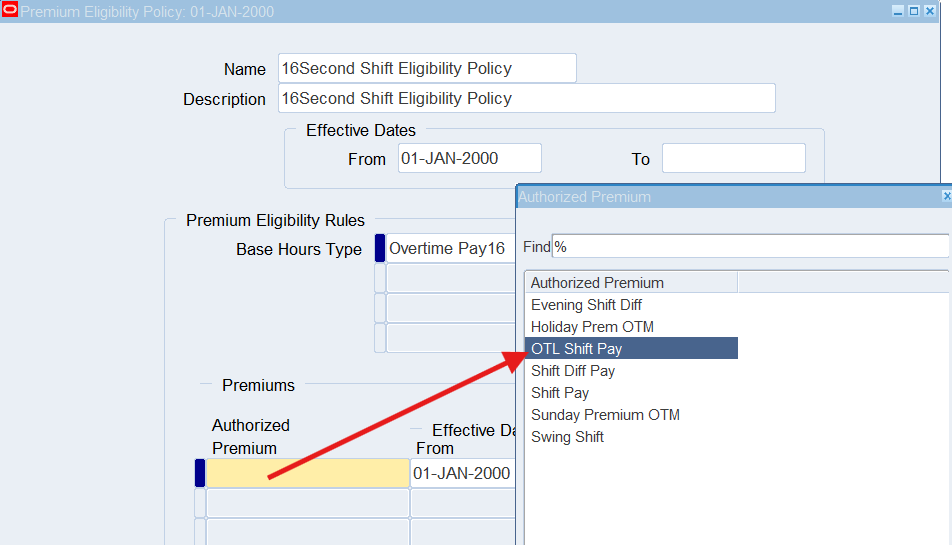
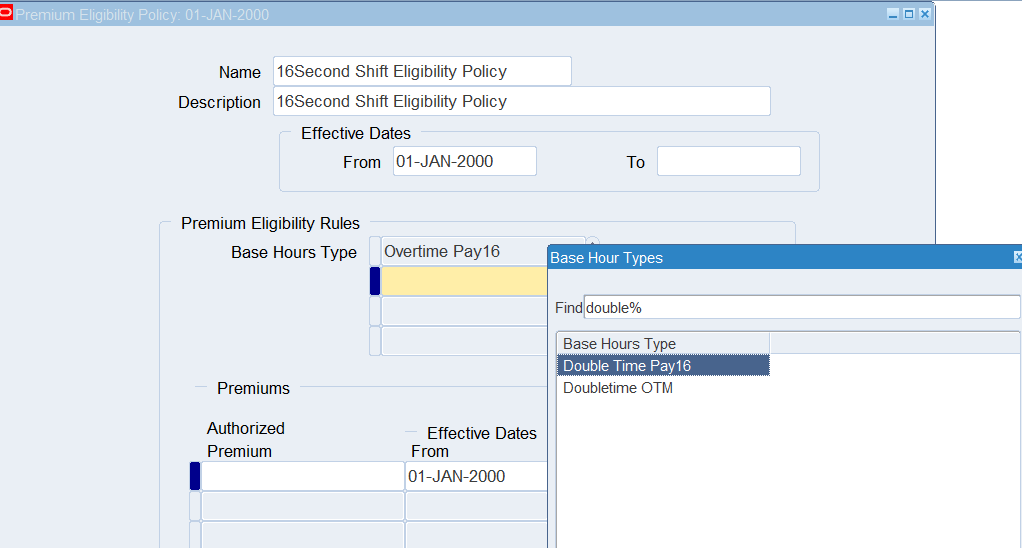
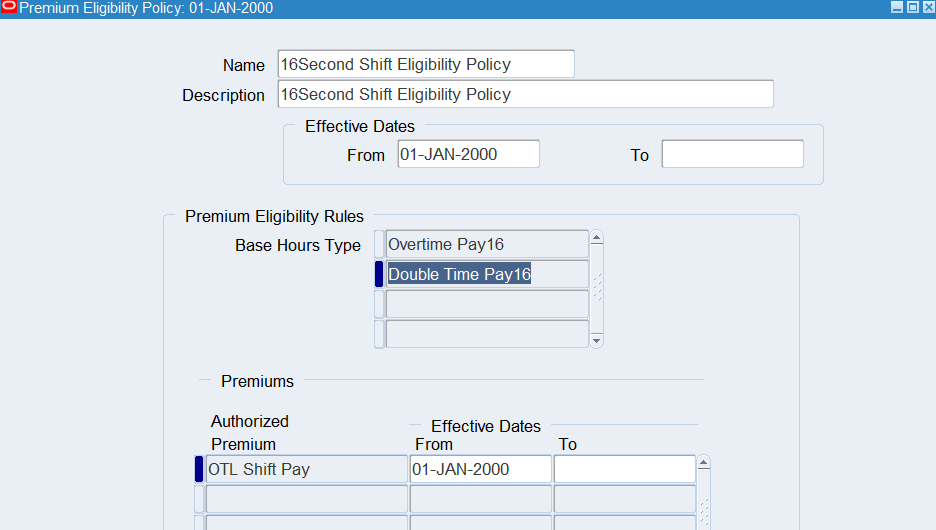
Defining Premium Eligibility Policies
Responsibility : US OTL Application Developer
Navigation : (N) OTL Time Accounting 🡪 Policies 🡪 Premium Eligibility
Date Track : 01-Jan-2000
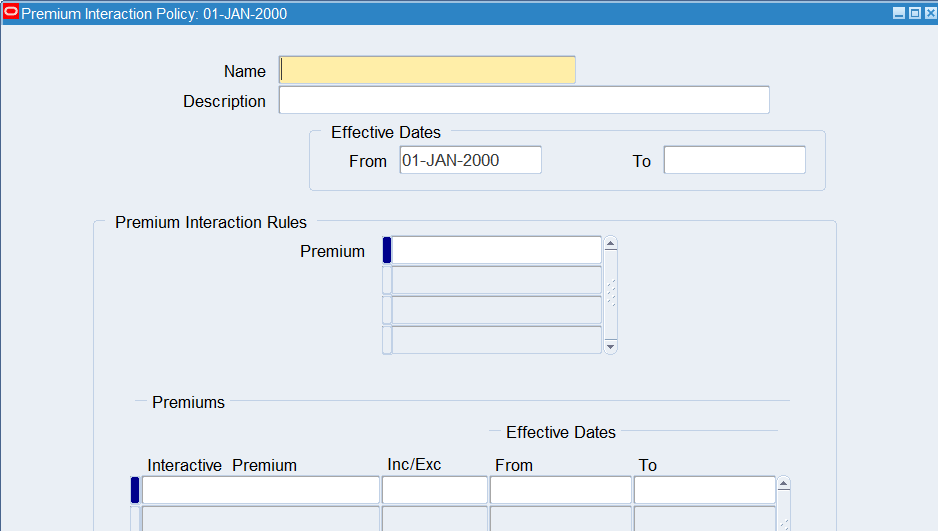
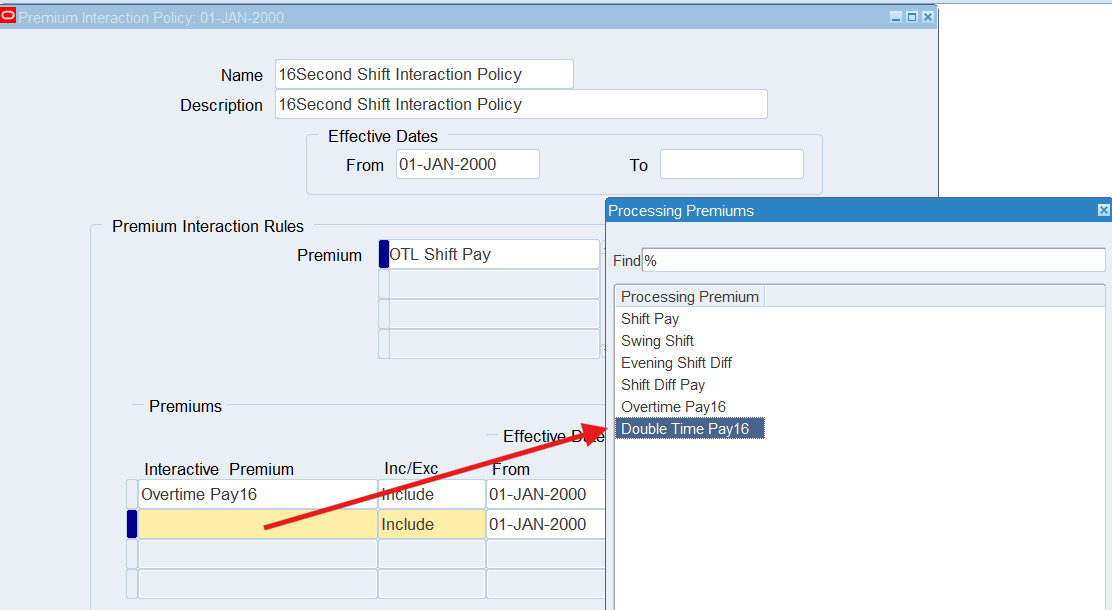
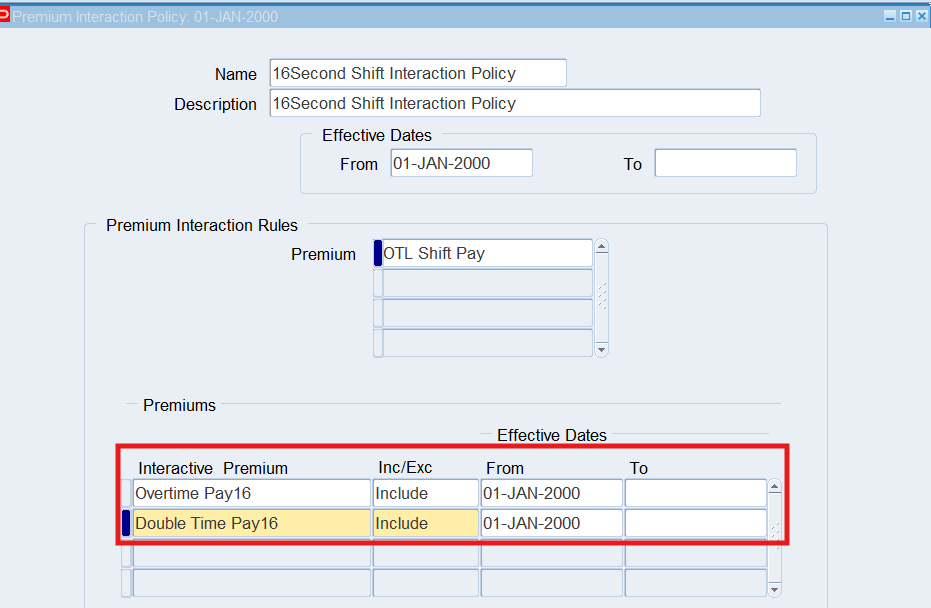
Defining Premium Interaction Policies
Responsibility : US OTL Application Developer
Navigation : (N) OTL Time Accounting 🡪 Policies 🡪 Premium Interaction
Date Track : 01-Jan-2000
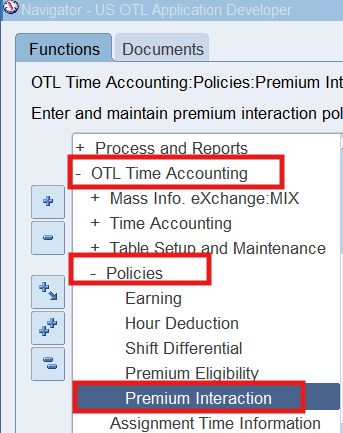
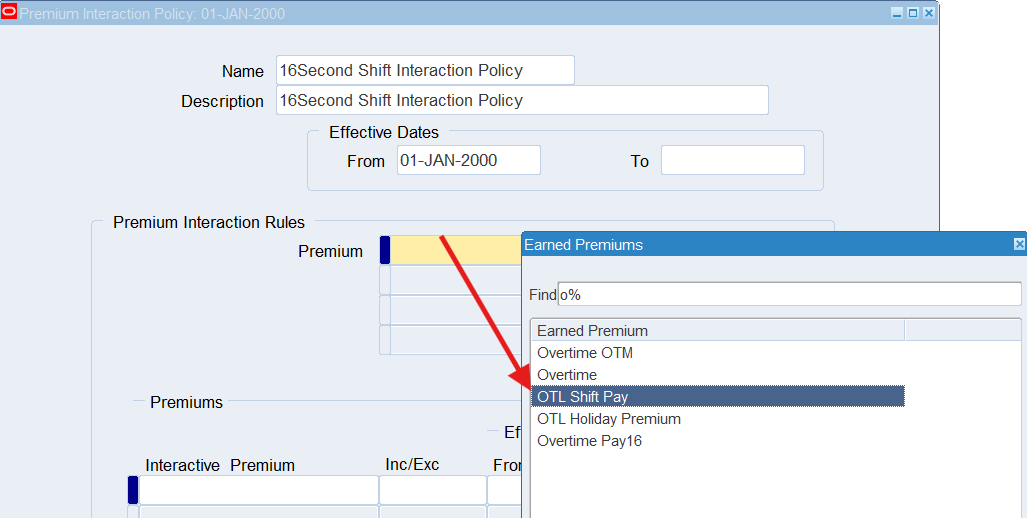
| Interactive Premium | Include / Exclude |
| Overtime Pay16 | Include |
| Double Time Pay16 | Include |
Practice 13: Defining Earning Policies
Earning Policies consolidate many previously defined structures and policies go generate the various pay rules enforced for an assignment. Earning Policies must be defined for each of the different pay policies within the organization.
Business Scenario
Retail employees are eligible to receive overtime pay and premium while corporate and warehouse employees are not. We will need to create an earning policy for the retail employees to generate the overtime pay for hours worked in excess of 8 hours a day. Also, need to create an earning policy for corporate employees to receive Holiday Pay.
Solution
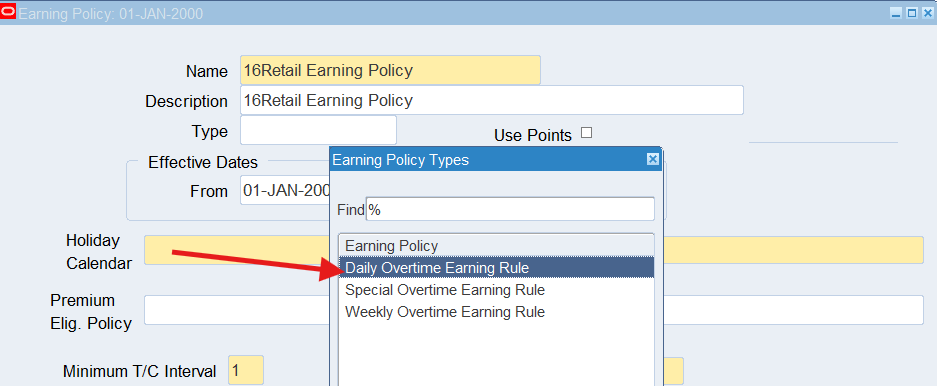
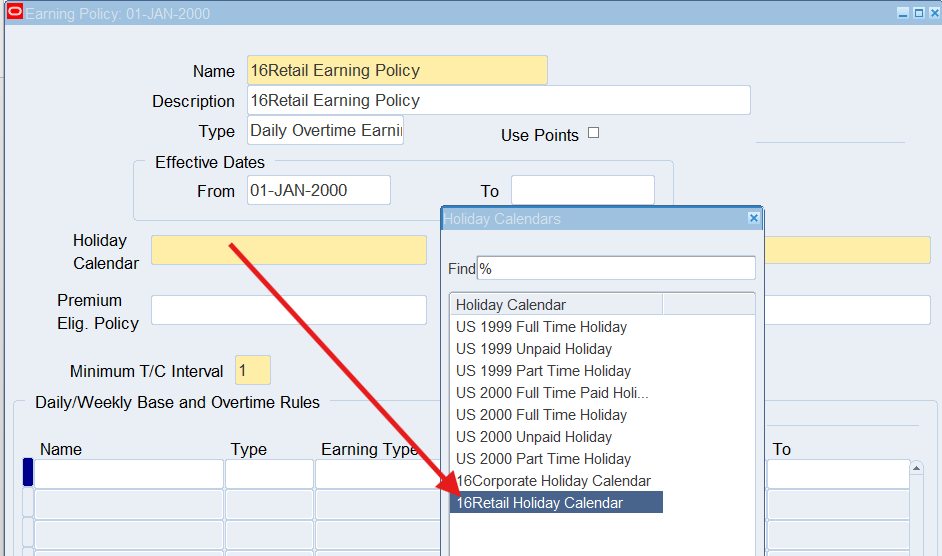
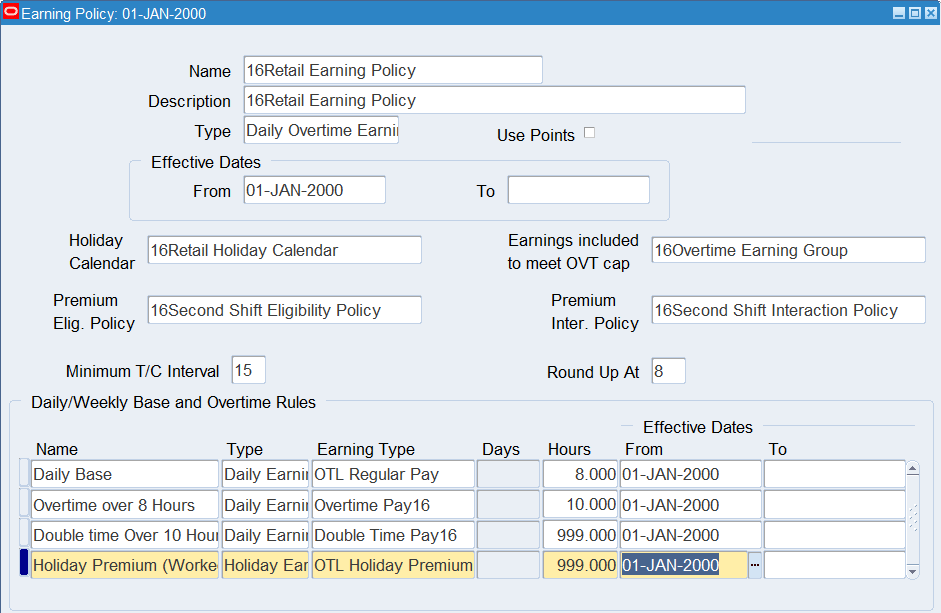
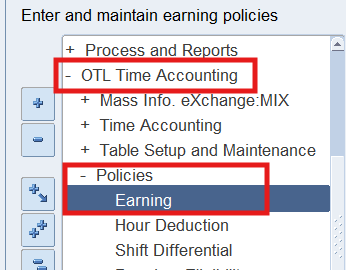
Defining an Earning Policy for Retail Employees
Responsibility : US OTL Application Developer
Navigation : (N) OTL Time Accounting 🡪 Policies 🡪 Earning
Date Track : 01-Jan-2000
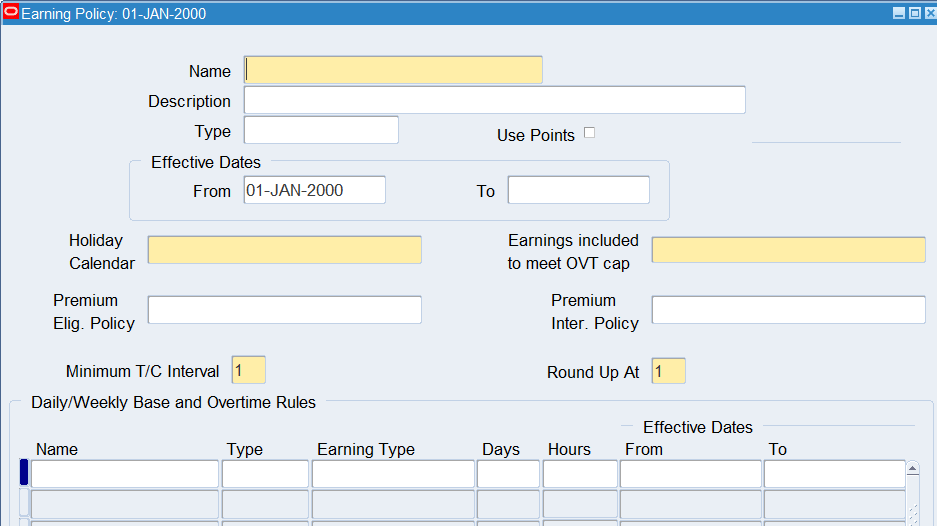
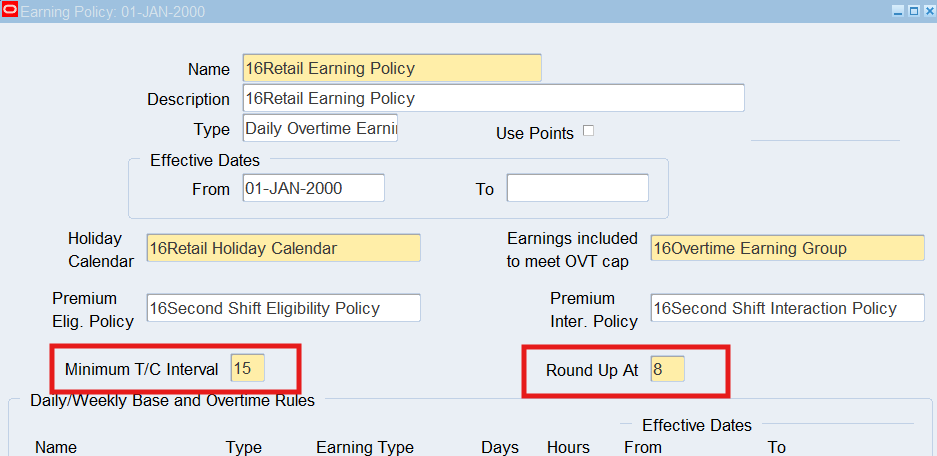
Minimum T/C Interval: This field represents the interval (in minutes) that time entry hours will be rounded up or down.
Round Up At: This field represents the minute at which the time would be rounded to the nearest interval entered in the previous step.
| Name | Type | Earning Type | Hours |
| Daily Base | Daily Earning Rule | OTL Regular Pay | 8 |
| Overtime over 8 Hours | Daily Earning Rule | Overtime Pay16 | 10 |
| Double time Over 10 Hours | Daily Earning Rule | Double Time Pay16 | 999 |
| Holiday Premium (Worked) | Holiday Earning Rule | OTL Holiday Premium | 999 |
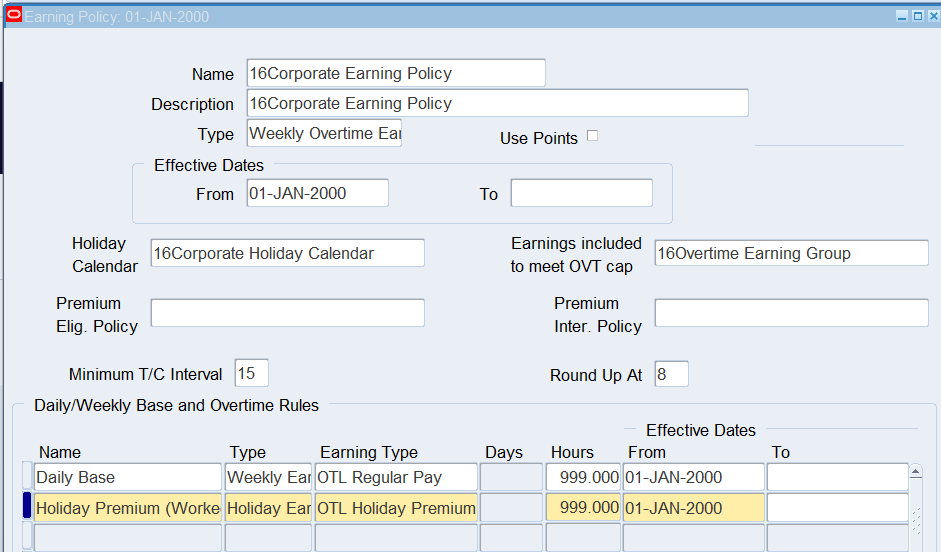
Defining an Earning Policy for Corporate Employees
Responsibility : US OTL Application Developer
Navigation : (N) OTL Time Accounting 🡪 Policies 🡪 Earning
Date Track : 01-Jan-2000
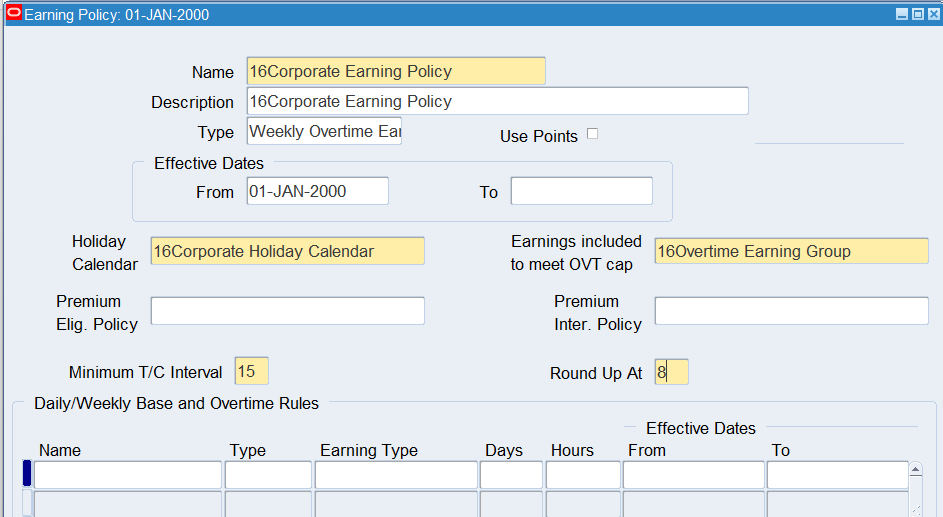
Minimum T/C Interval: This field represents the interval (in minutes) that time entry hours will be rounded up or down.
Round Up At: This field represents the minute at which the time would be rounded to the nearest interval entered in the previous step.
| Name | Type | Earning Type | Hours |
| Daily Base | Weekly Earning Rule | OTL Regular Pay | 999 |
| Holiday Premium (Worked) | Holiday Earning Rule | OTL Holiday Premium | 999 |
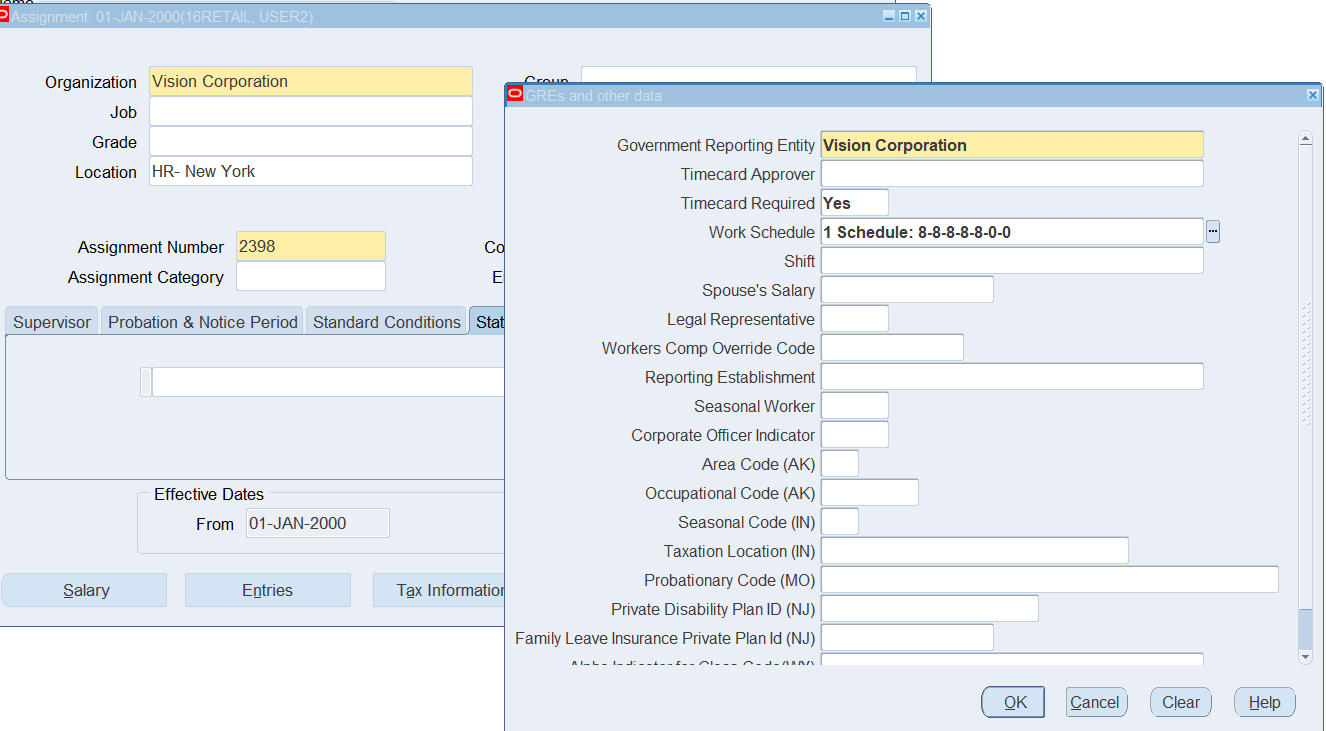
Practice 14: Assigning Structures and Policies to an Employee
Assign structures and policies to workers and view the assignment information in the Employee Assignment Information Folder.
Business Scenario
Associate the rules to the retail and corporate employees. Both groups of employees will need to have auto generation flag set to YES.
Corporate employees will have the ability to enter timesheet using self-service timecard page and enter exceptions if needed from the Time Accounting Timecard window.
Retail employees will have their timecard automatically generated using the OTL Time & Labor Rules defined. Time Entries can be reviewed directly from the Time Accounting Timecard window and enter exceptions as necessary.
Solution
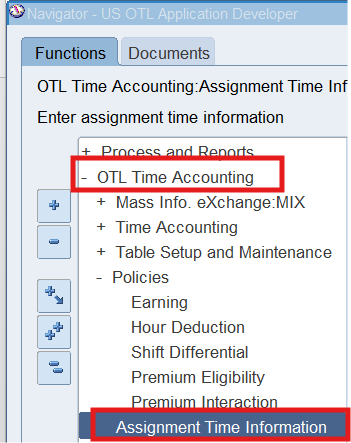
Responsibility : US OTL Application Developer
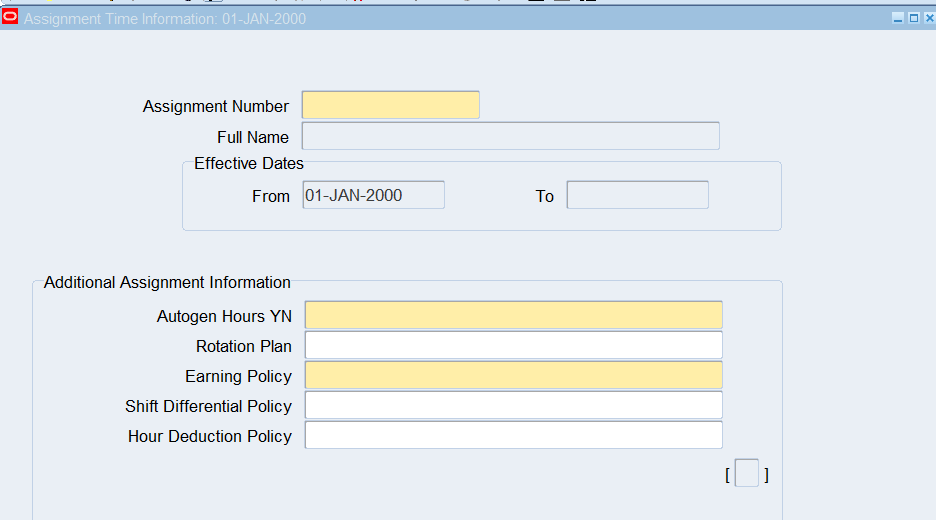
Navigation : (N) OTL Time Accounting 🡪 Assignment Time Information
Date Track : 01-Jan-2000
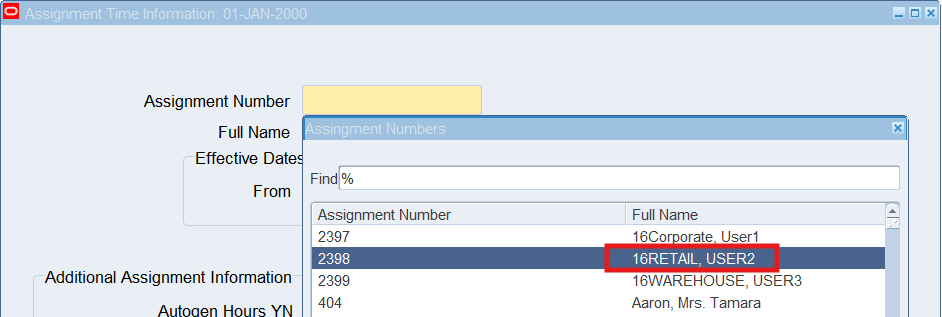
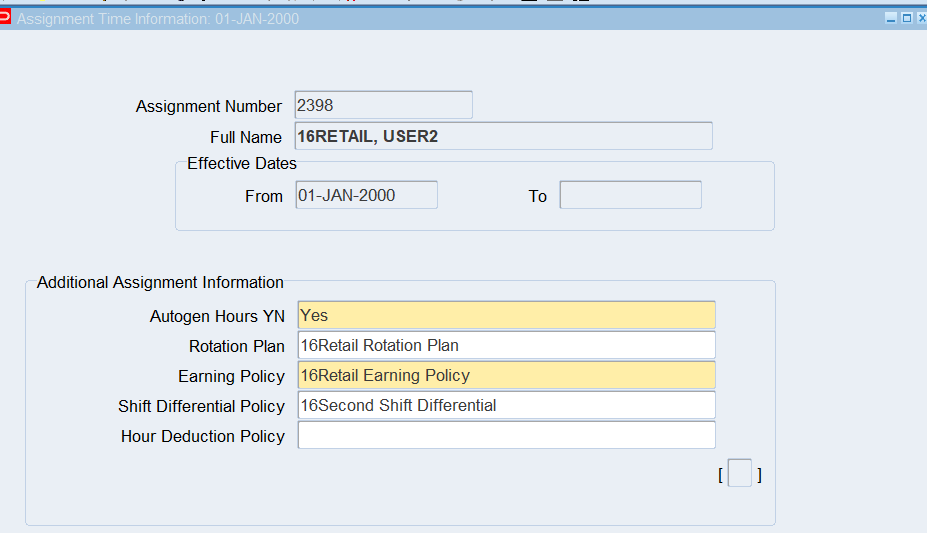
Assignment Number : 16Retail Employee
Autogen Hours (YN) : “Y” 🡪 If select “No” user will manually enter time and labor data.
Rotation Plan : 16Retail Rotation Plan
Earning Policy : 16Retail Earning Policy
Shift Differential Policy : 16Second Shift Differential
Select Assignment Number for Retail Employee
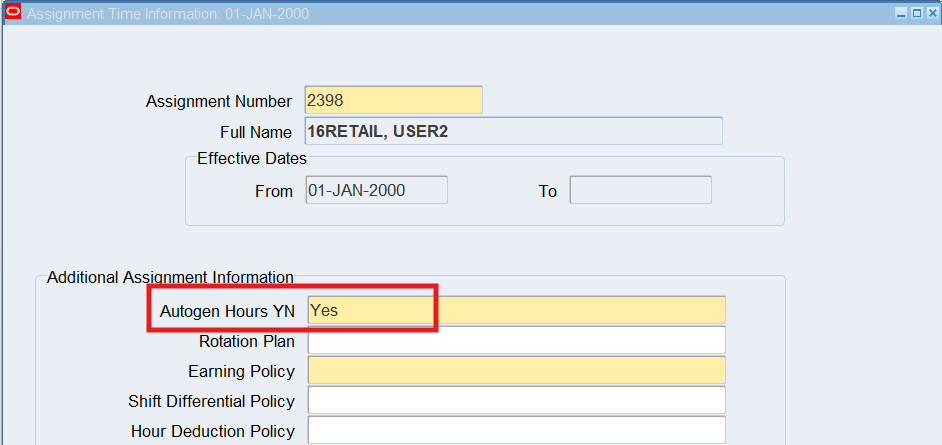
Note: If you select No, you will manually enter time and labor data.
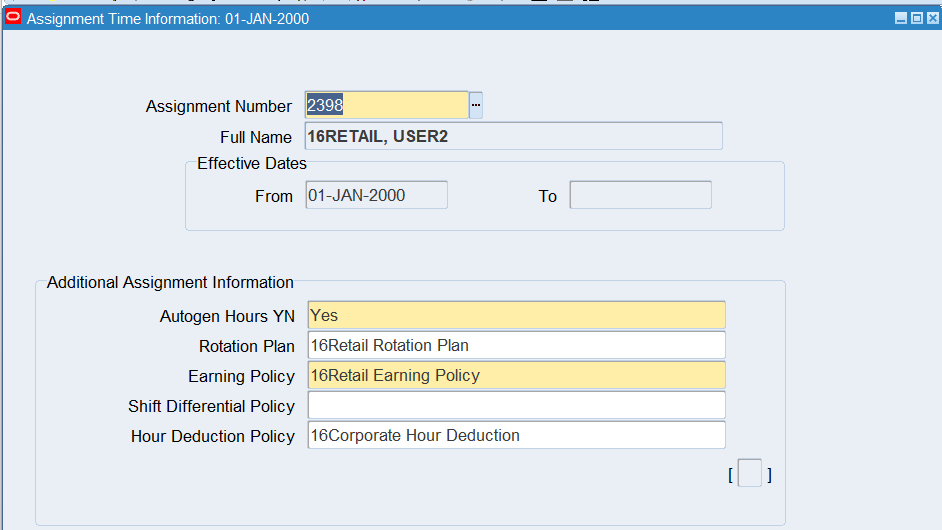
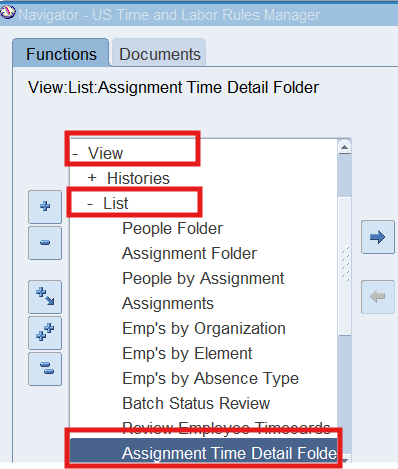
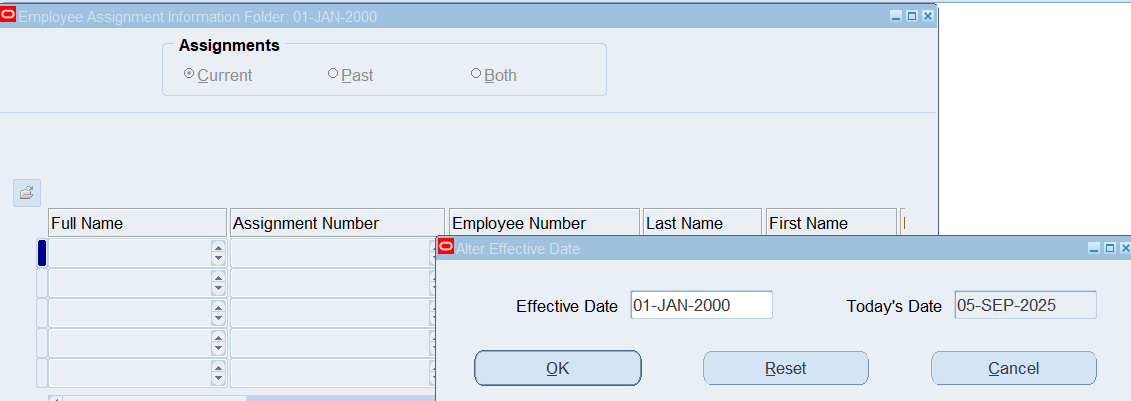
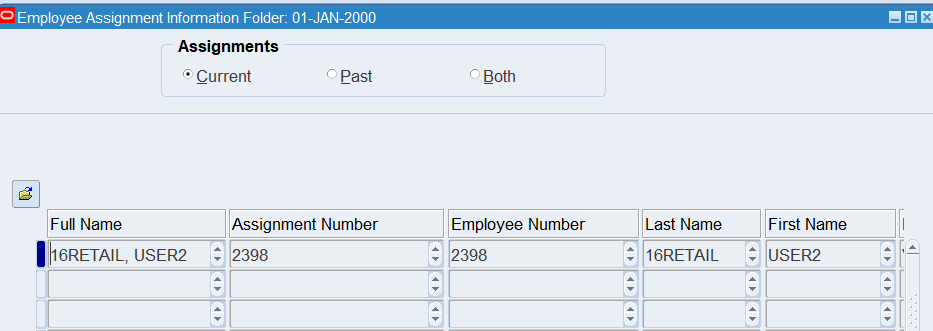
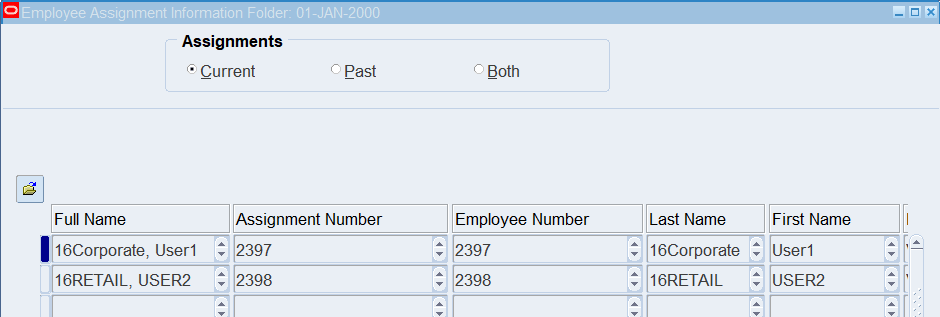
Viewing Employee Assignment Information Folder
Responsibility : US Time and Labor Rules Manager
Navigation : (N) View 🡪 List 🡪 Assignment Time Detail Folder
Date Track : 01-Jan-2000
Practice 15: Automatic Timecard Generation
Business Scenario
Auto Timecard Generation for the Corporate and Retail employees at the beginning of the pay period.
Solution
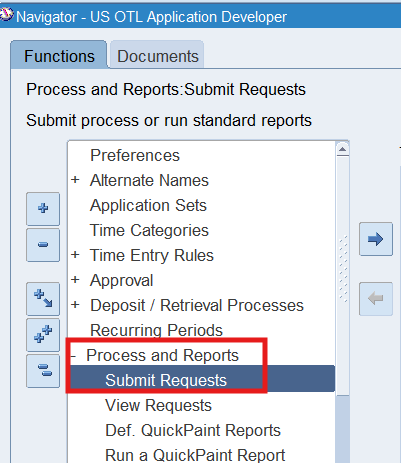
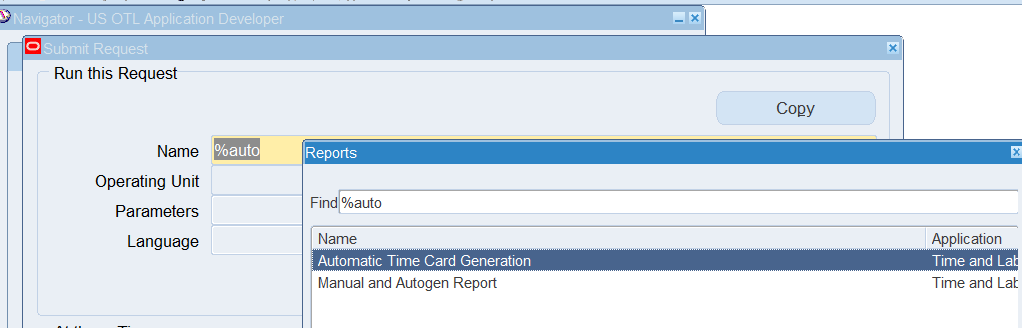
Responsibility : US OTL Application Developer
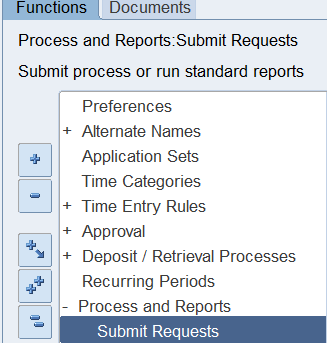
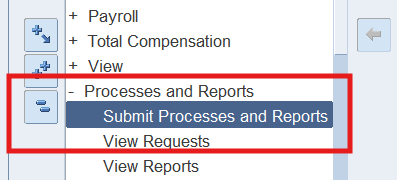
Navigation : Process and Reports 🡪 Submit Requests
Select single Request 🡪 Automatic Time Card Generation

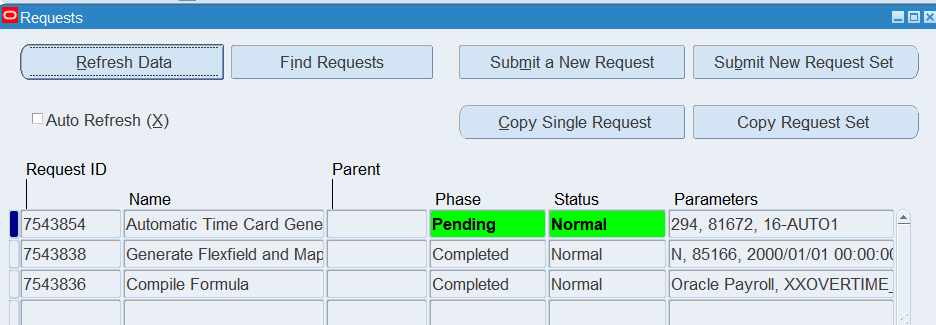
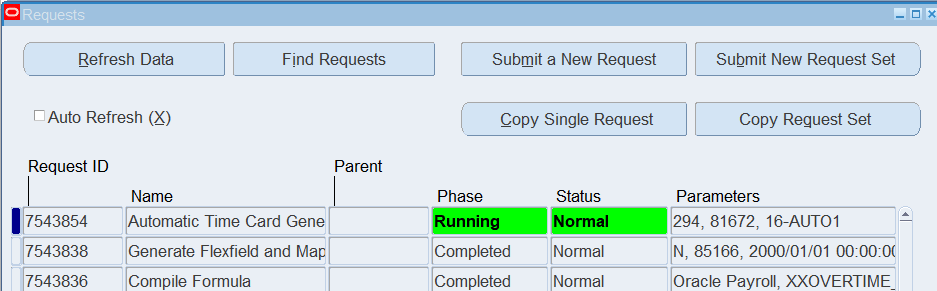
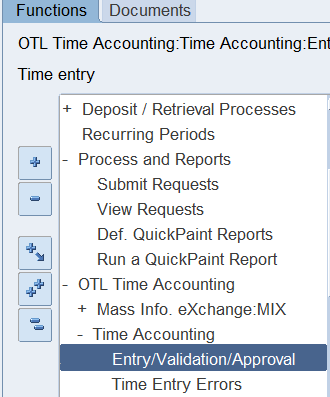
Viewing Auto generated Timecards
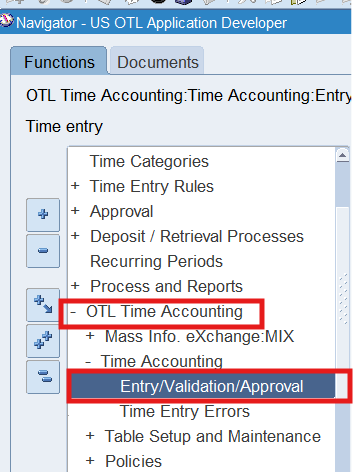
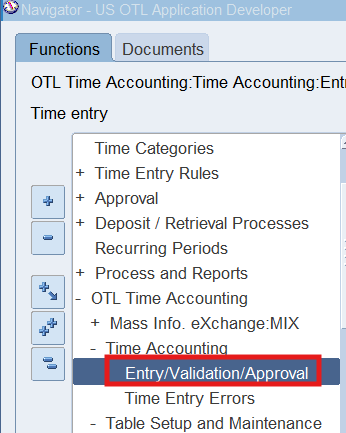
Responsibility : US OTL Application Developer
Navigation : (N) OTL Time Accounting 🡪 Time Accounting 🡪 Entry/Validation/Approval
Date Track : Date of Auto Generation
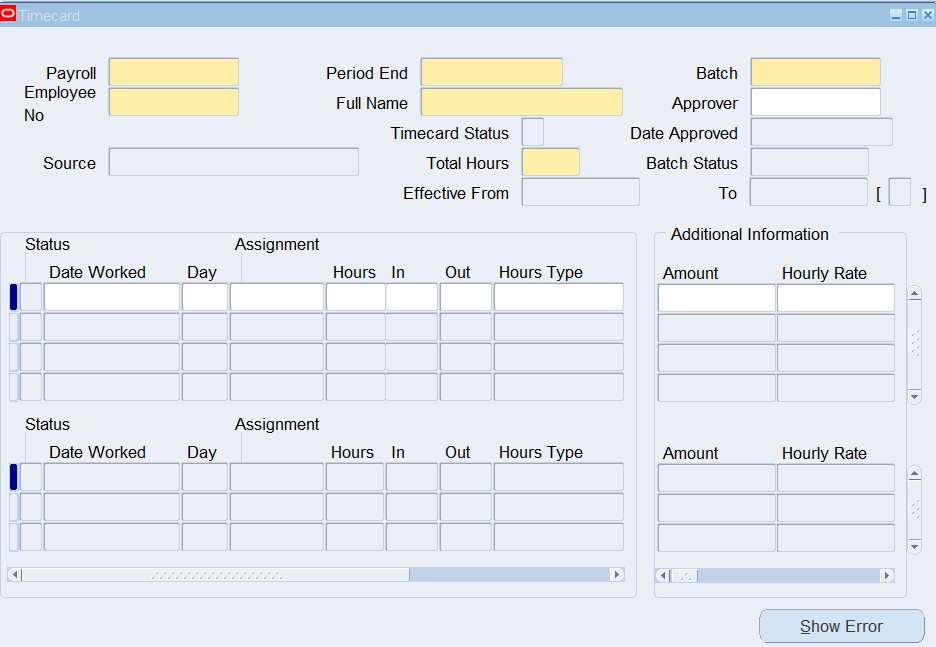
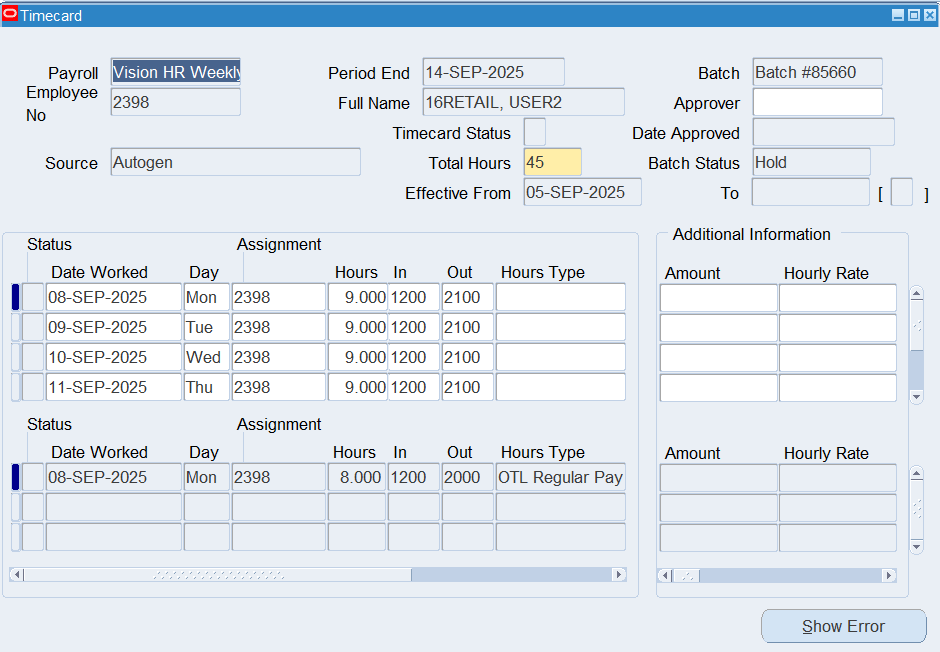
Note: Notice that the timecard source field will reflect “Autogen”.
Batch status should reflect “Hold” or “Error” if errors exist.
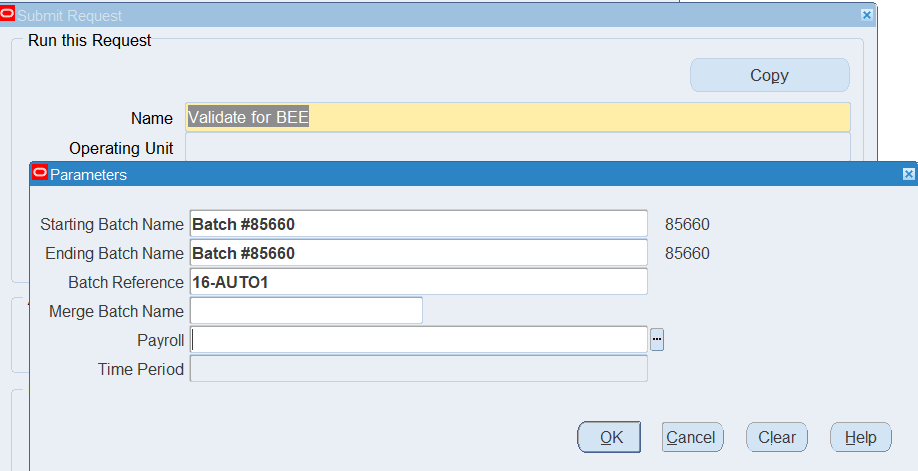
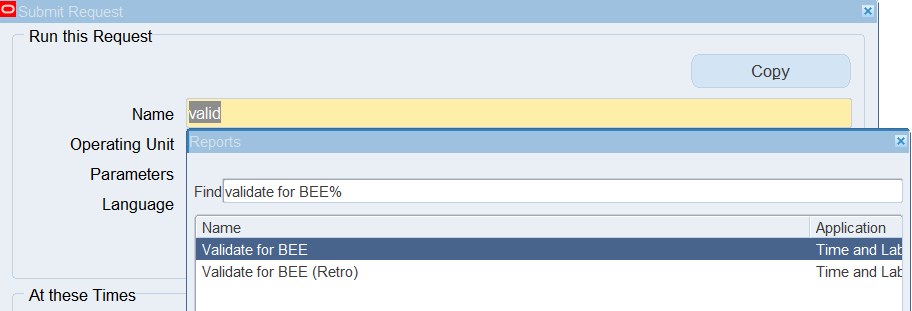
Validate for BEE
Responsibility : US OTL Application Developer
Navigation : (N) Processes and Reports 🡪 Submit Requests
Select 🡪 Validate for BEE
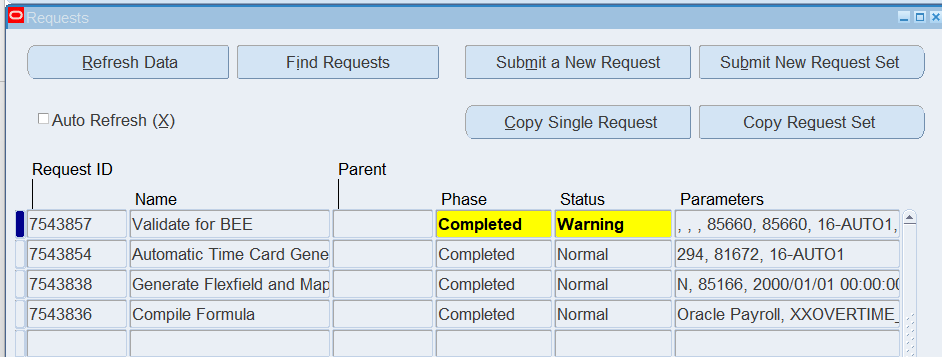
Verify the Results
Responsibility : US OTL Application Developer
Navigation : (N) OTL Time Accounting 🡪 Time Accounting 🡪 Entry/Validation/Approval
Date Track : Current Date
Batch Status: Validated with Warnings
Note: Notice that the Batch status should reflect “Validate With Warning” due to missing Timecard Approver in the Timecard window.
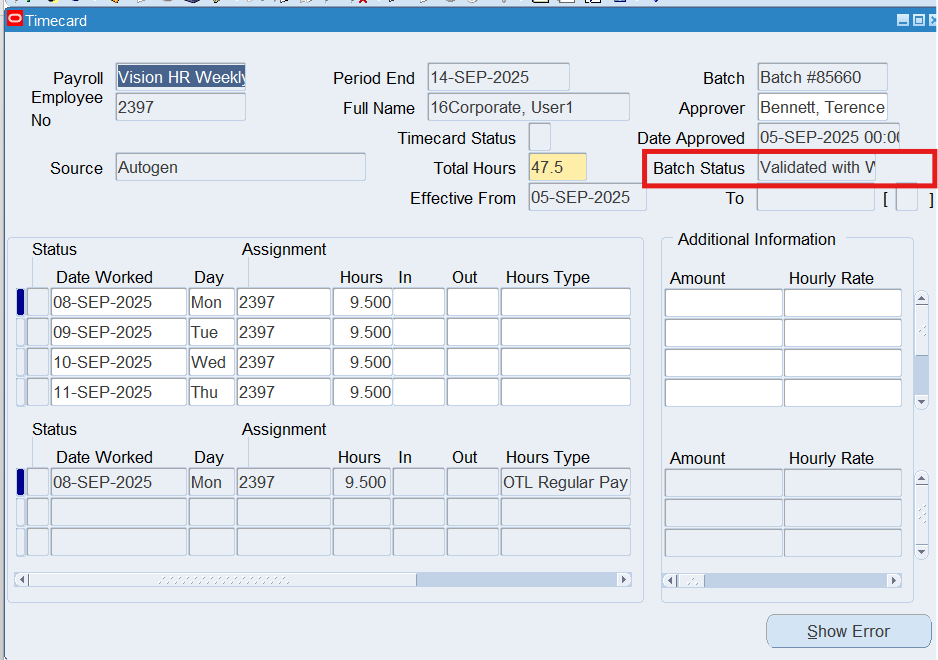
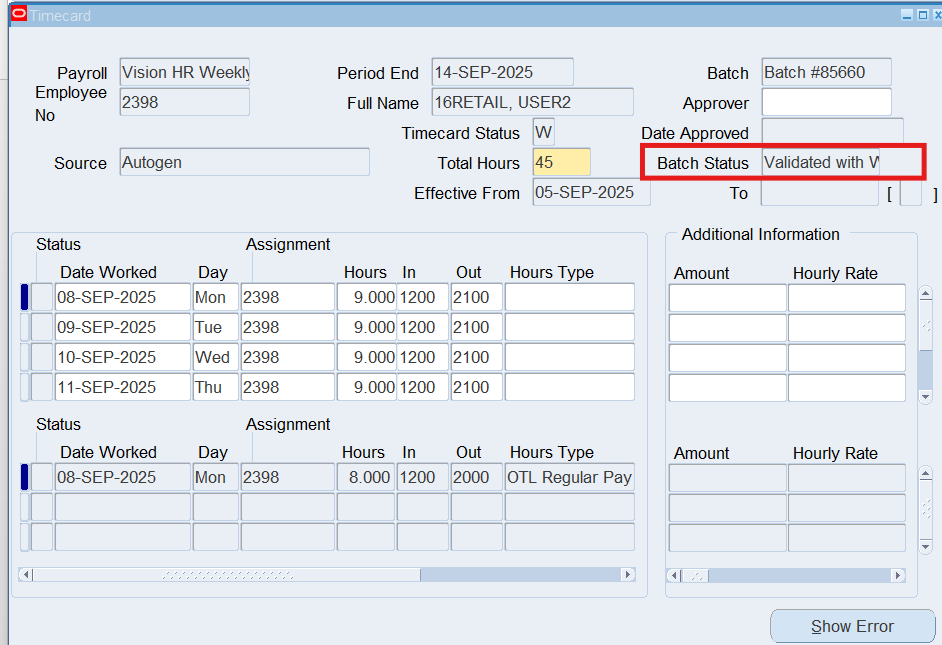
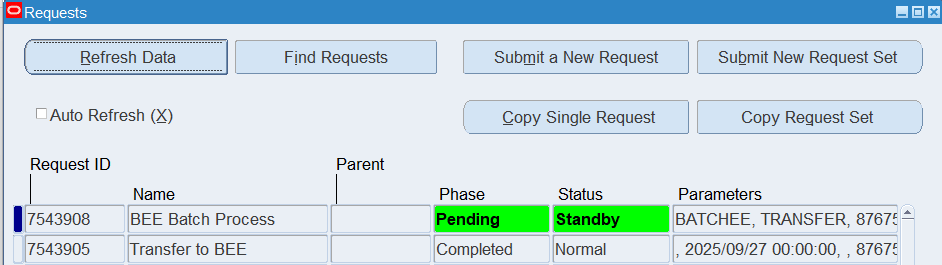
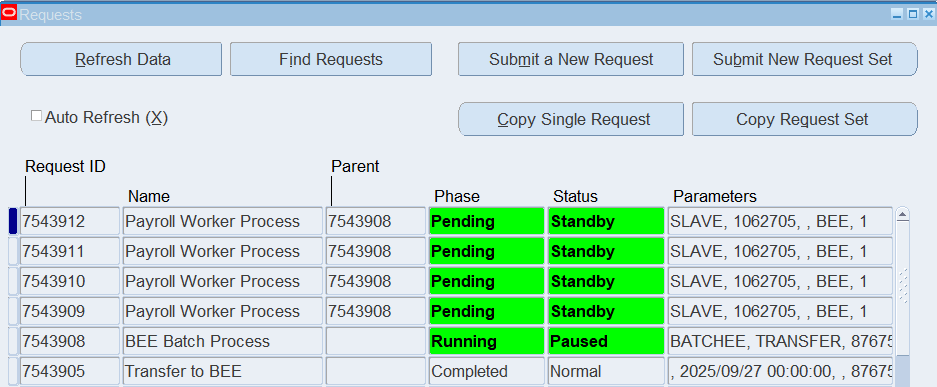
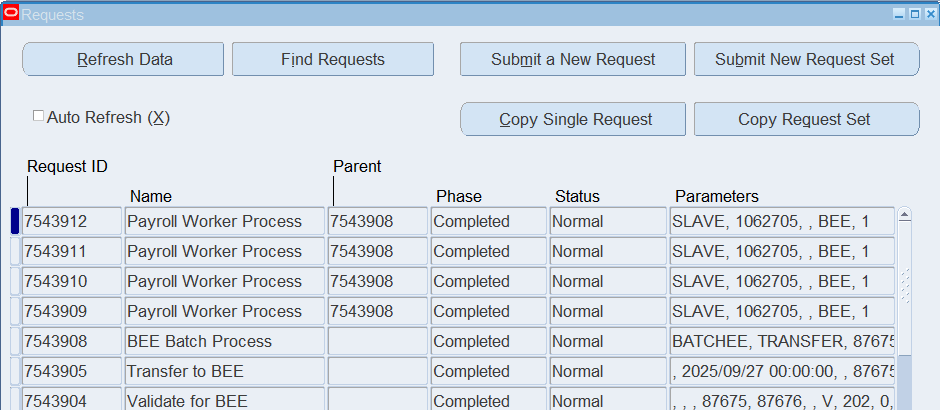
Transfer to BEE
(N) Process and Reports 🡪 Submit Requests
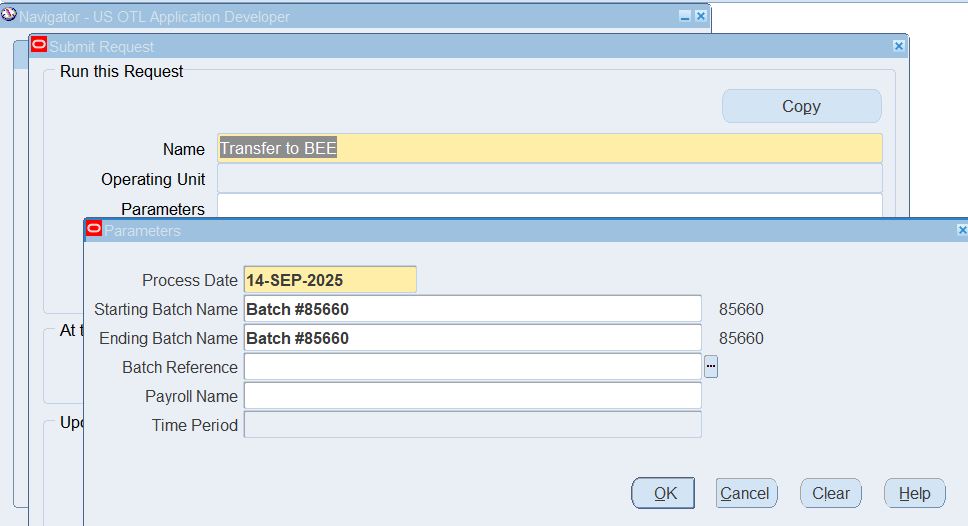
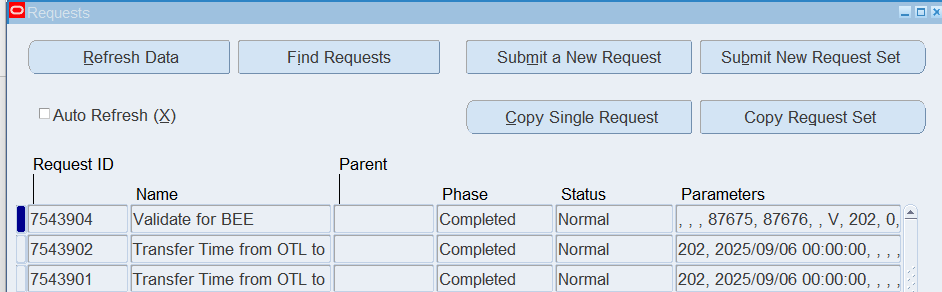
View Results
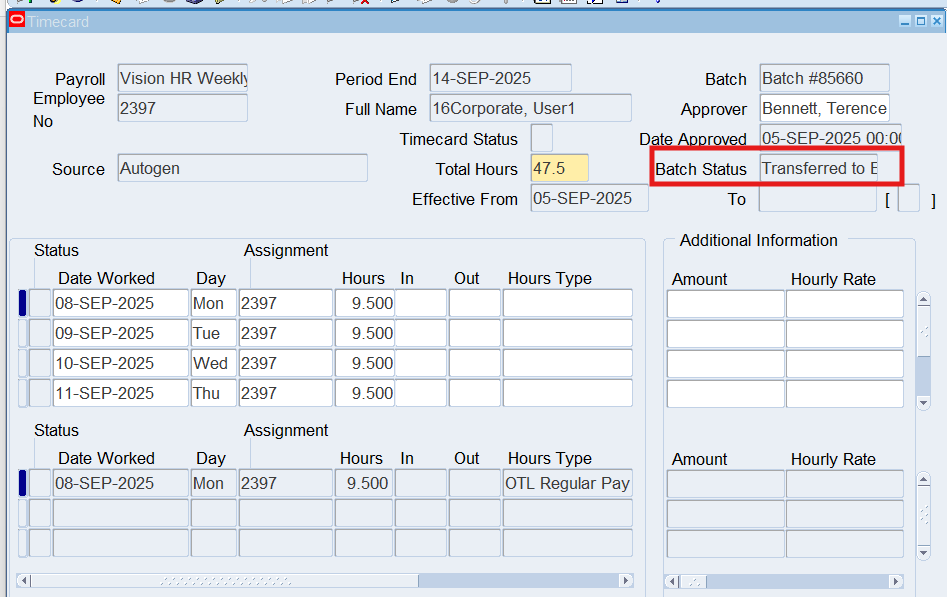
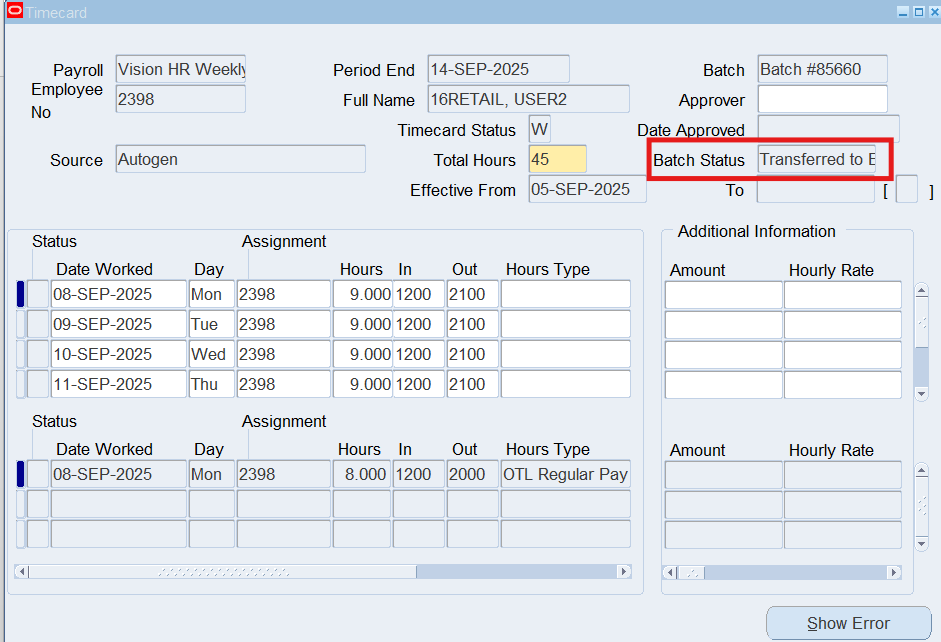
Note: Notice that the Batch status should reflect “Transferred to BEE”.
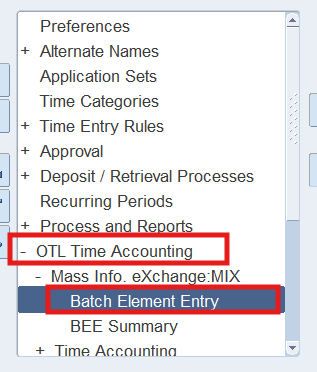
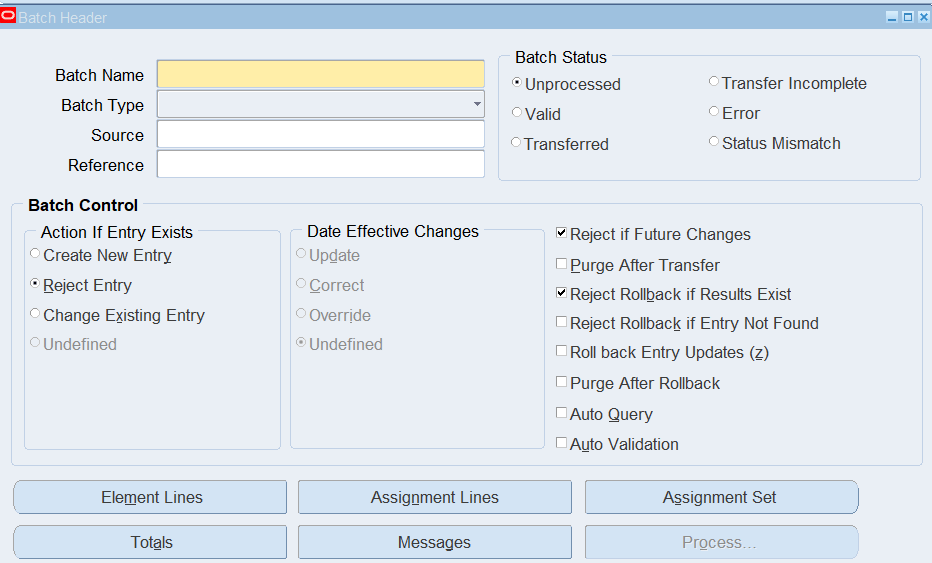
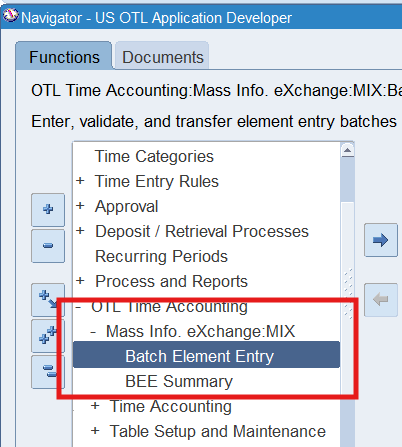
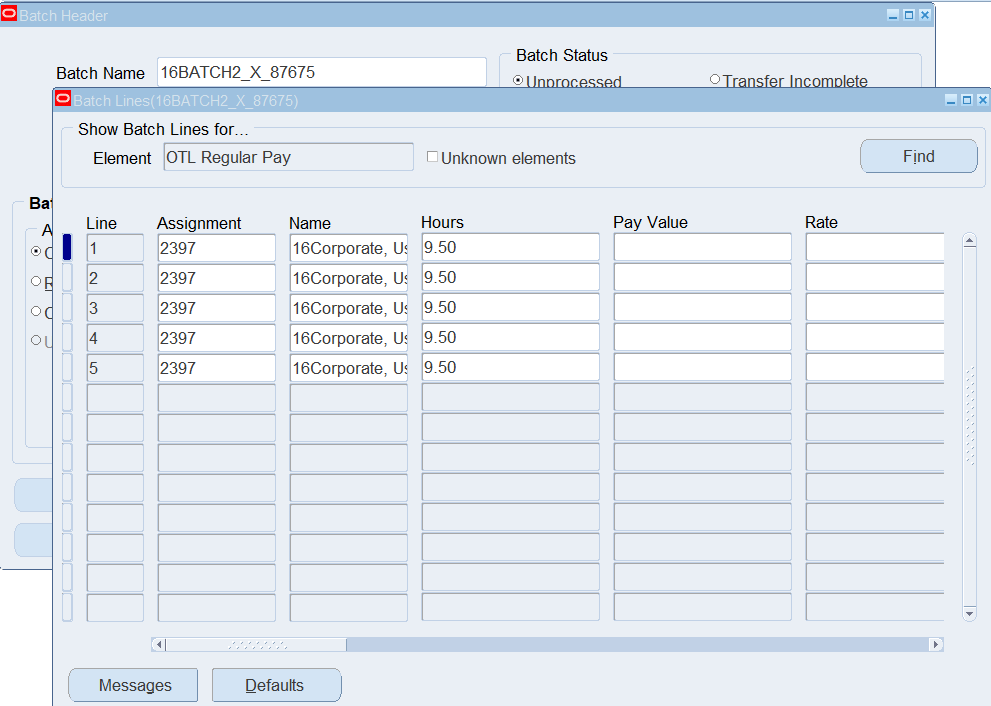
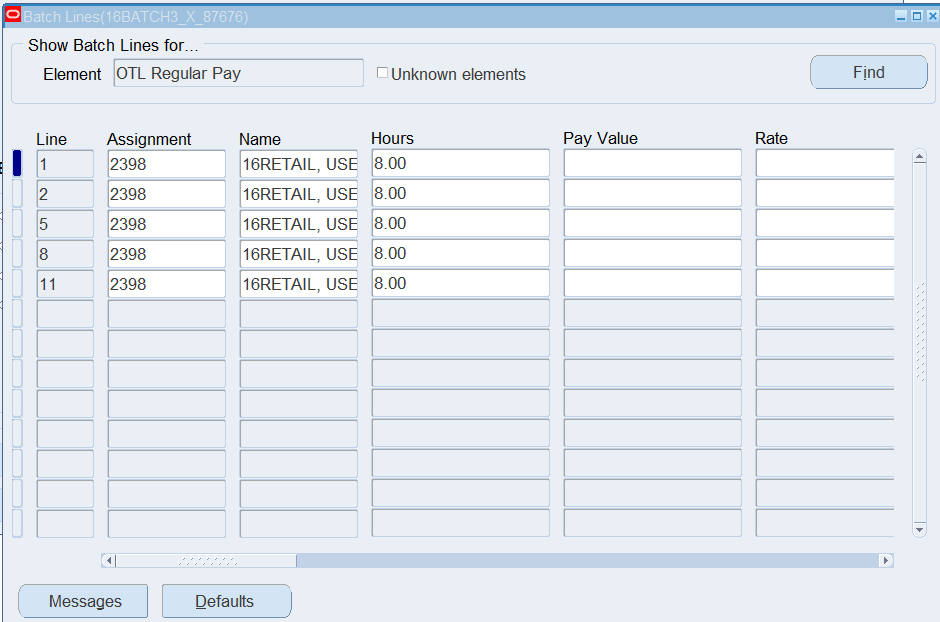
Transferring Timecards to Element Entries
Responsibility : US Super HRMS Manager
Navigation : (N) Mass Info. eXchange:MIX 🡪 Batch Element Entry
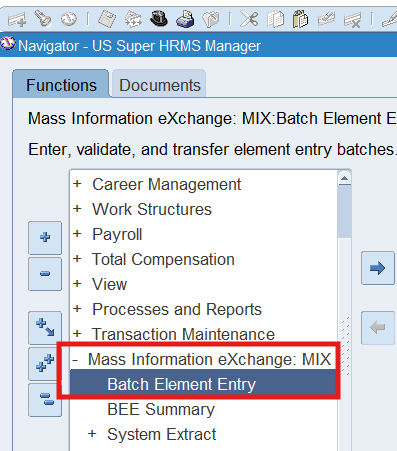
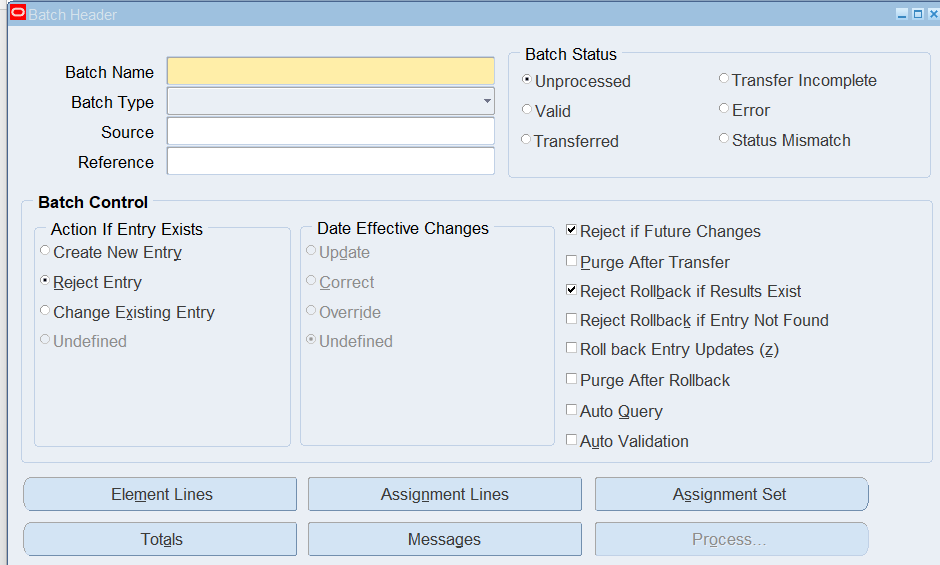
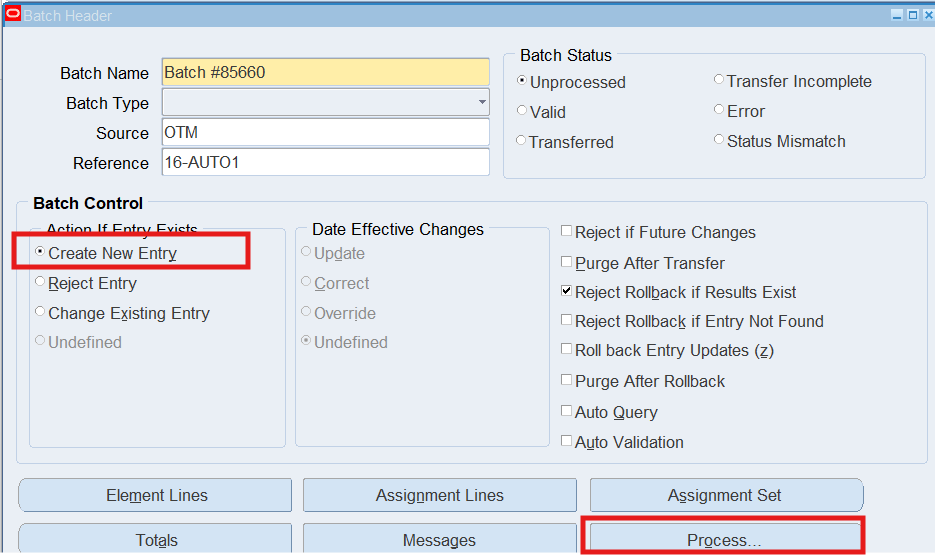
Make sure “Create New Entry” checkbox enabled and Press “Process”
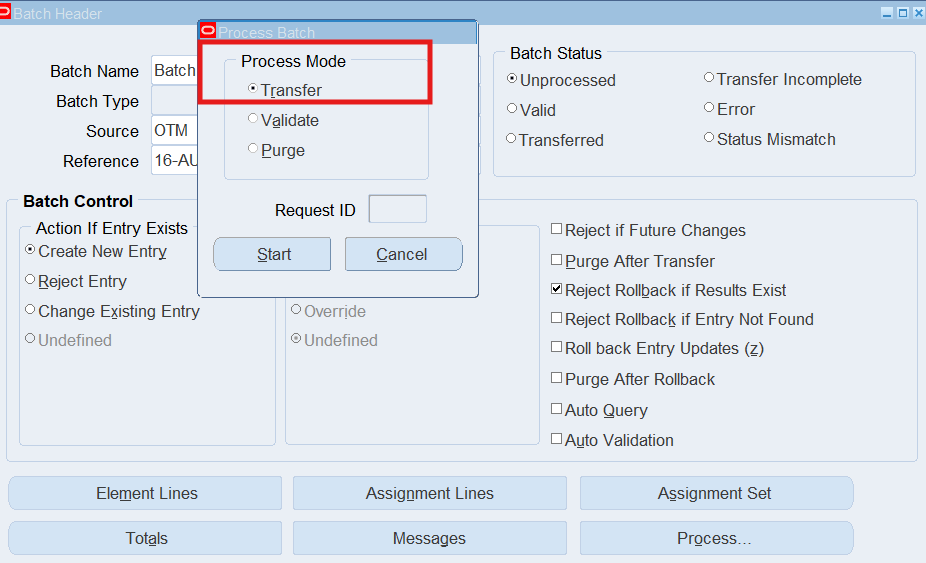
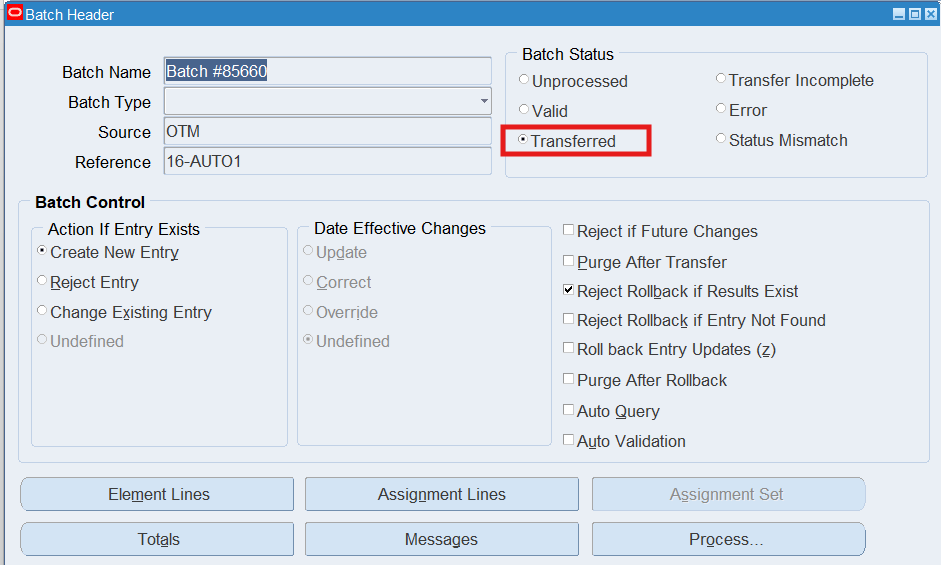
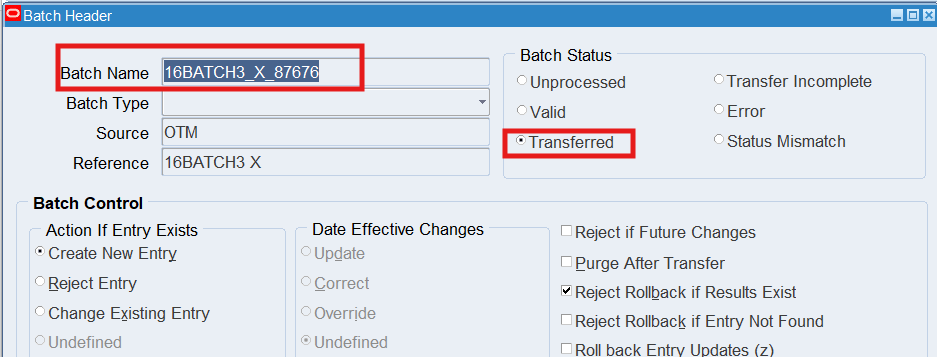
Note: The Batch Header window will repopulate indicating the Batch Status as “Transferred”
Review Transferred timecards in Element Entries
Responsibility : US Super HRMS Manager
Navigation : (N) People 🡪 Enter and Maintain
Date Track : Pay period end date
Practice 16: Entering Timecard using Self Service
Enter timecards and run the processes to transfer timecards to BEE and Projects, and run the Error Retrieval Handling Report.
Business Scenario
One timesheet entry for warehouse employee and one for retail employee, and one for corporate employee. In order to achieve this, we need to login using appropriate employee in order to receive the correct timecard layout.
Once the time and labor data has been entered and submitted, we will need to sign on as the Supervisor for the warehouse and retail employees and approve the timecards.
For warehouse employees, once the timecard has been approved, we will run the process to transfer from OTL to BEE, and then to Oracle Projects.
Retail and corporate employees will enter time in Self Service. In the next section, we will run the process to transfer time from OTL to BEE and the Transfer and Validate for BEE process.
Solution
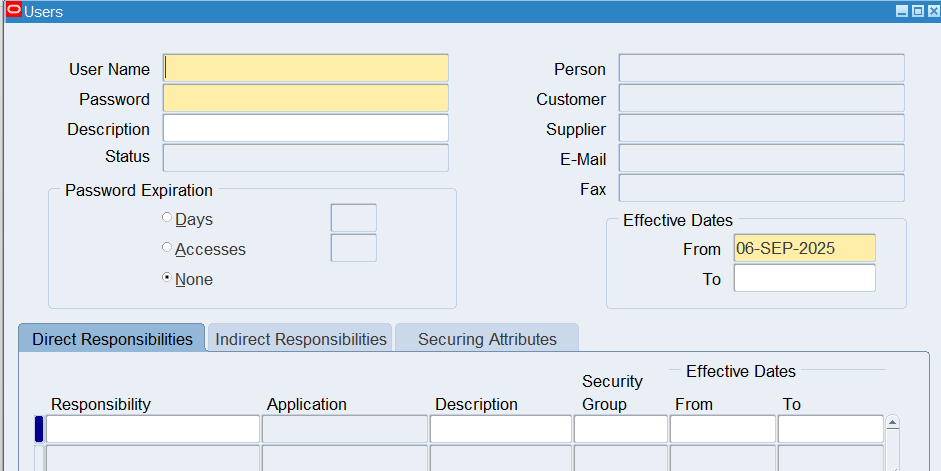
Create Application User for the Corporate Employee
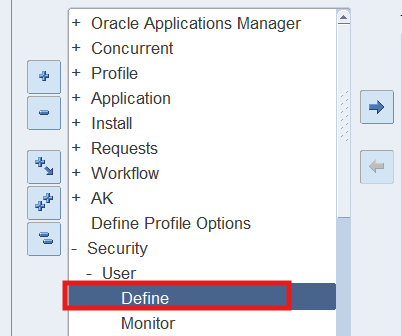
Responsibility : System Administrator
Navigation : (N) Security 🡪 User 🡪 Define
User Name : 16CORPORATE
Employees : 16Corporate
Add following Responsibilities
| OTL Self Service | US Super HRMS Manager |
| System Administrator | Projects, Vision Services (USA) |
| Manager Self-Service | Workflow User Web (New) |
| Mass Timecard Approval | US OTL Application Developer |
| US OTL Administrator | OTL Super Timekeeper |
Responsibility : System Administrator
Navigation : (N) Security 🡪 User 🡪 Define
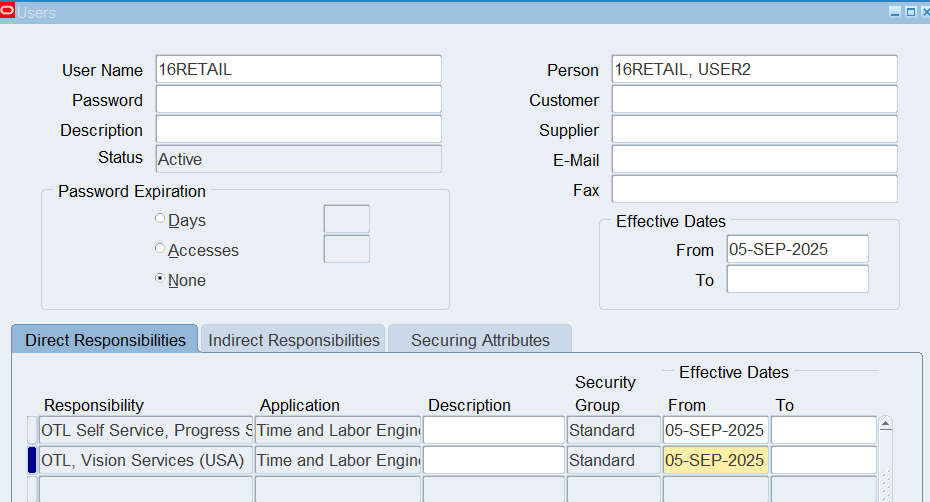
User Name : 16RETAIL
Employees : 16Retail
Assign Responsibility : OTL Self Service
Responsibility : System Administrator
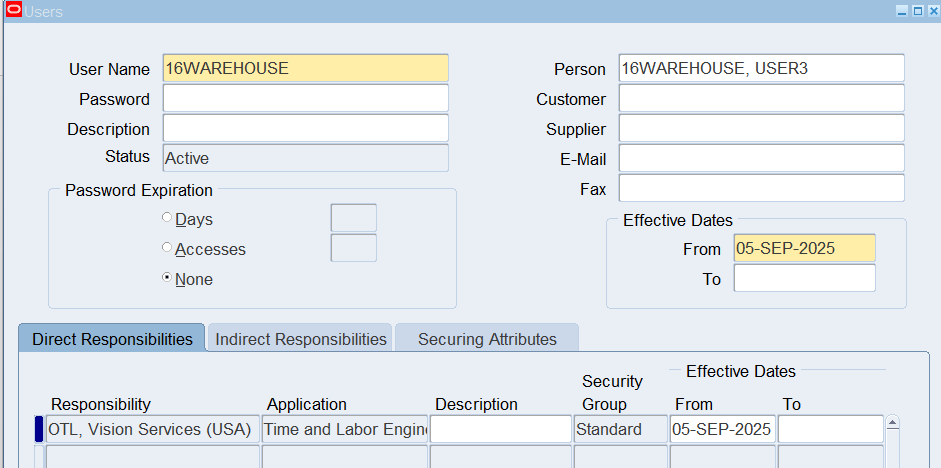
Navigation : (N) Security 🡪 User 🡪 Define
User Name : 16WAREHOUSE
Employees : 16Warehouse
Assign Responsibility : OTL, Vision Services (USA)
Note: Only need to assign “Self Service Responsibility” to warehouse and retail employees. Both, “OTL, Vision Services (USA) and OTL Service are self-service responsibilities
There is a MO: Operating Unit with value Vision Services assigned to “OTL, Vision Services (USA)” responsibility for projects purpose.

Test application user sign-on
User : 16CORPORATE

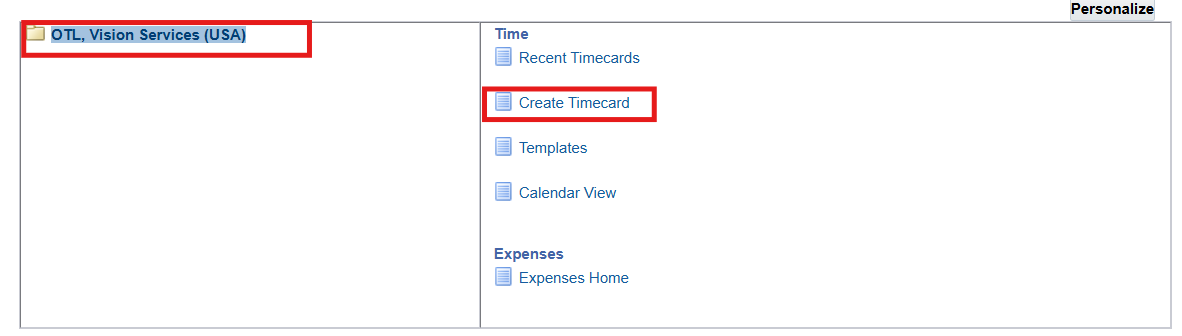
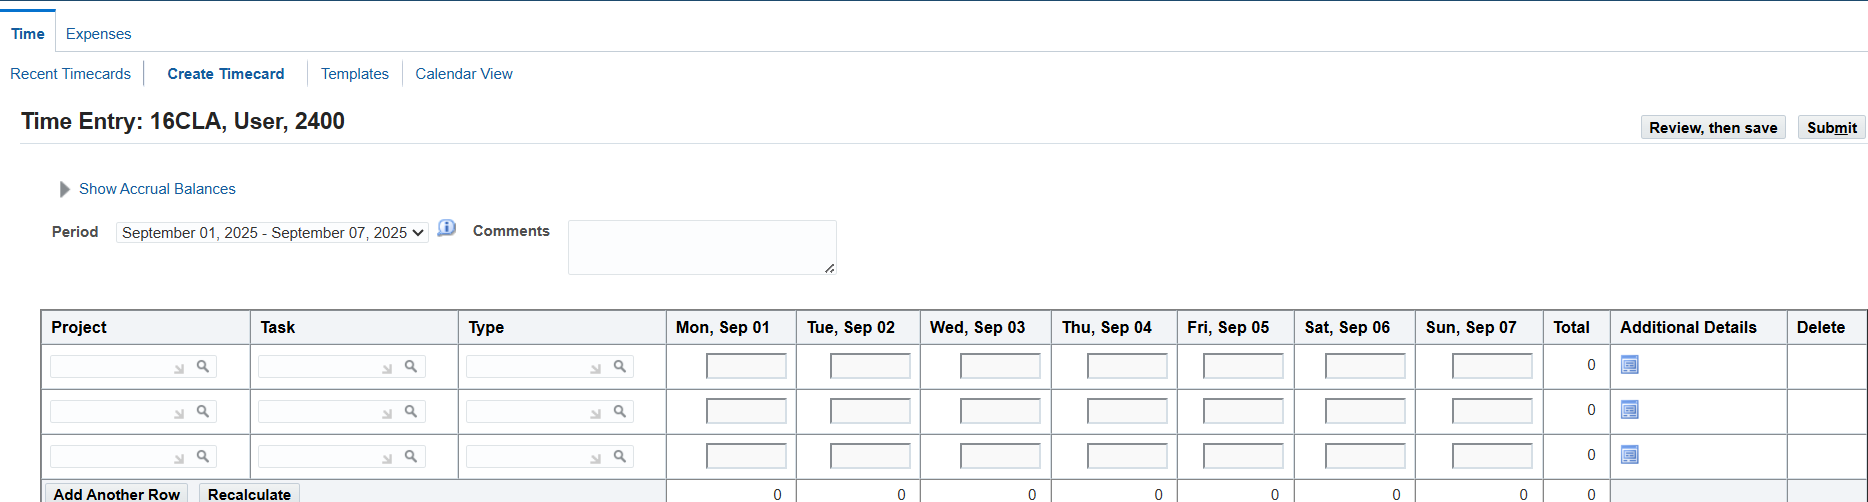
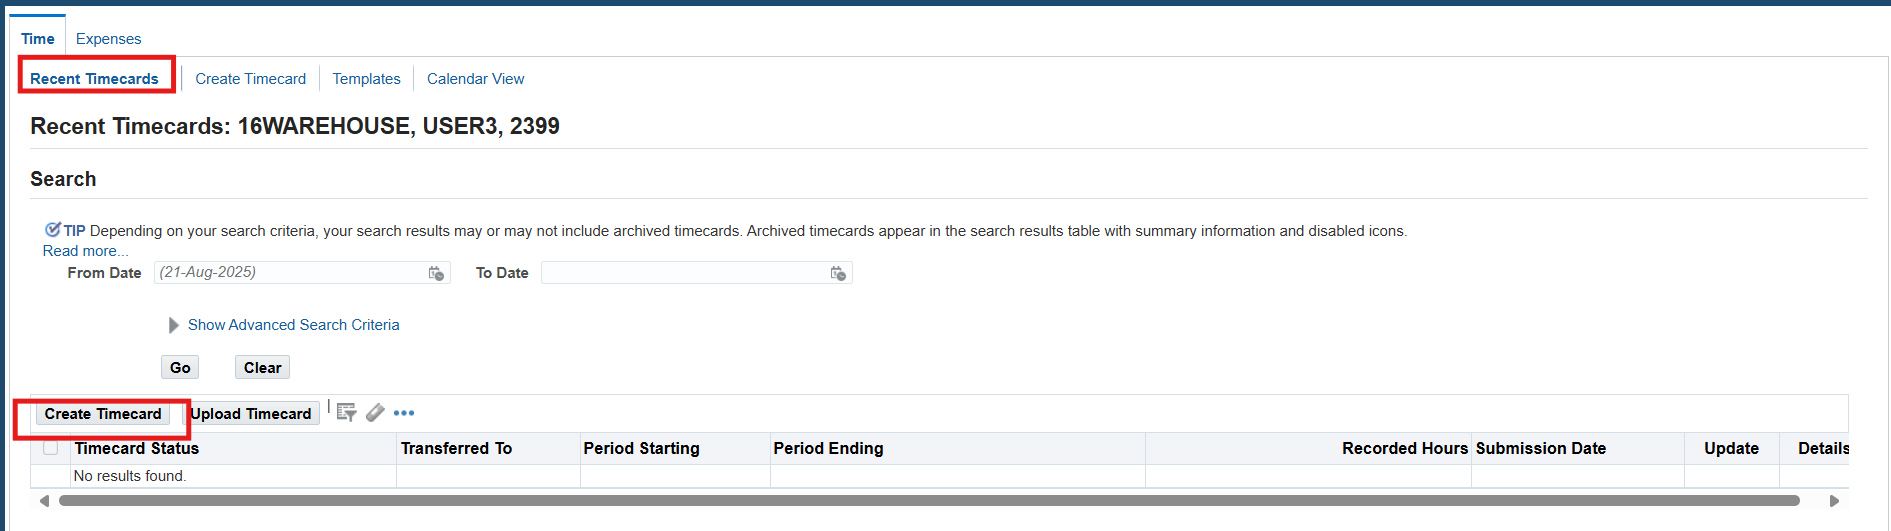
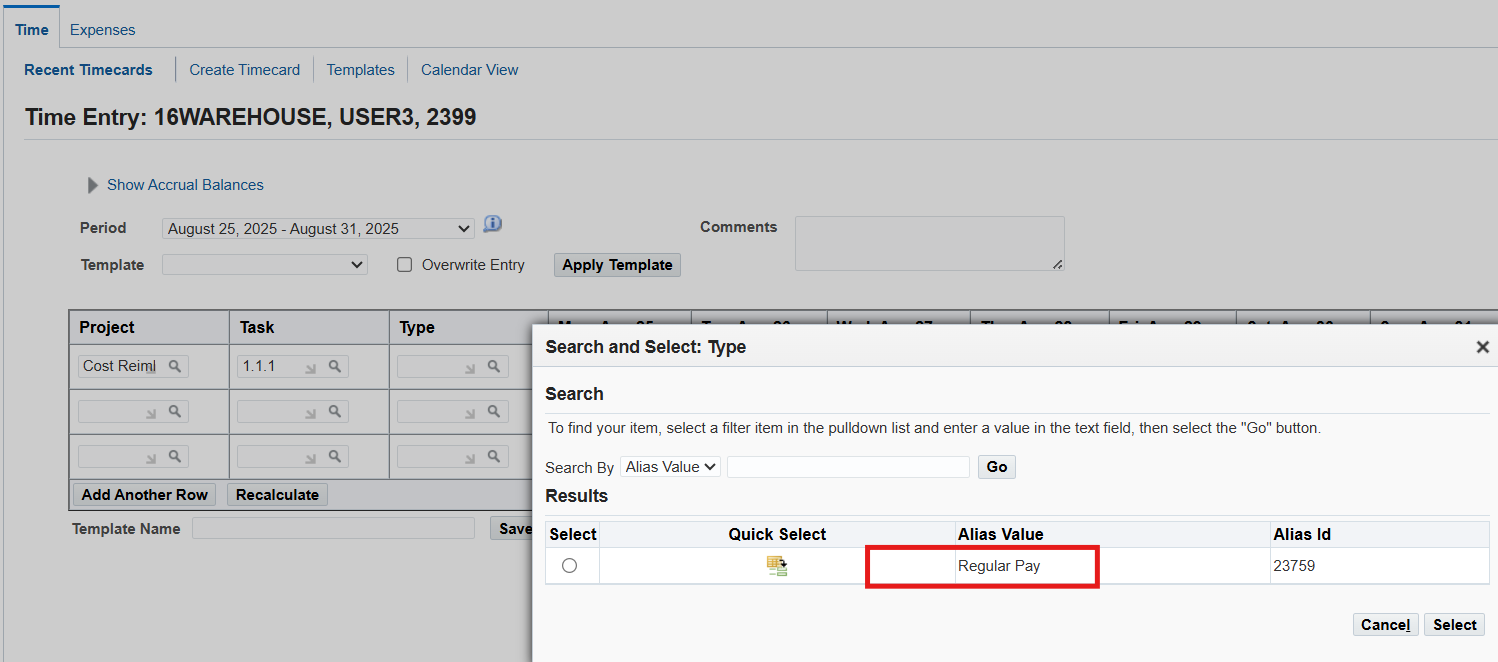
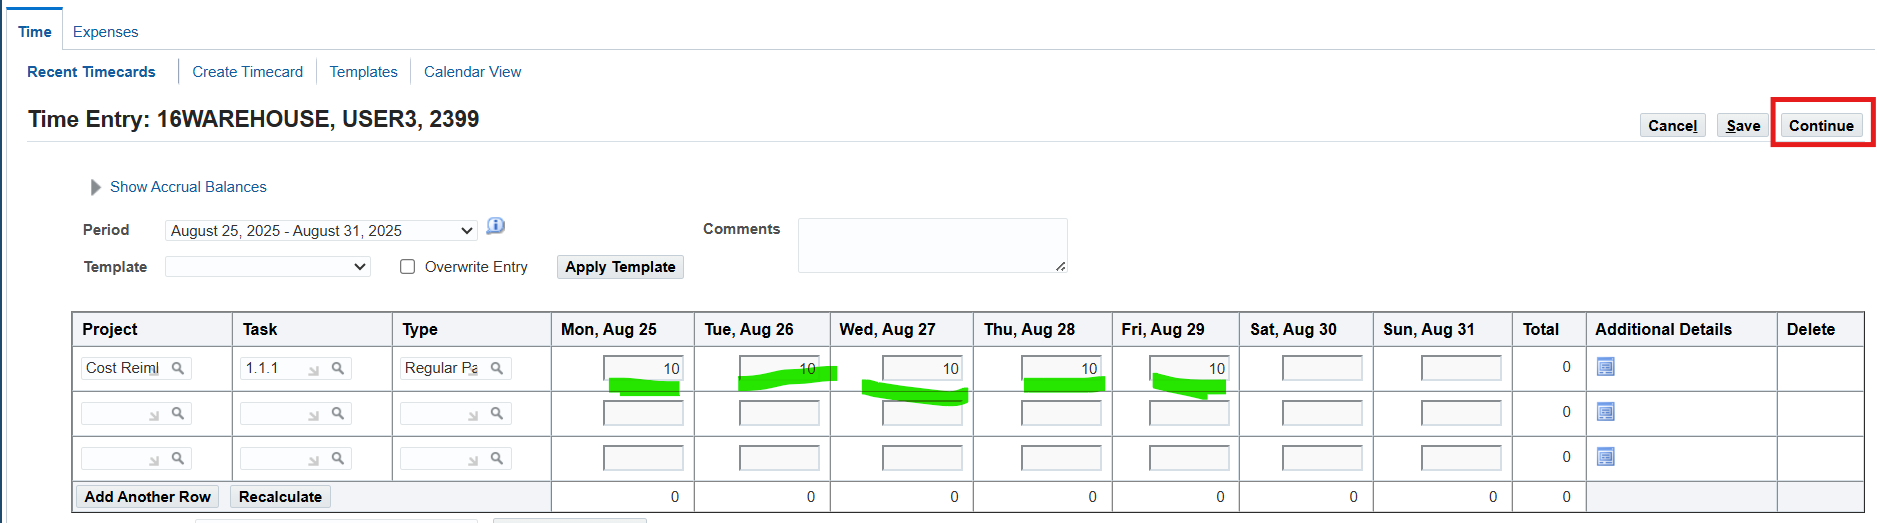
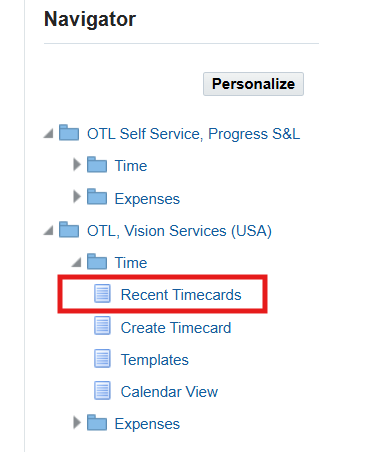
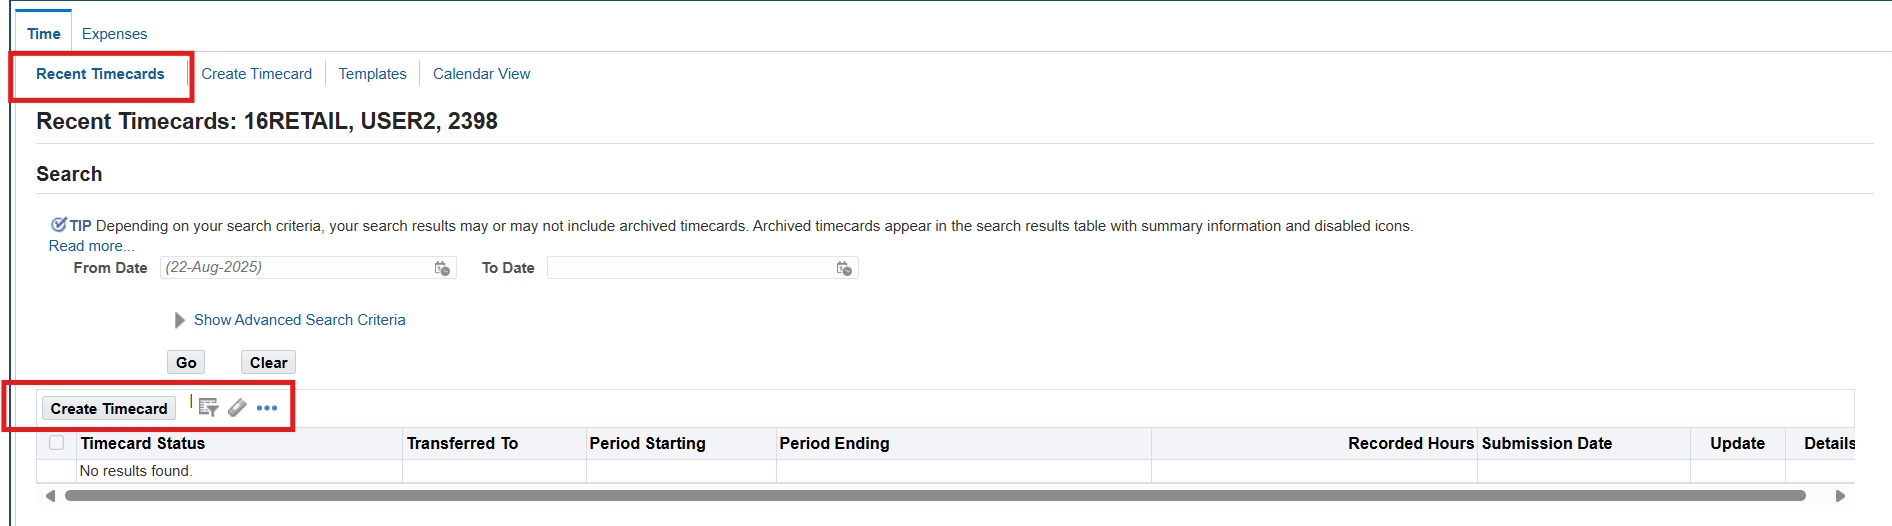
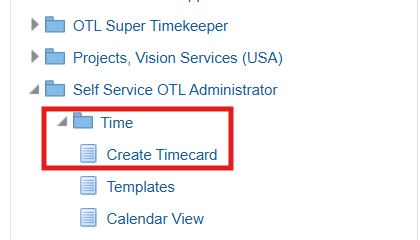
Entering time and labor for warehouse employees using the projects/payroll timecard layout
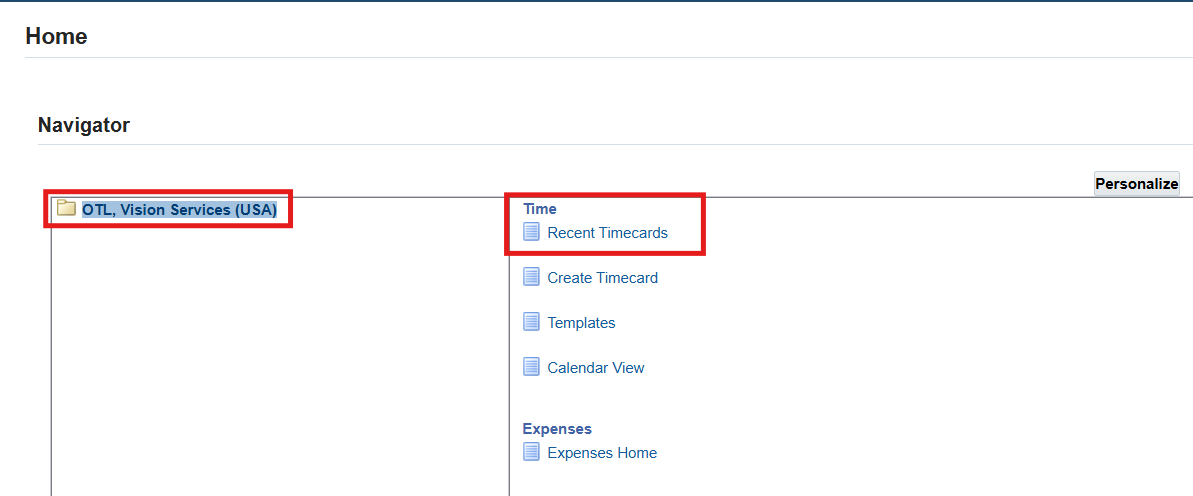
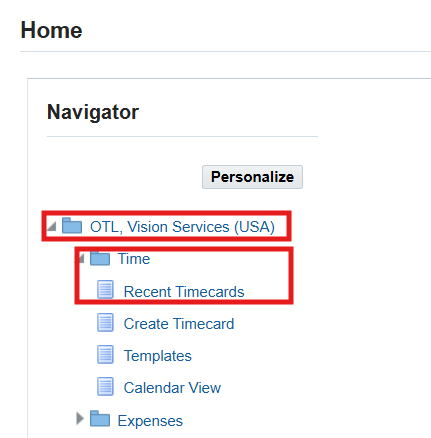
- Log on to Self Service using 16WAREHOUSE application sign on and choose the OTL, Vision Services (USA) responsibility
- (N) Time 🡪 Time Entry
- On the Recent Timecards page, choose Create Timecard button
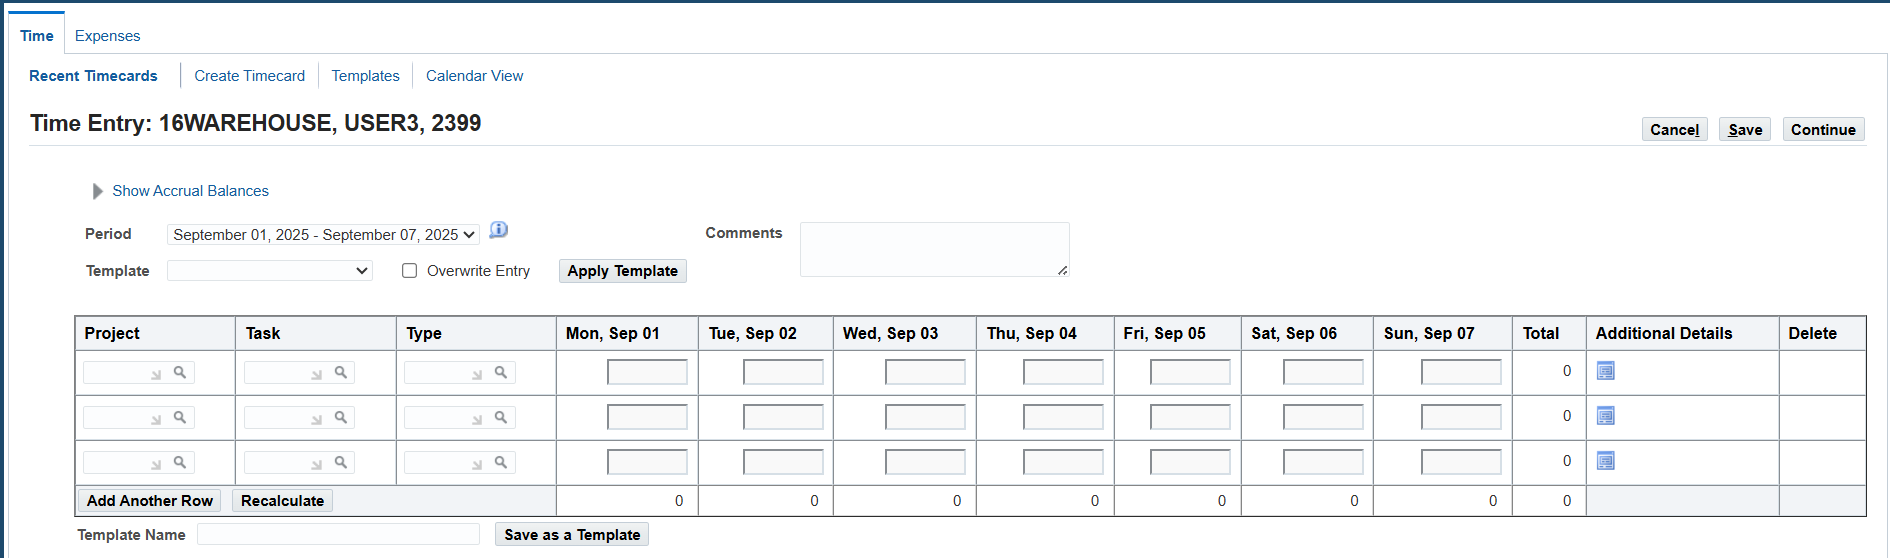
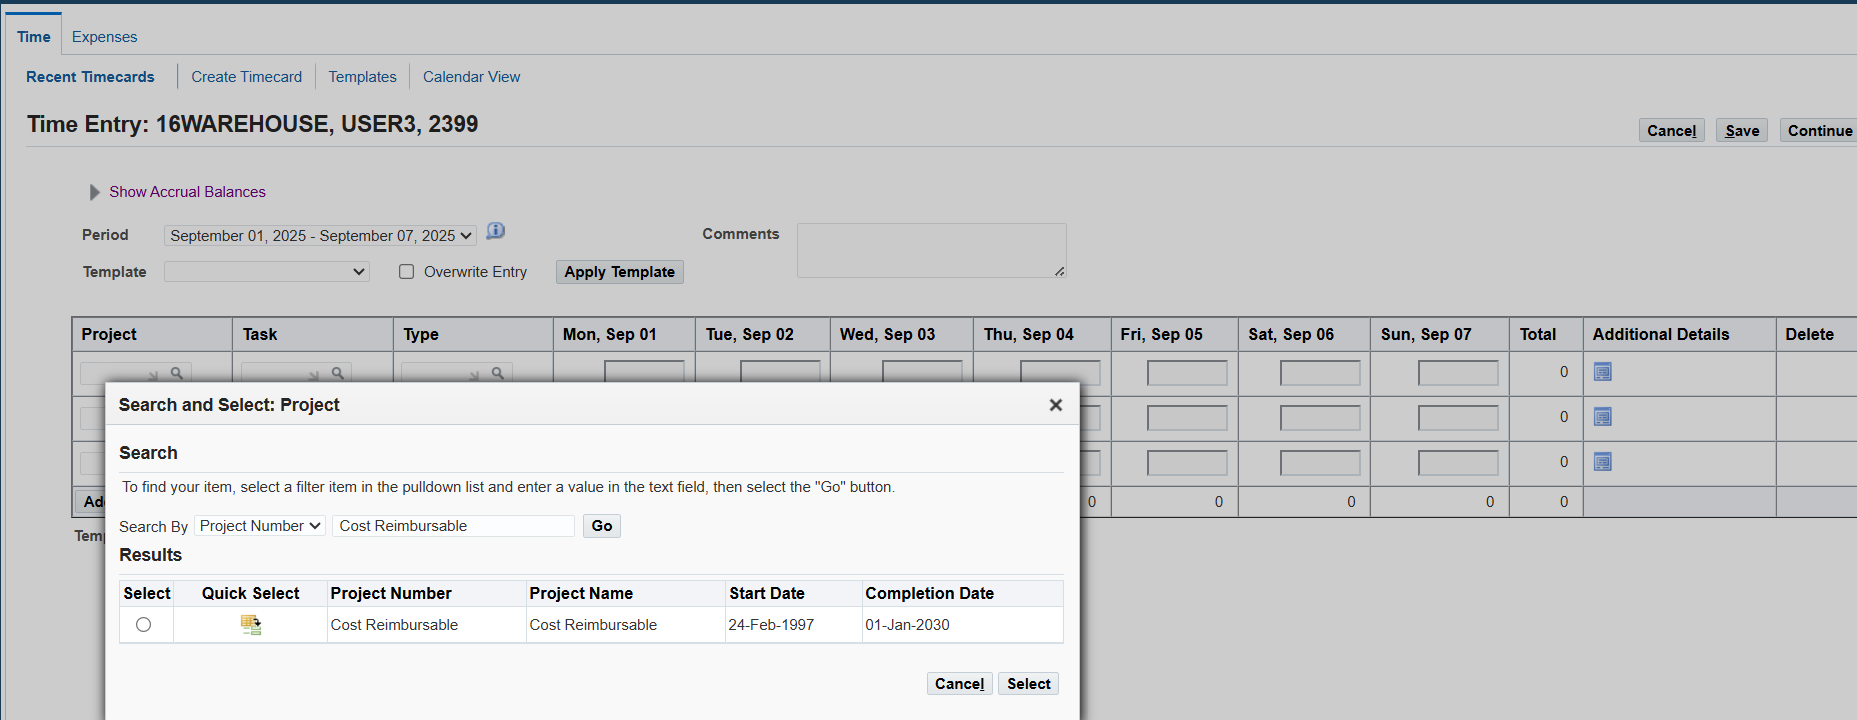
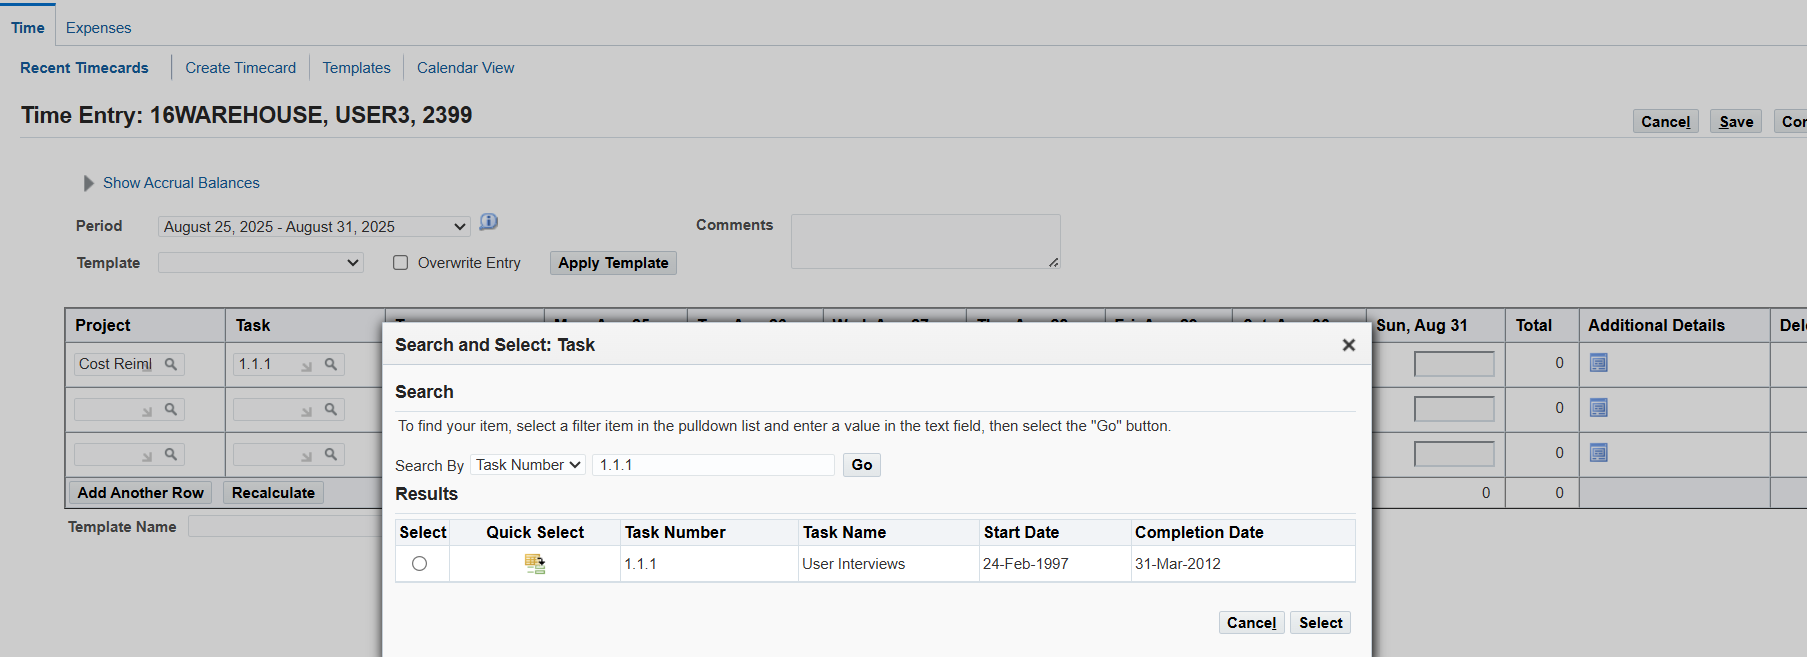
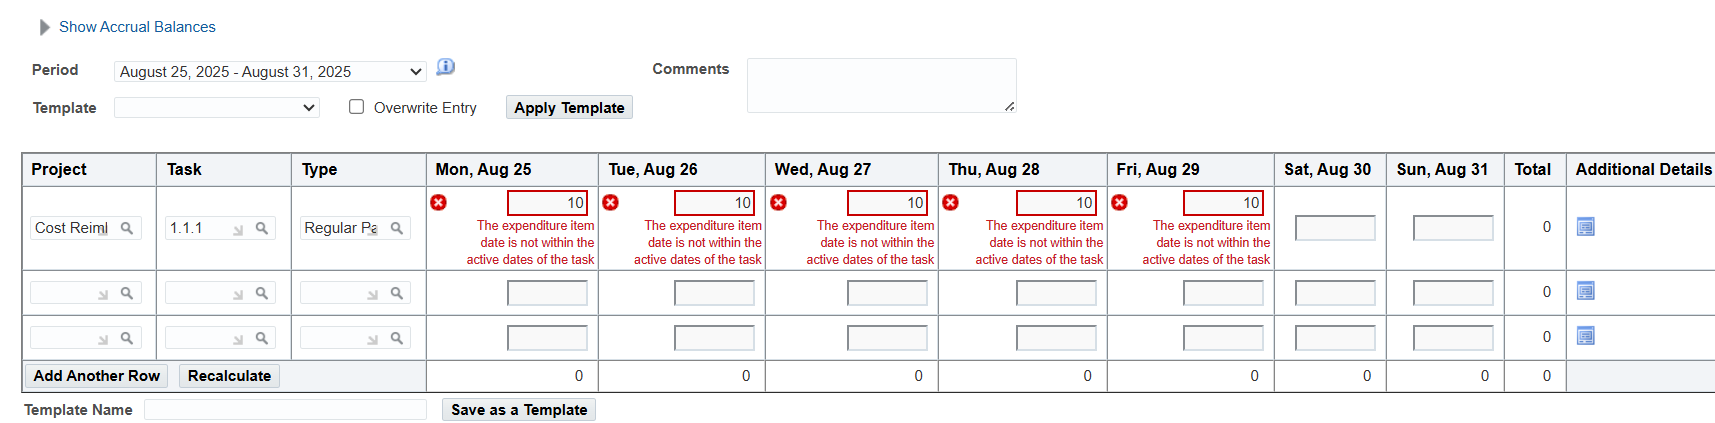
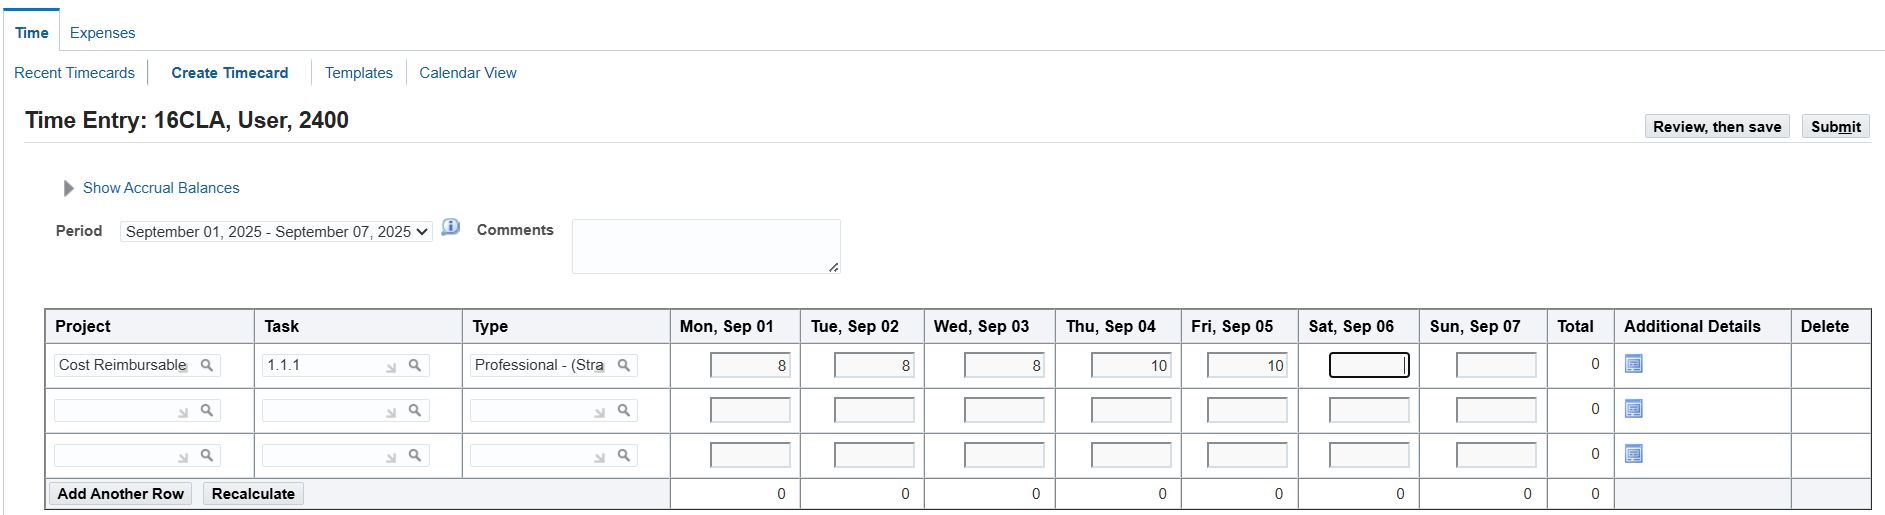
Validate Project and tasks status
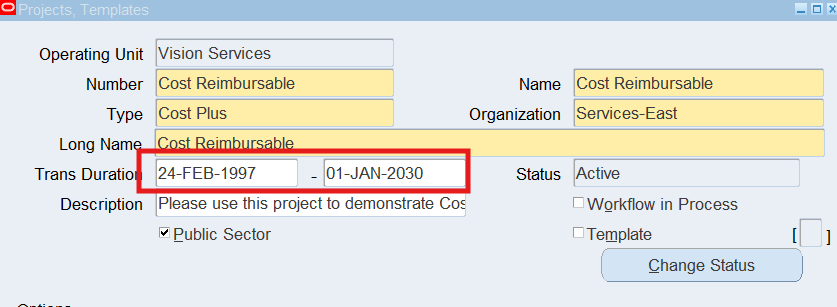
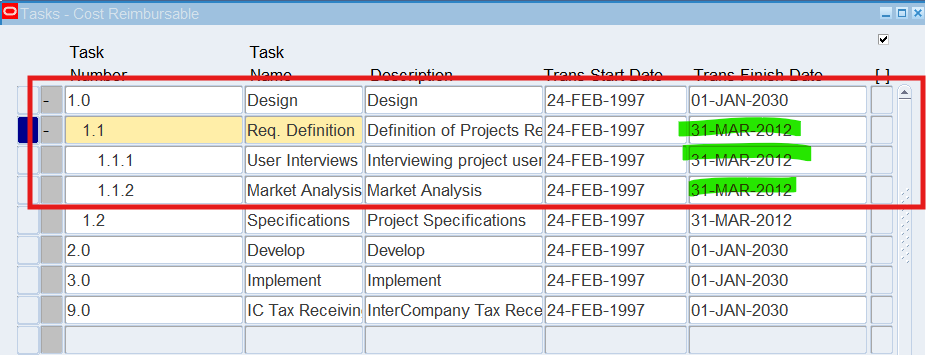
Sub Task has an end-date of 31-MAR-2012 therefore not allow new transactions
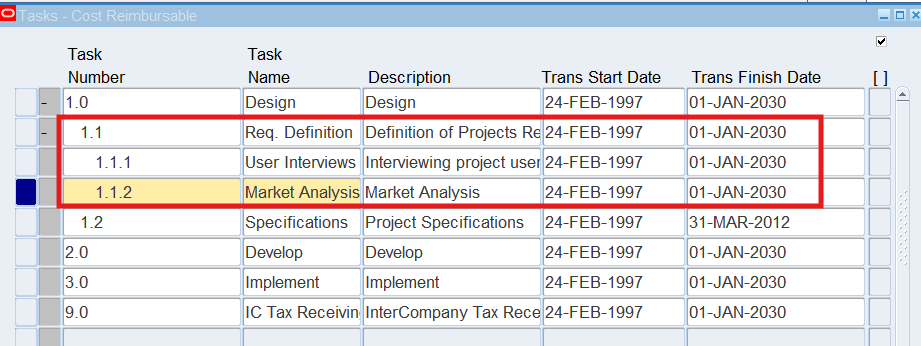
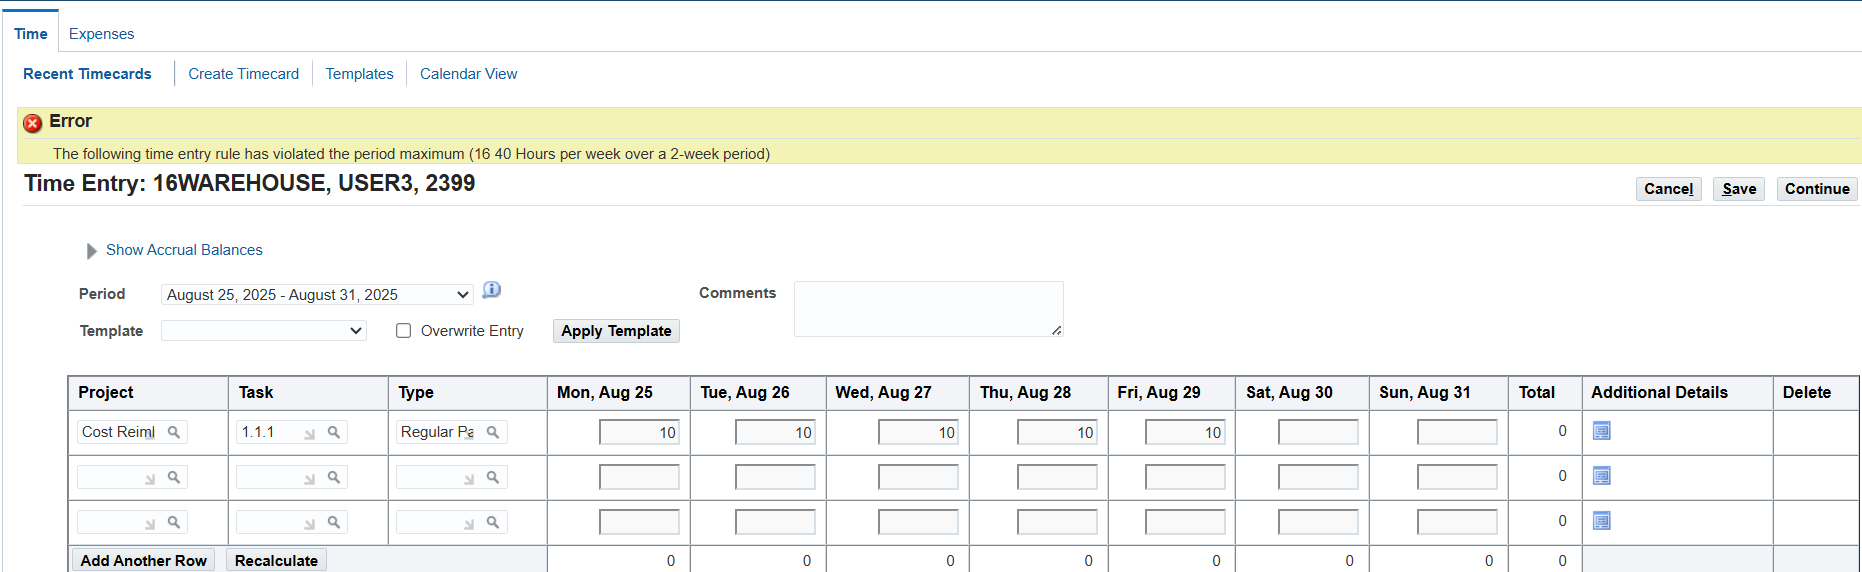
Note: Review an error displayed due to the setup of the 16Warehouse Rule.
Change Friday to 0 hours and continue

All issues are now resolved
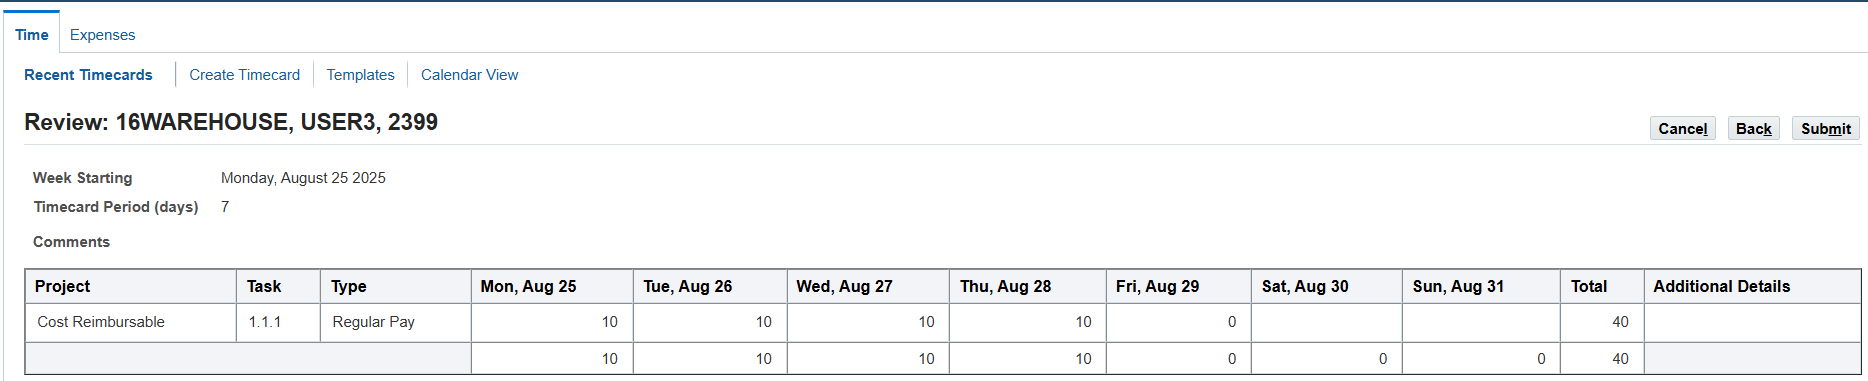
Review timecard, then choose Submit button

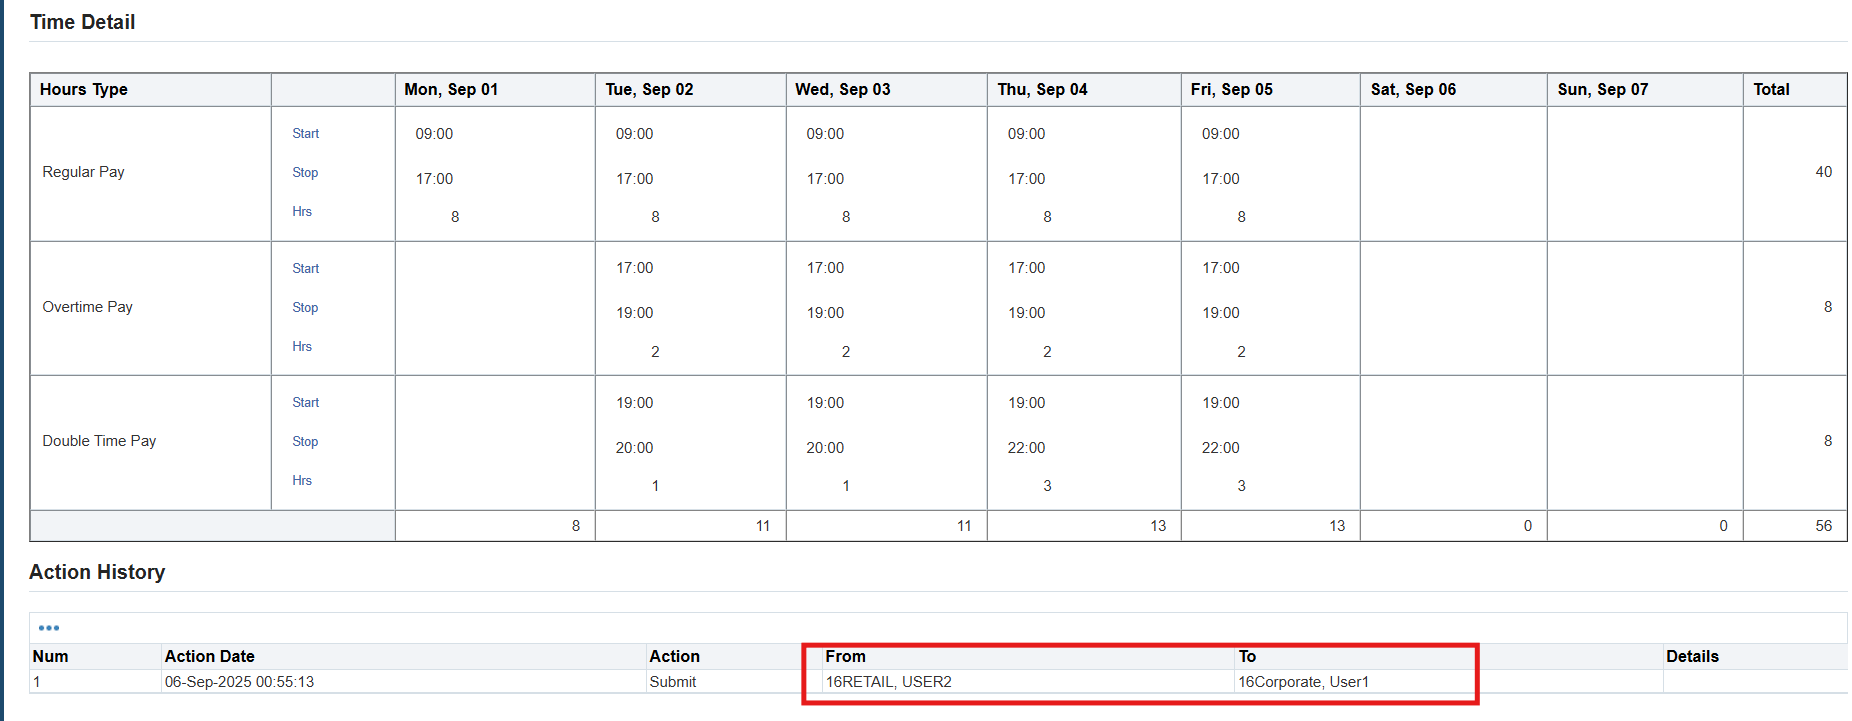
Entering time and labor for Retail employees using the work schedule timecard layout
- Log on to Self Service using 16RETAIL application sign on and choose the OTL Self Service responsibility
- (N) Time 🡪 Time Entry
- On the Recent Timecards page, choose Create Timecard button
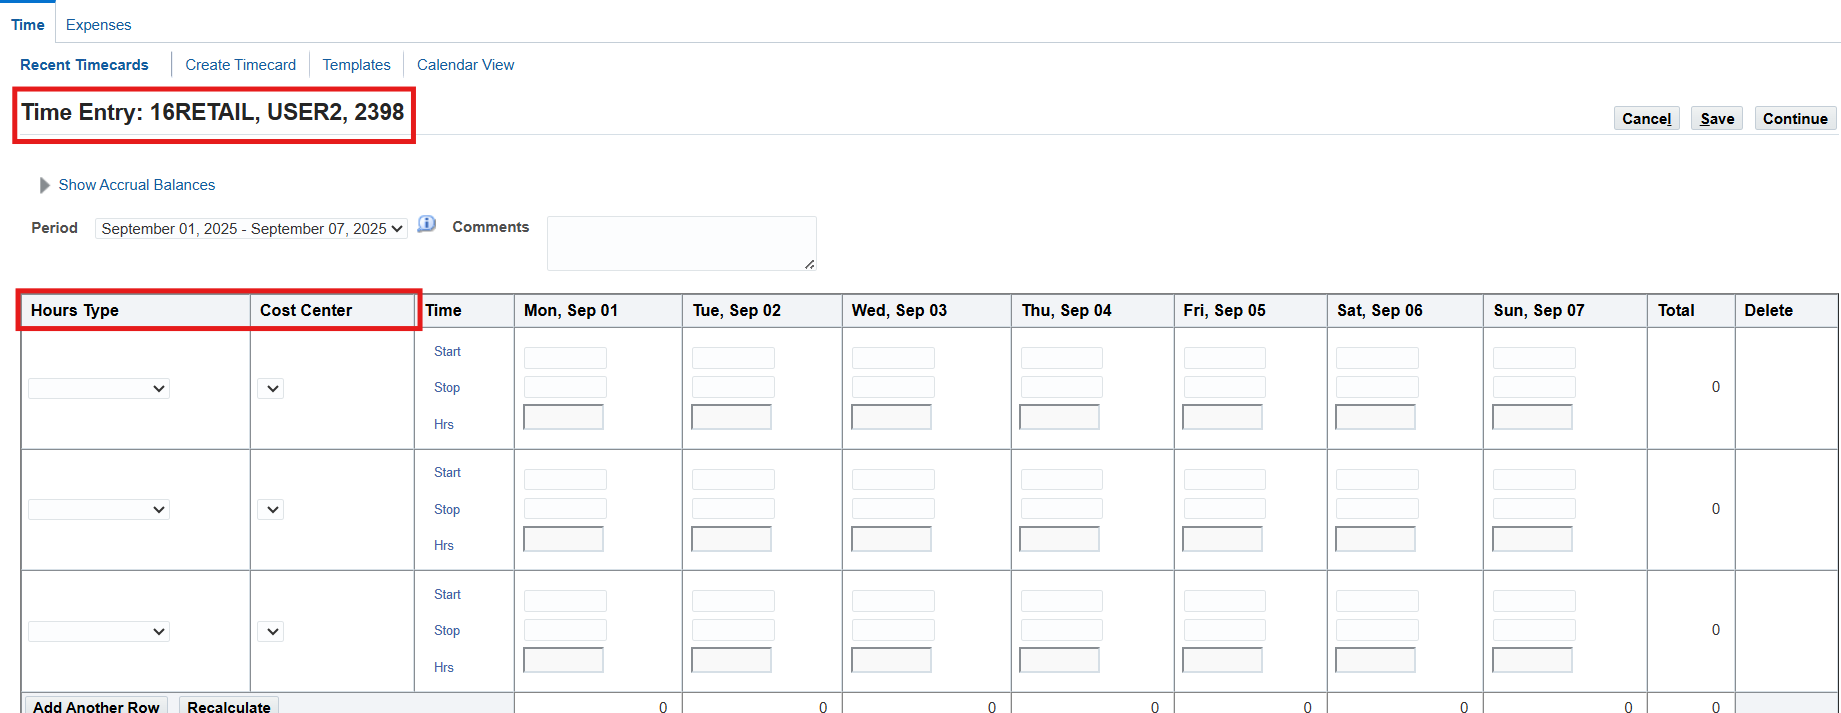
Select “Regular Pay” as Hours Type
Enter the time for each day of the week Monday through Friday as follows:
| Monday | Tuesday | Wednesday | Thursday | Friday |
| 09:00 | 09:00 | 09:00 | 09:00 | 09:00 |
| 18:00 | 21:00 | 21:00 | 23:00 | 23:00 |
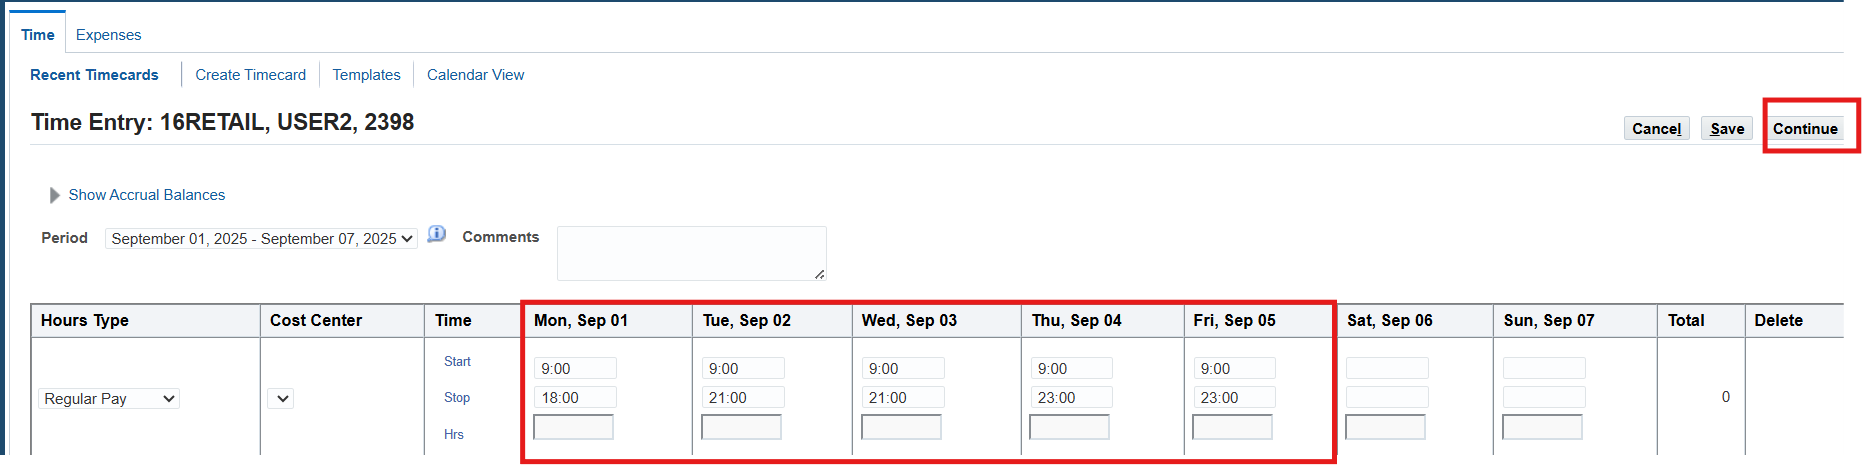
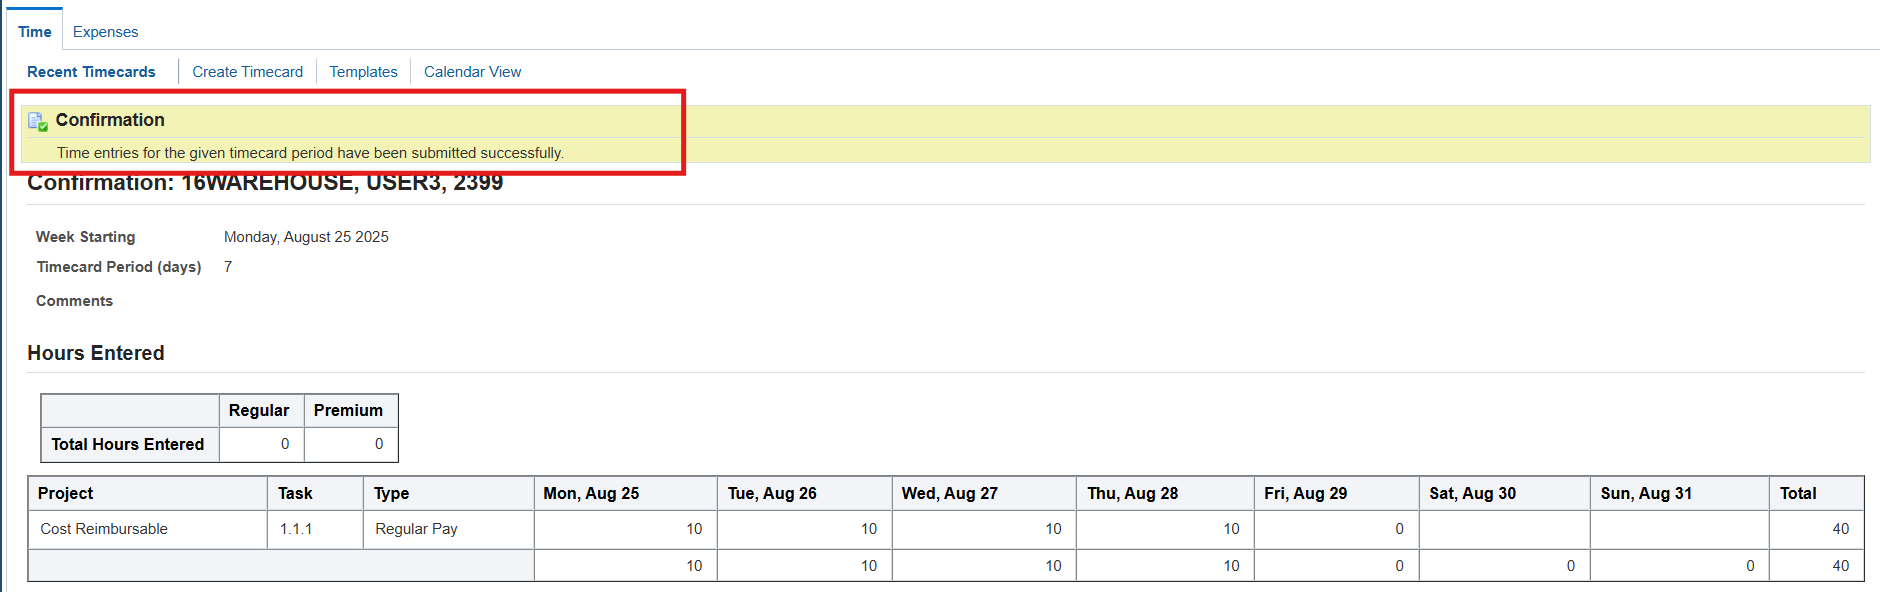
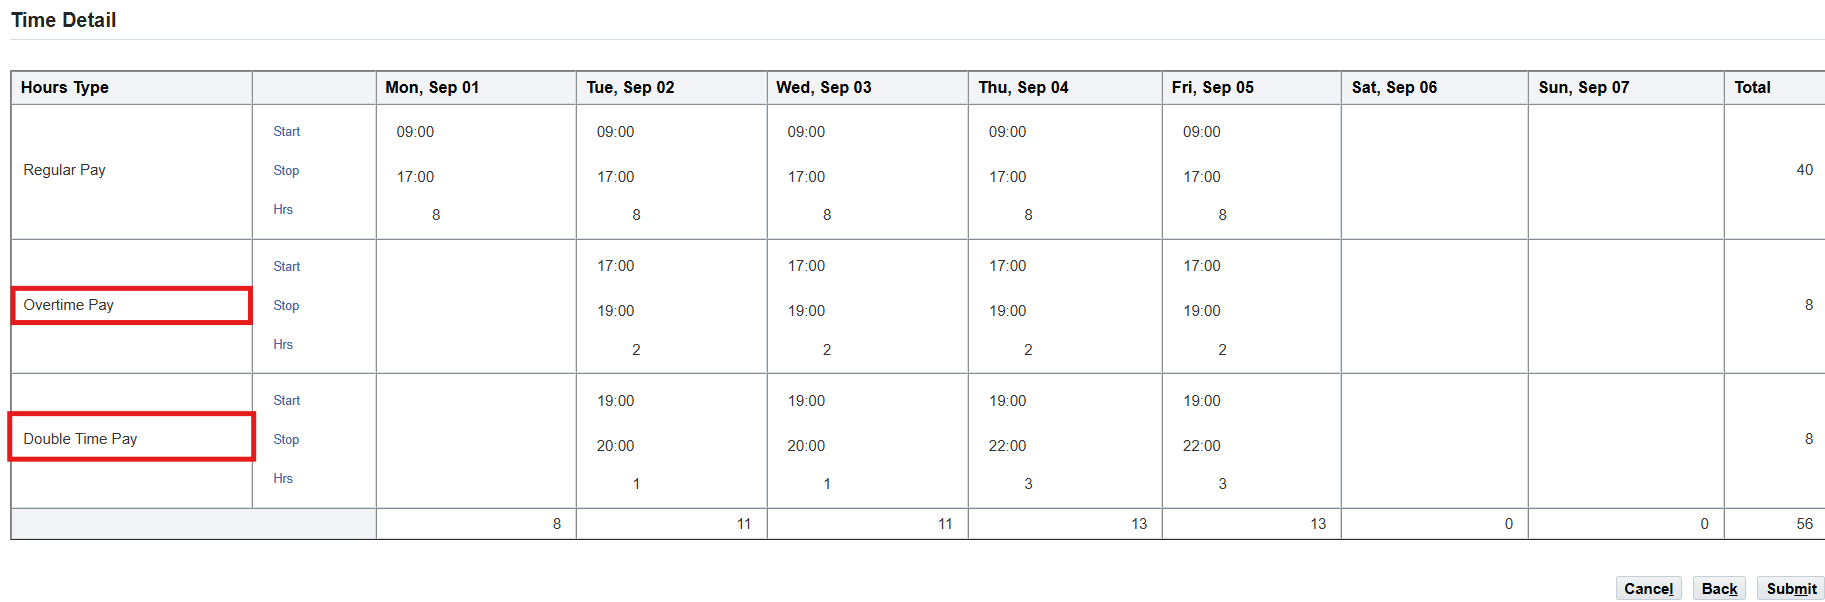
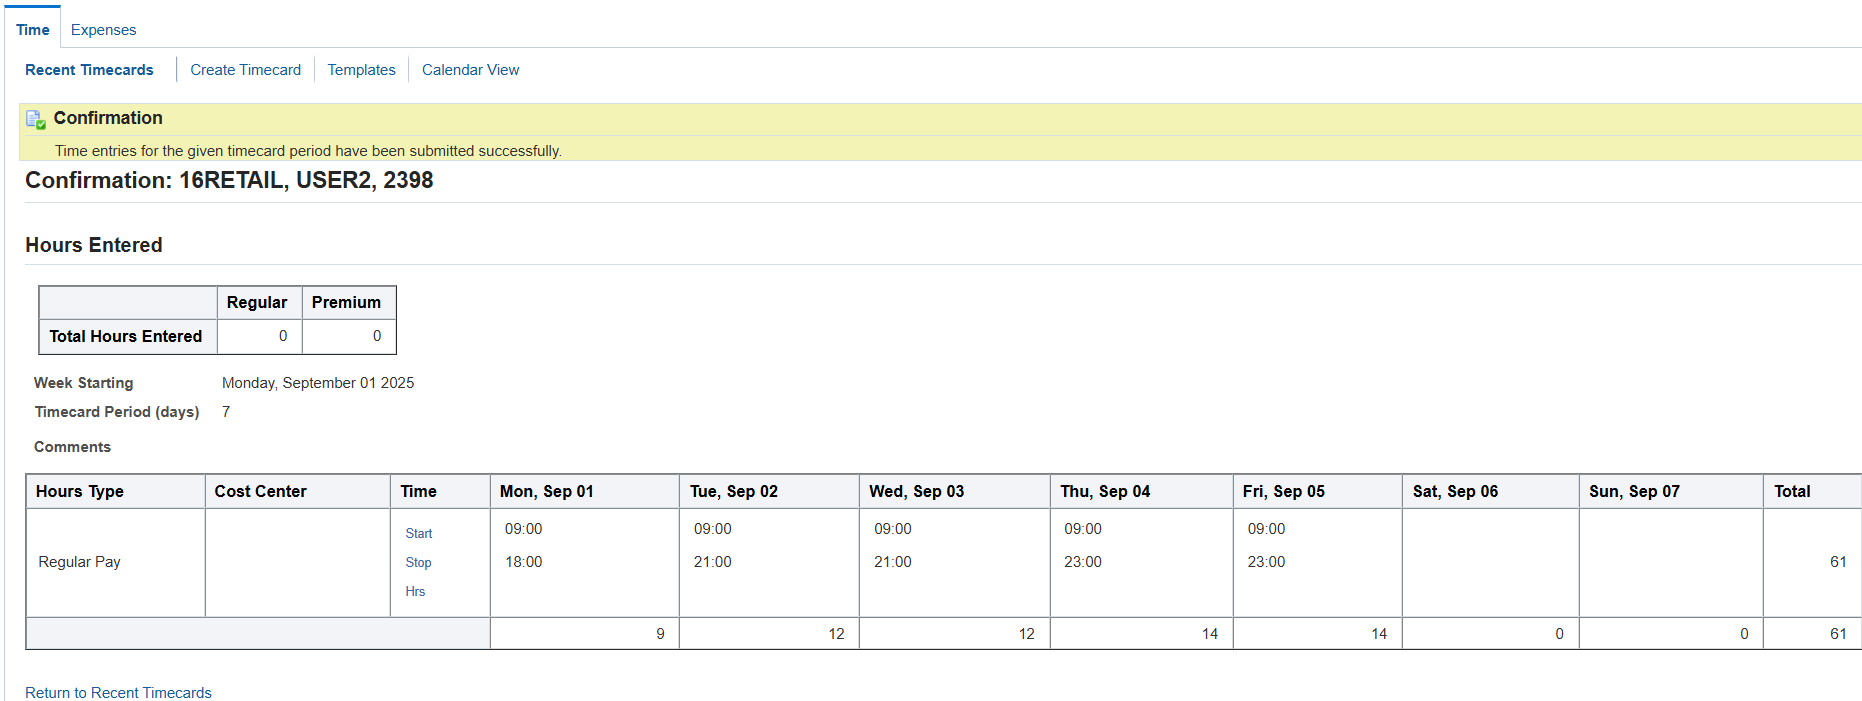
Review timecard before submitting. Once review time entries, choose Submit button, Confirmation page indicating the time and labor data entered and the Time Details exploded based on OTLR.
Entering time and labor for corporate employees using the exception timecard layout
- Log on to Self Service using 16CORPORATE application user sign on and choose the OTL Self Service responsibility
- (N) Time 🡪 Time Entry
- On the Recent Timecards page, choose Create Timecard button
- Enter the Regular Pay hours for each day of the week Monday through Friday as follows:
| Monday | Tuesday | Wednesday | Thursday | Friday |
| 9.5 | 9.5 | 9.5 | 9.5 | 9.5 |
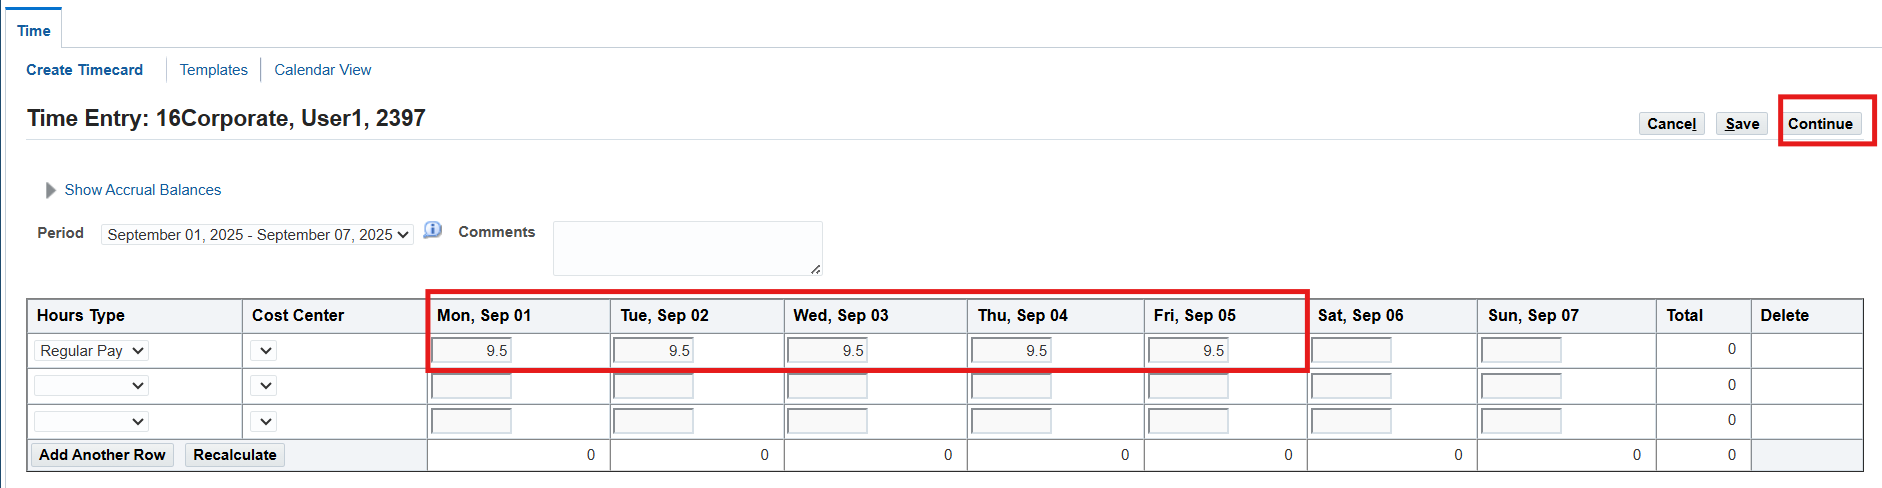
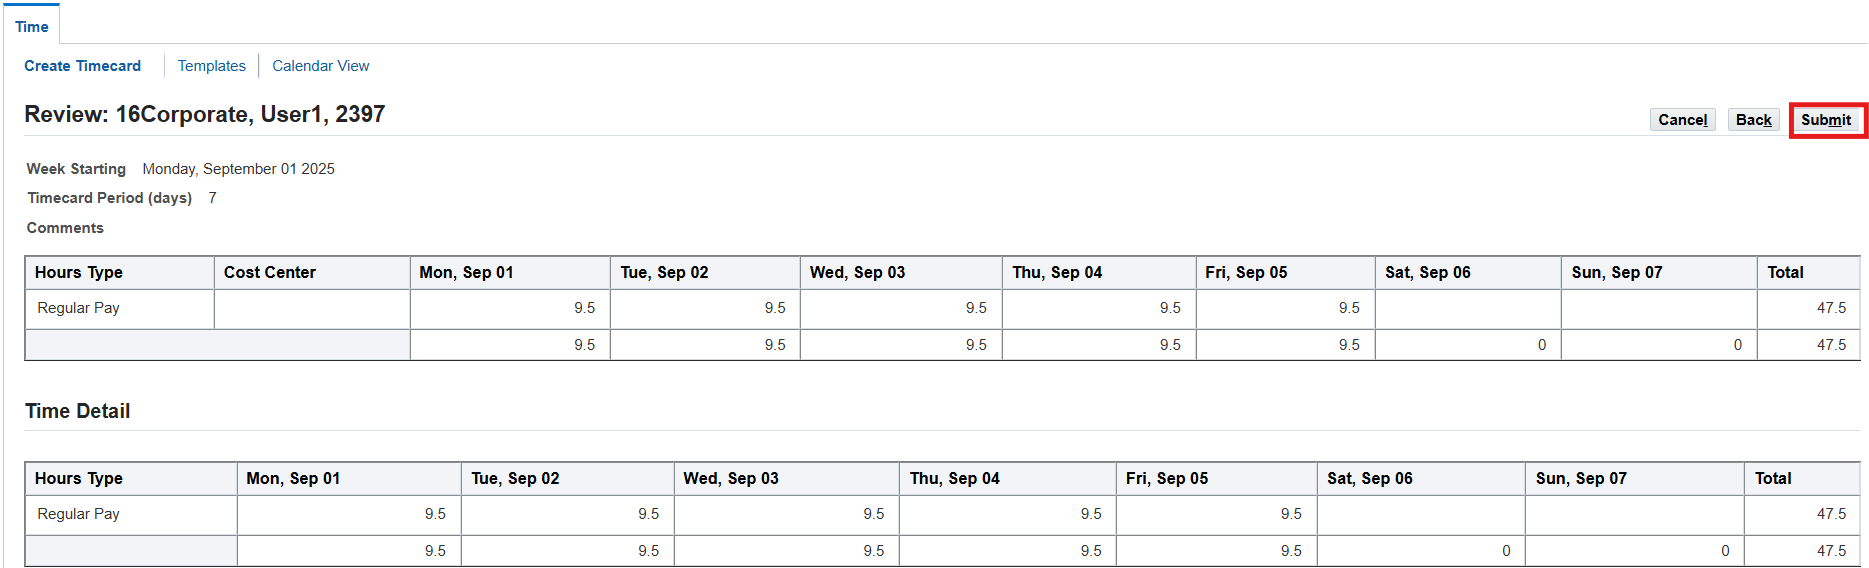
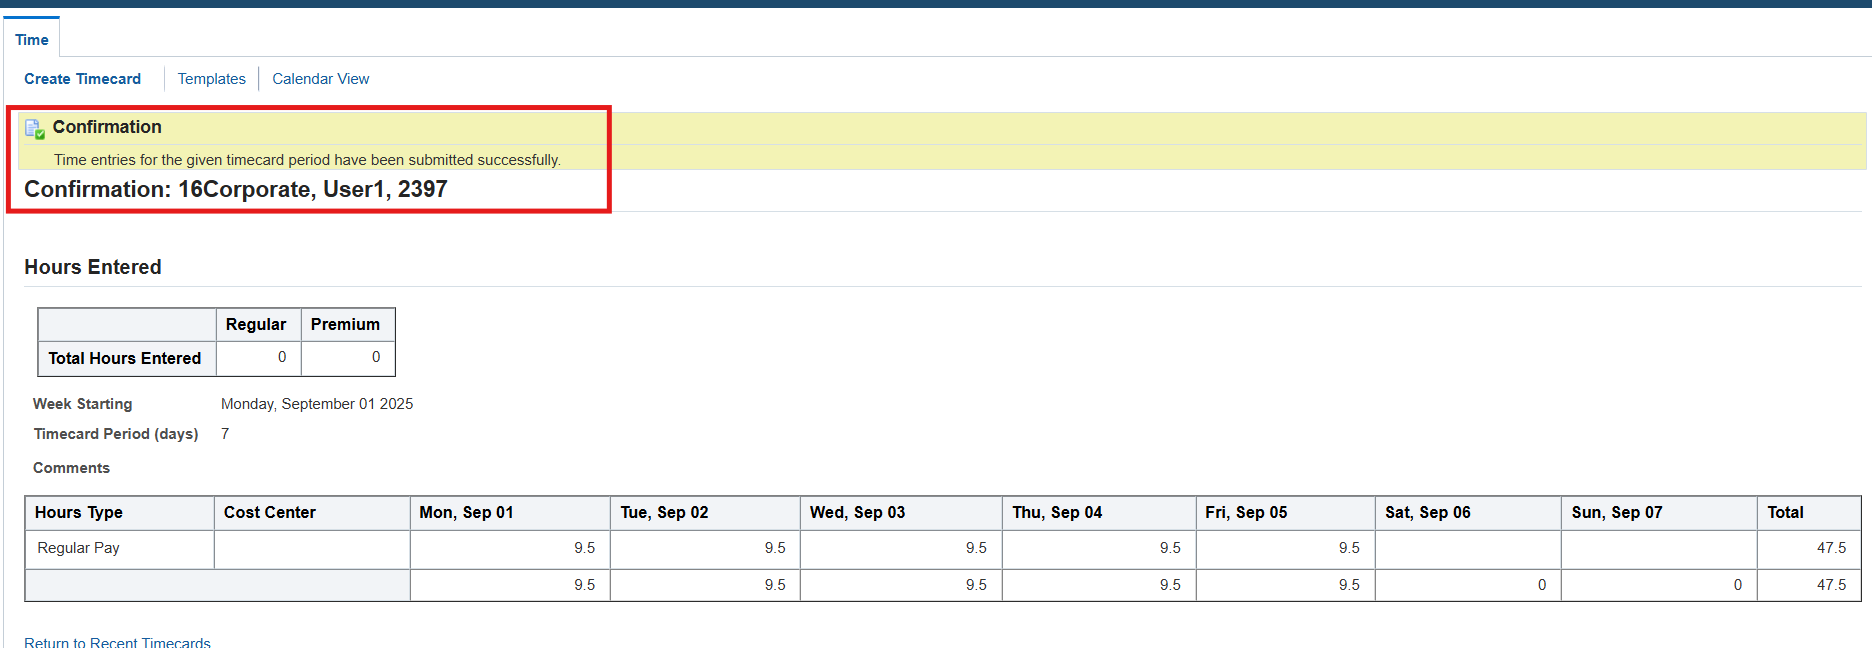
Review timecard and Submit
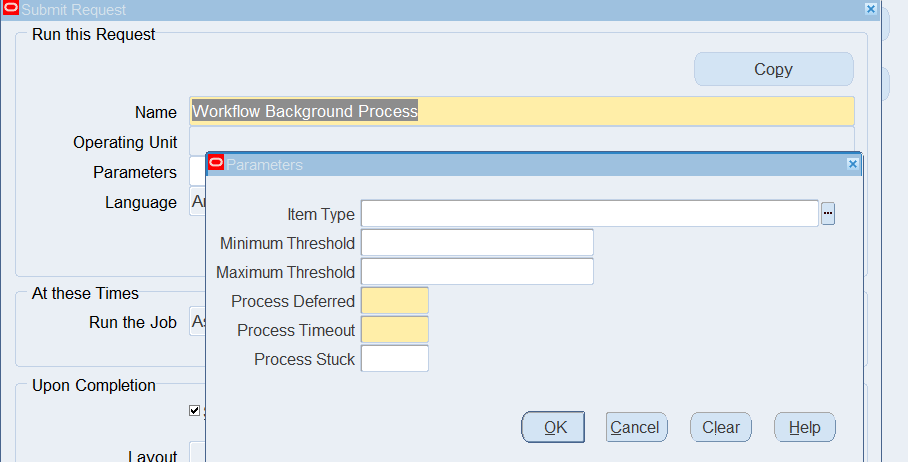
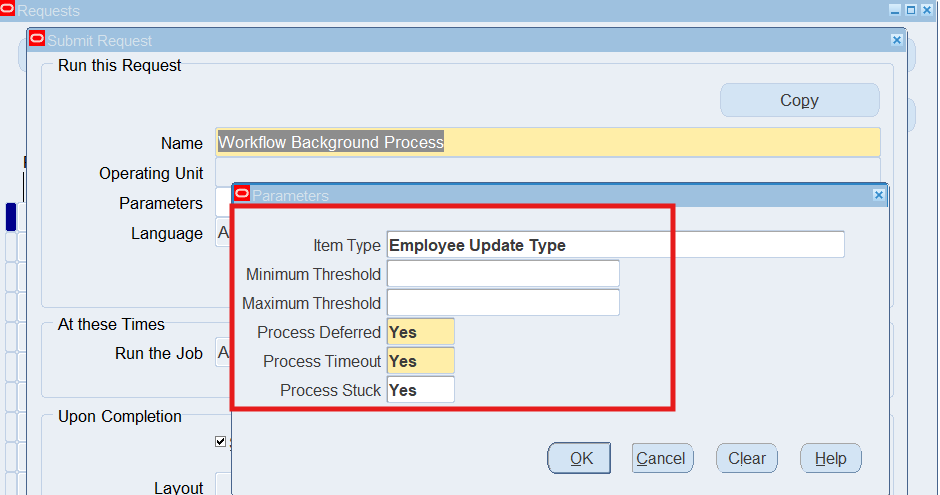
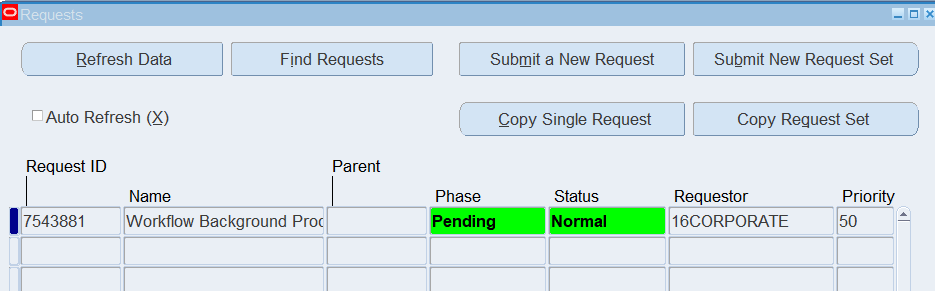
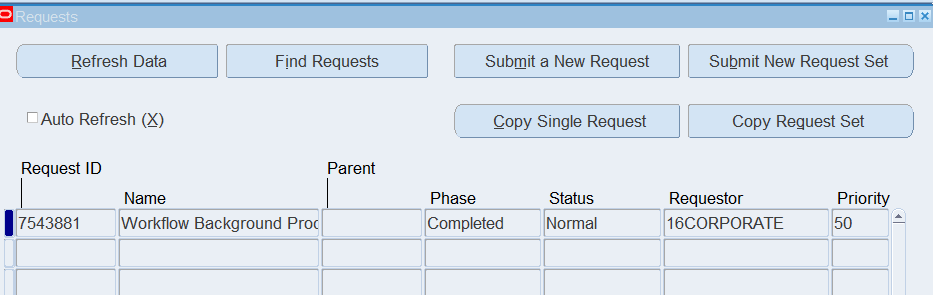
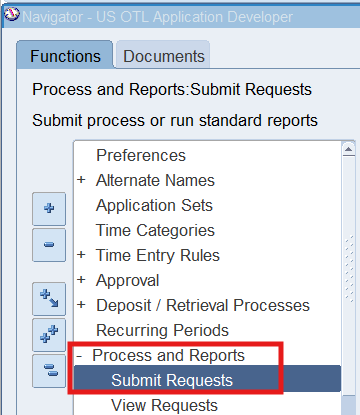
Workflow Background Process
Run Background Process for OTL Workflows for Employees item Type
(N) Requests 🡪 Run
Select Workflow Background Process
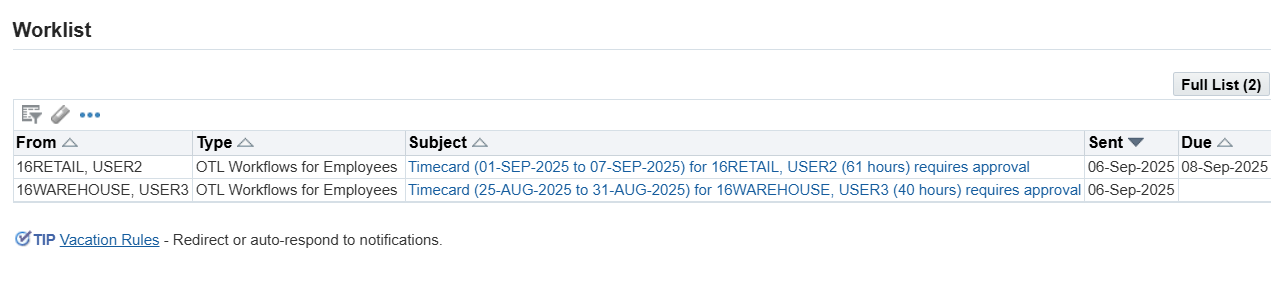
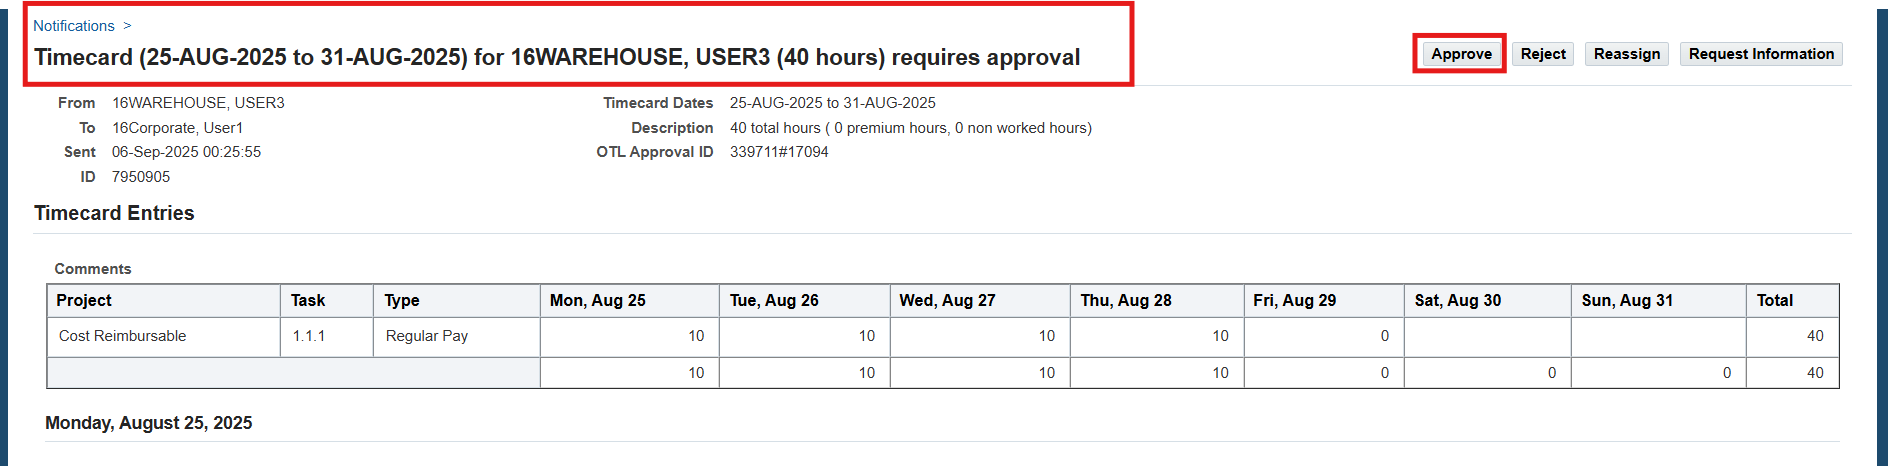
Approvals for 16RETAIL and 16WAREHOUSE
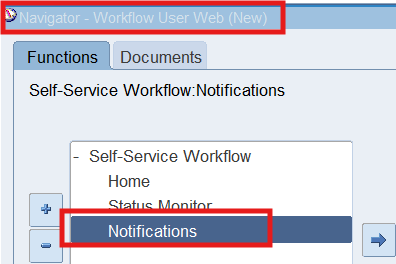
1. Log on to Self Service using 16CORPORATE application sign on, and chose Workflow User Web (New) responsibility
2. (N) Notifications
3. Click on the link from the Subject field for 16Retail
4. Optionally, choose the Timecard link to review both the Entered and exploded timecard.
5. Choose the Approve button
Note: You can also use Mass Timecard Approval responsibility to approve timecards.


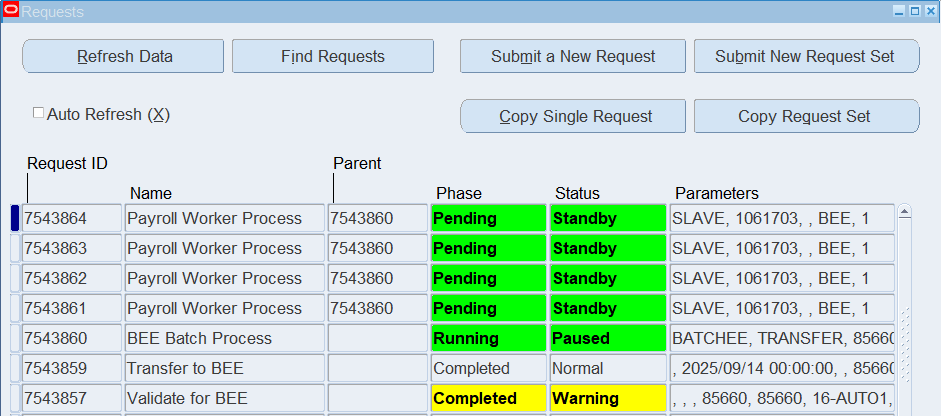
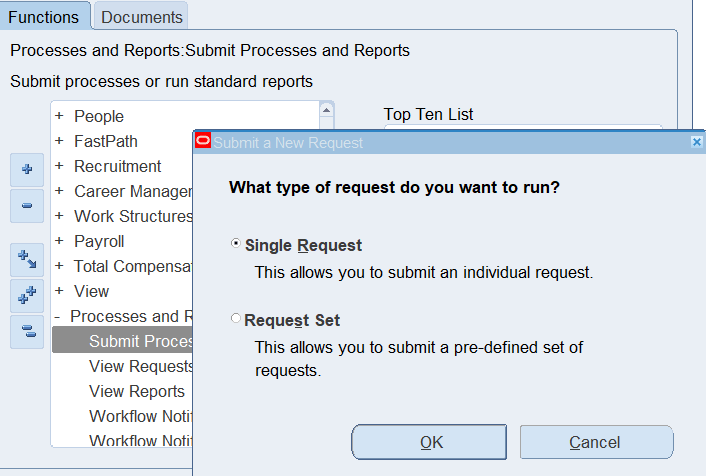
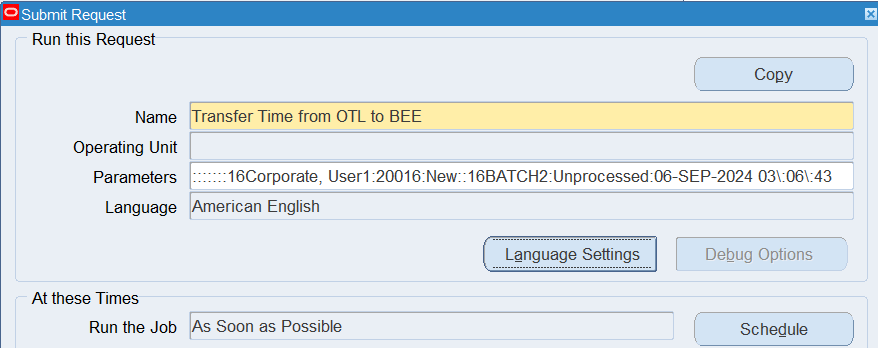
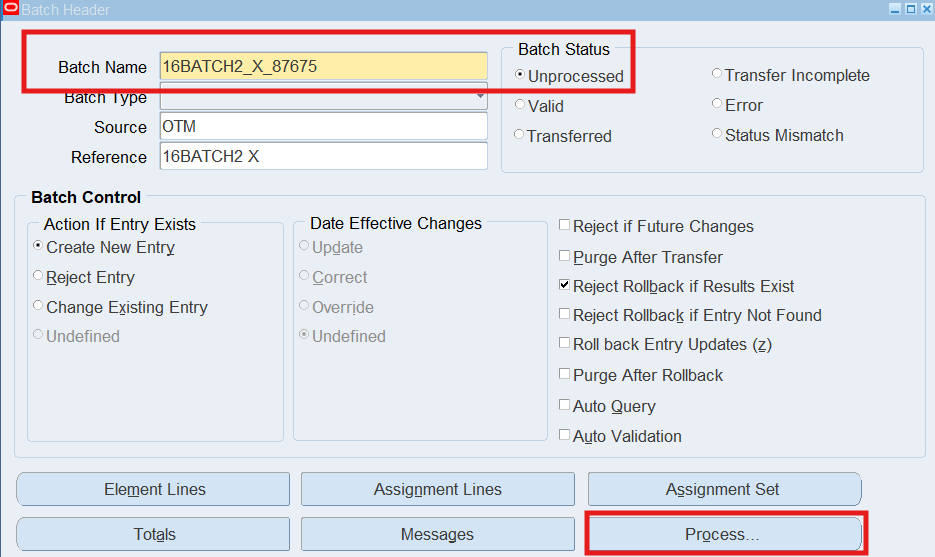
Transferring Time from OTL to BEE
The Transfer Time from OTL to BEE process works in 2 ways. If the Rules Evaluation Preference is set to “Yes” then the process transfers the timecard data from SS to PUI Timecard form, eg: Retail and Corporate employees. If the Rules Evaluation Preference is set to “NO”, the batches get transferred directly to BEE bypassing the PUI Timecard from eg: Warehouse Employees.
Responsibility : US Super HRMS Manager
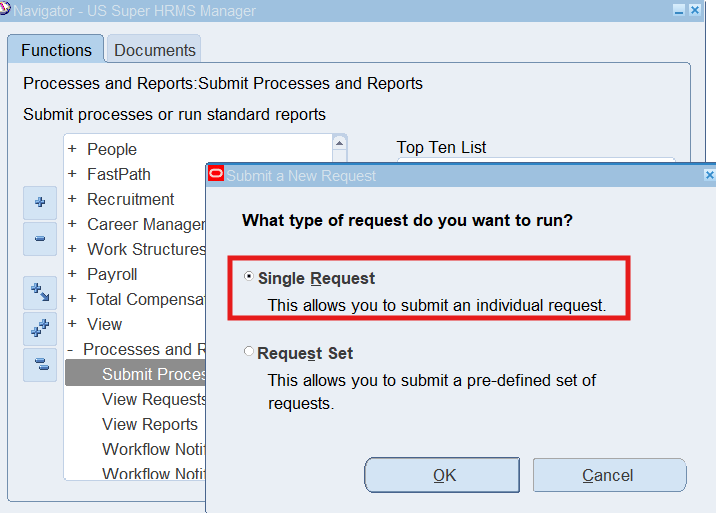
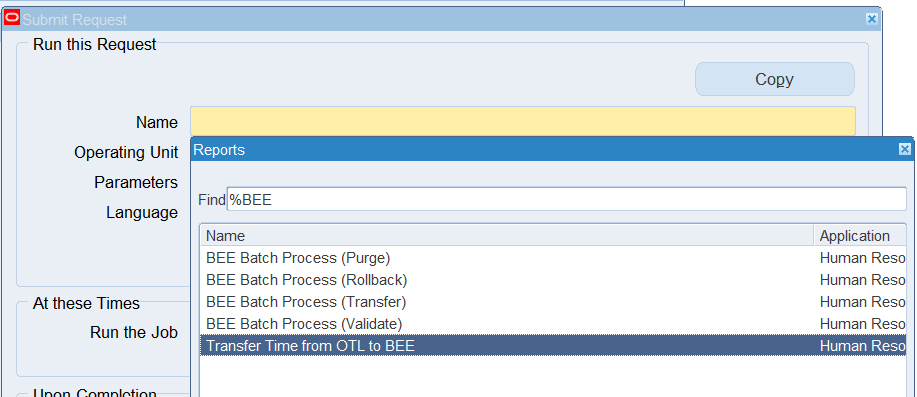
Navigation : (N) Processes and Reports 🡪 Submit Processes and Reports
Select Single Request and choose OK
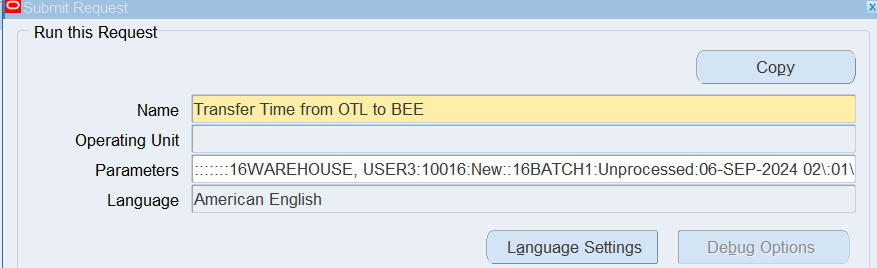
Select “Transfer Time from OTL to BEE”

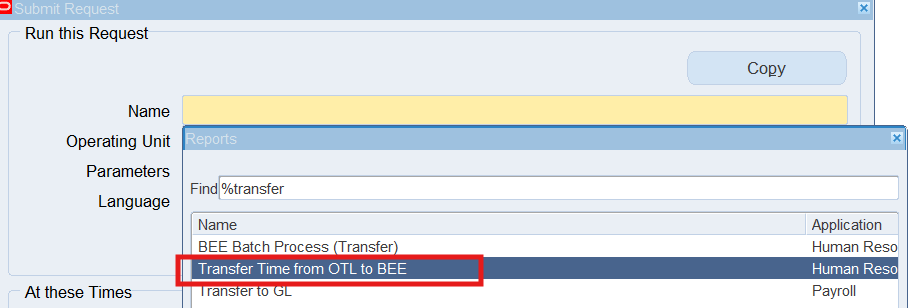
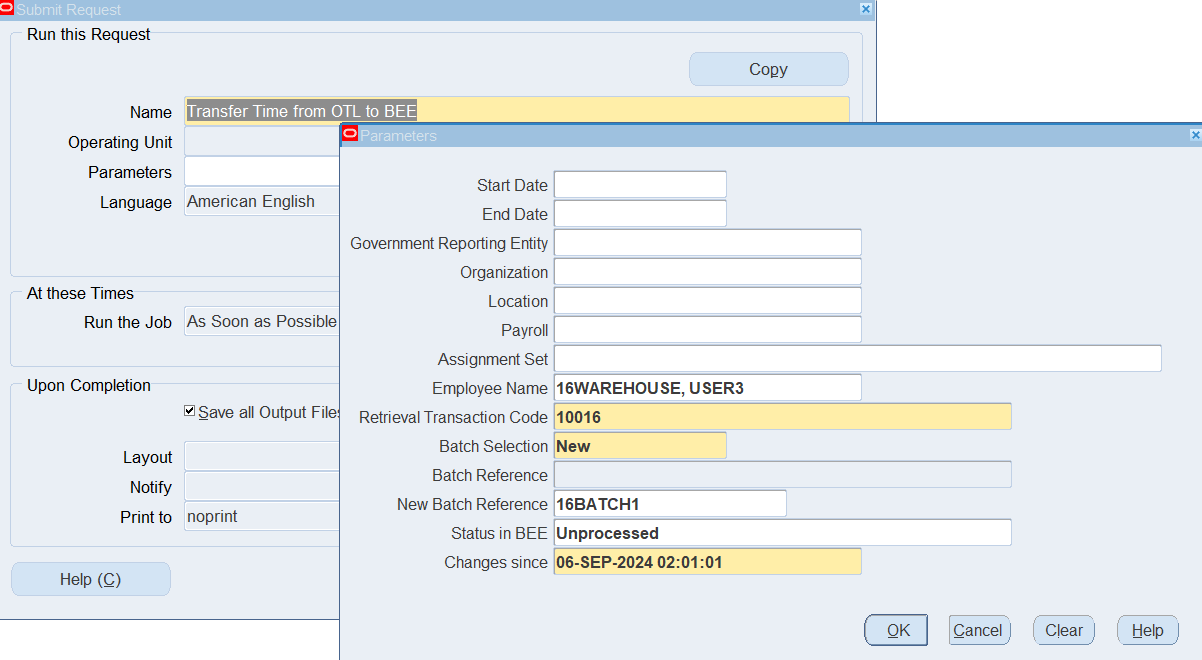
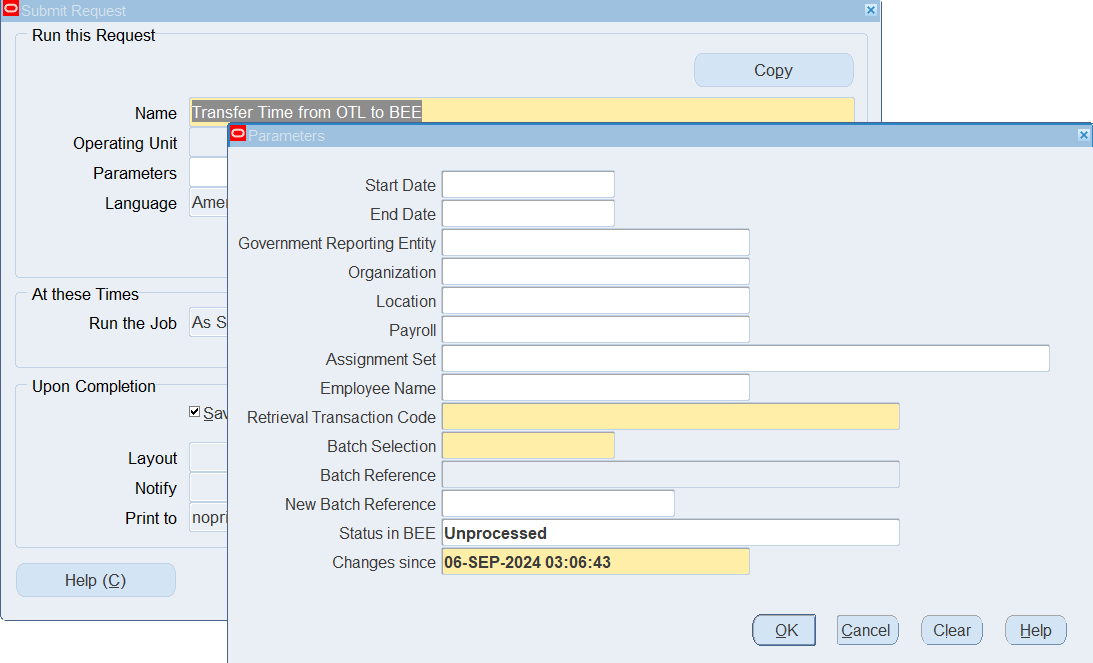
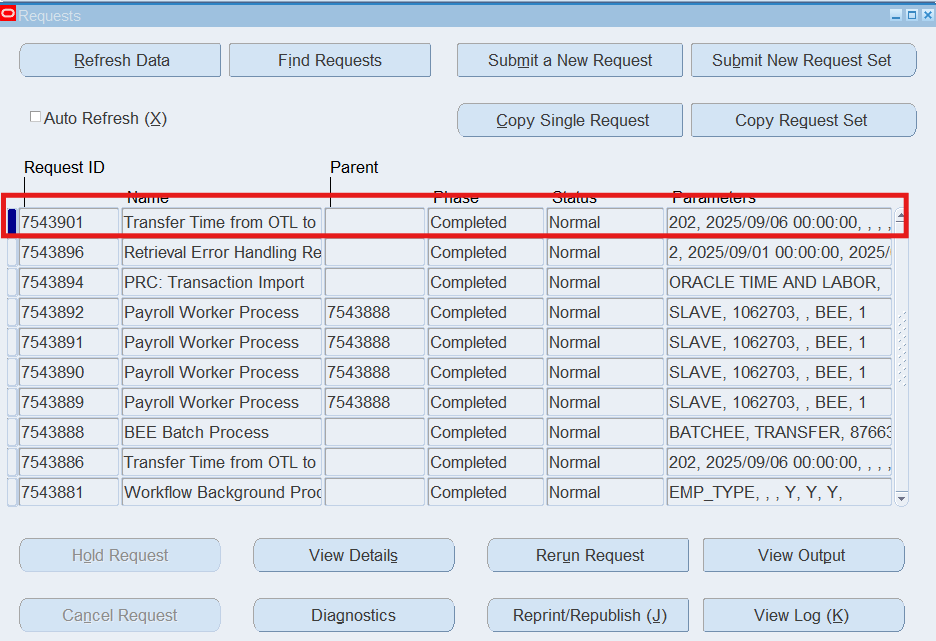
Retrieval Transaction Code – Enter 10016 in the Retrieval Transaction Code field to identify all timecards that will be retrieved in this process run. You can use this code to identify this run when you submit Oracle Time Retrieval Error Handing Report.

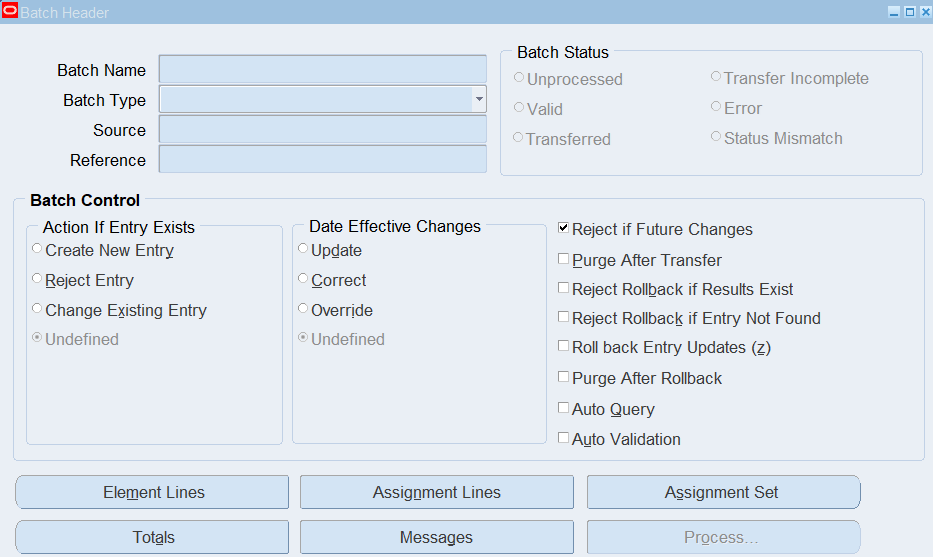
Viewing Batch Status
Responsibility : US OTL Application Developer
Navigation : (N) OTL Time Accounting 🡪 Mass Info. eXchange:MIX🡪 Batch Element Entry
Perform Query (F11) 🡪 In Reference field enter “16BATCH1%”
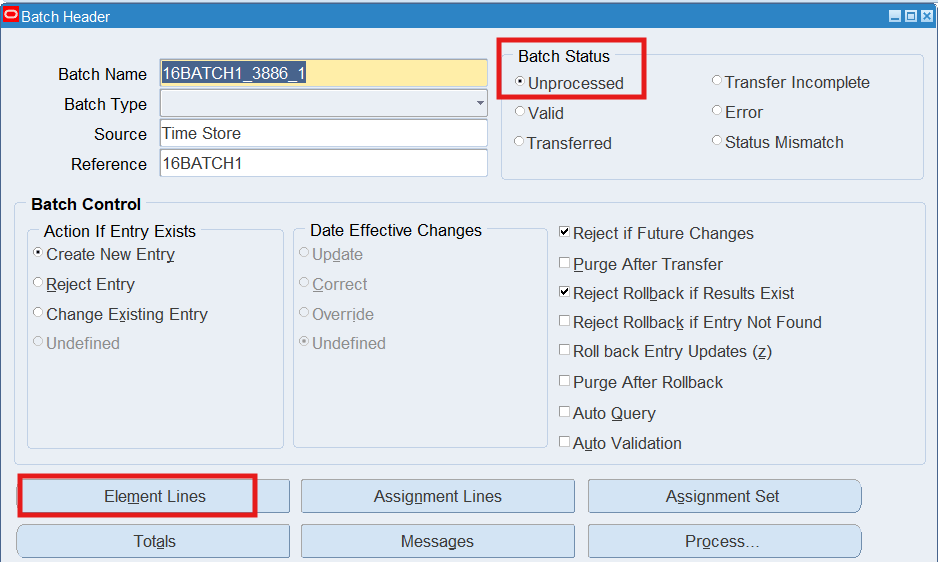
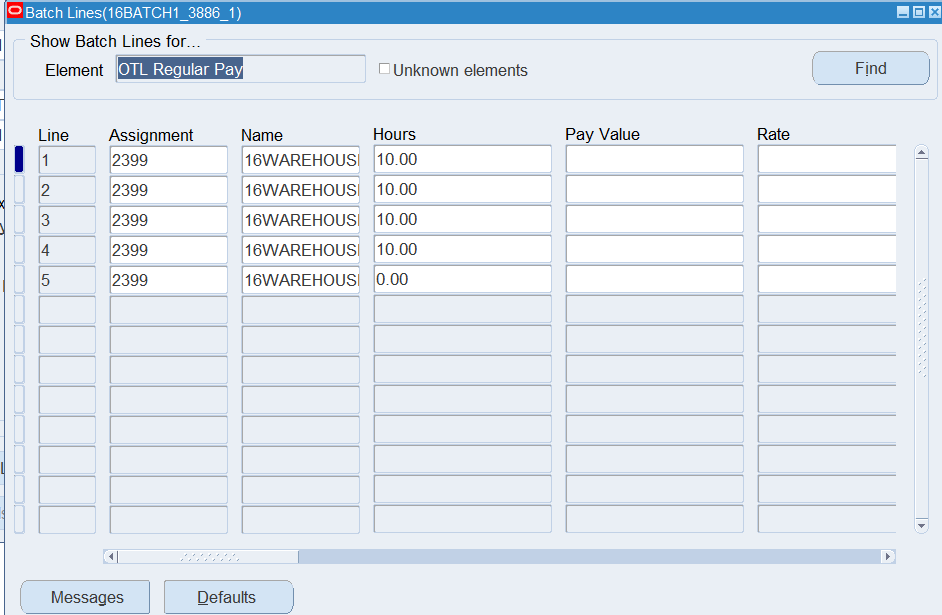
Select “Element Lines”
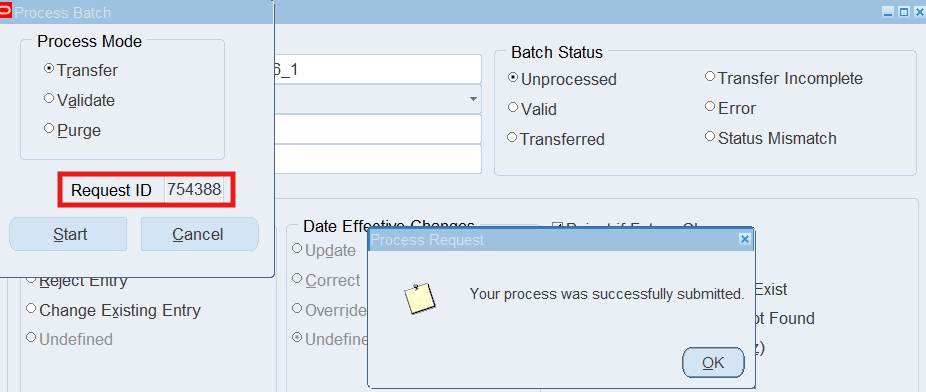
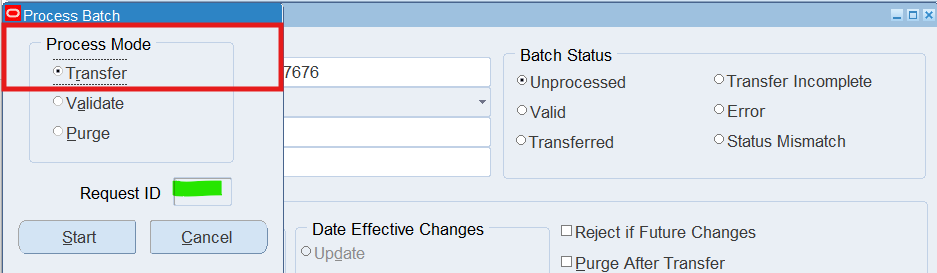
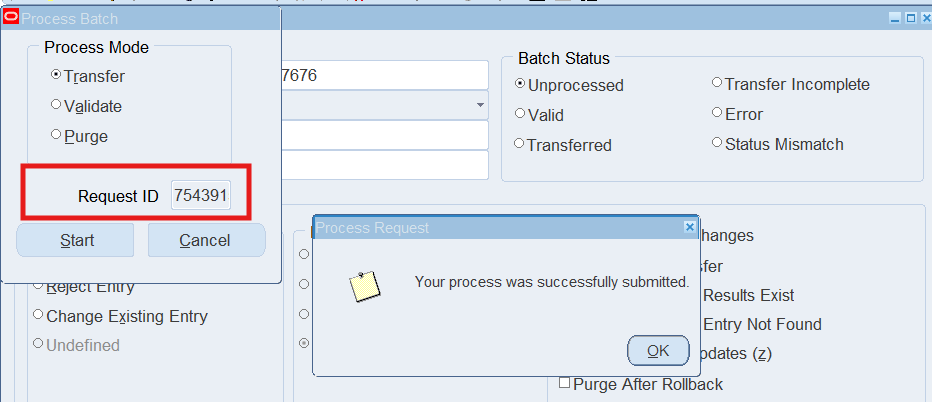
Note: If the Batch Status is “Unprocessed”. Choose the Process button, select “Transfer” as the Process Mode, and choose the Start button.
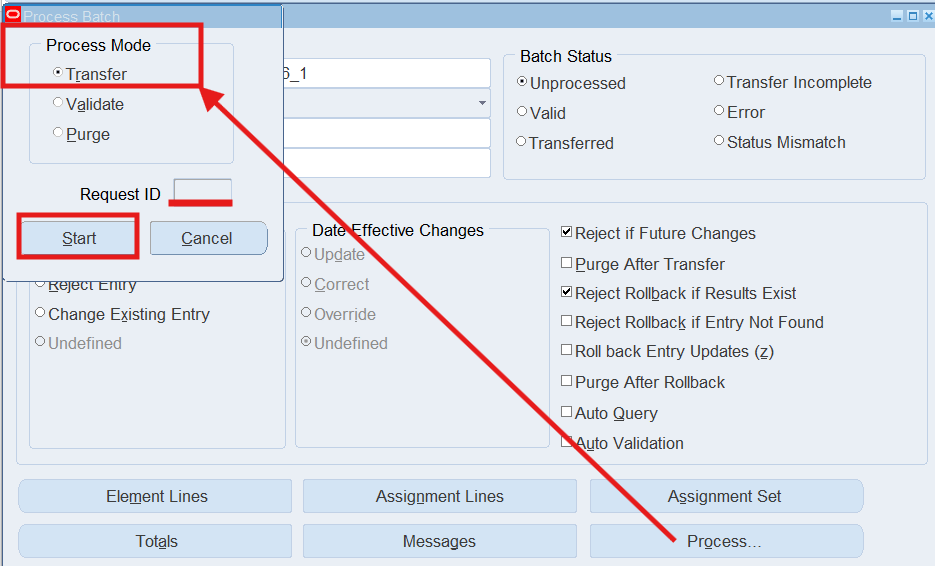
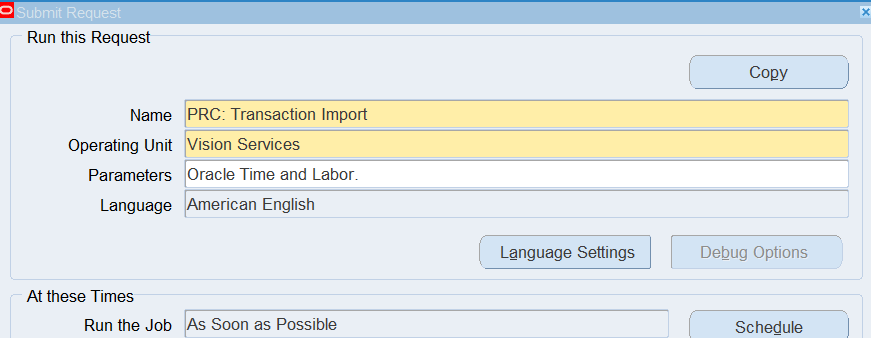
Running the Transaction Import from OTL to Oracle Projects
Responsibility : Projects, Vision Services (USA)
Navigation : (N) Other 🡪 Requests 🡪 Run
Select : Single Request PRC: Transaction Import
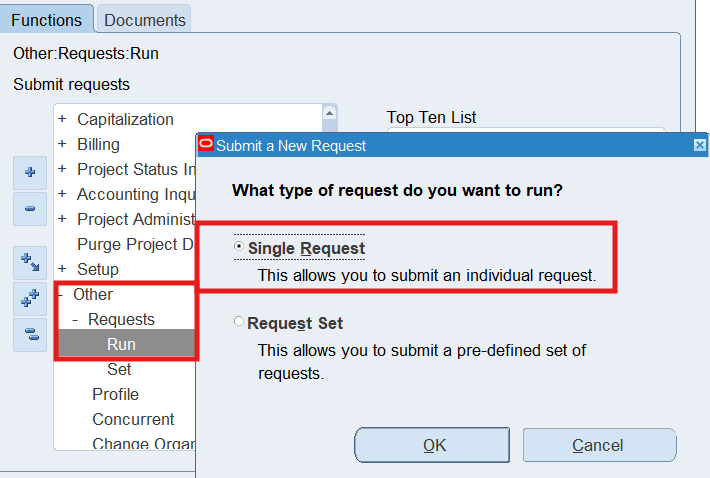
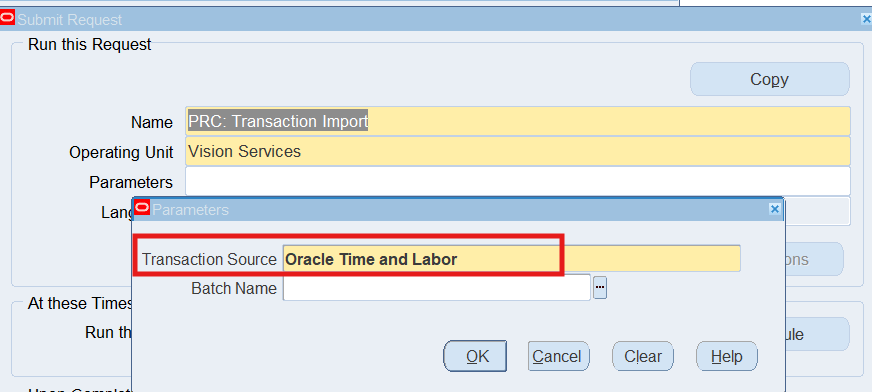
Select Transaction Source “Oracle Time and Labor”
Batch Name Leave Blank

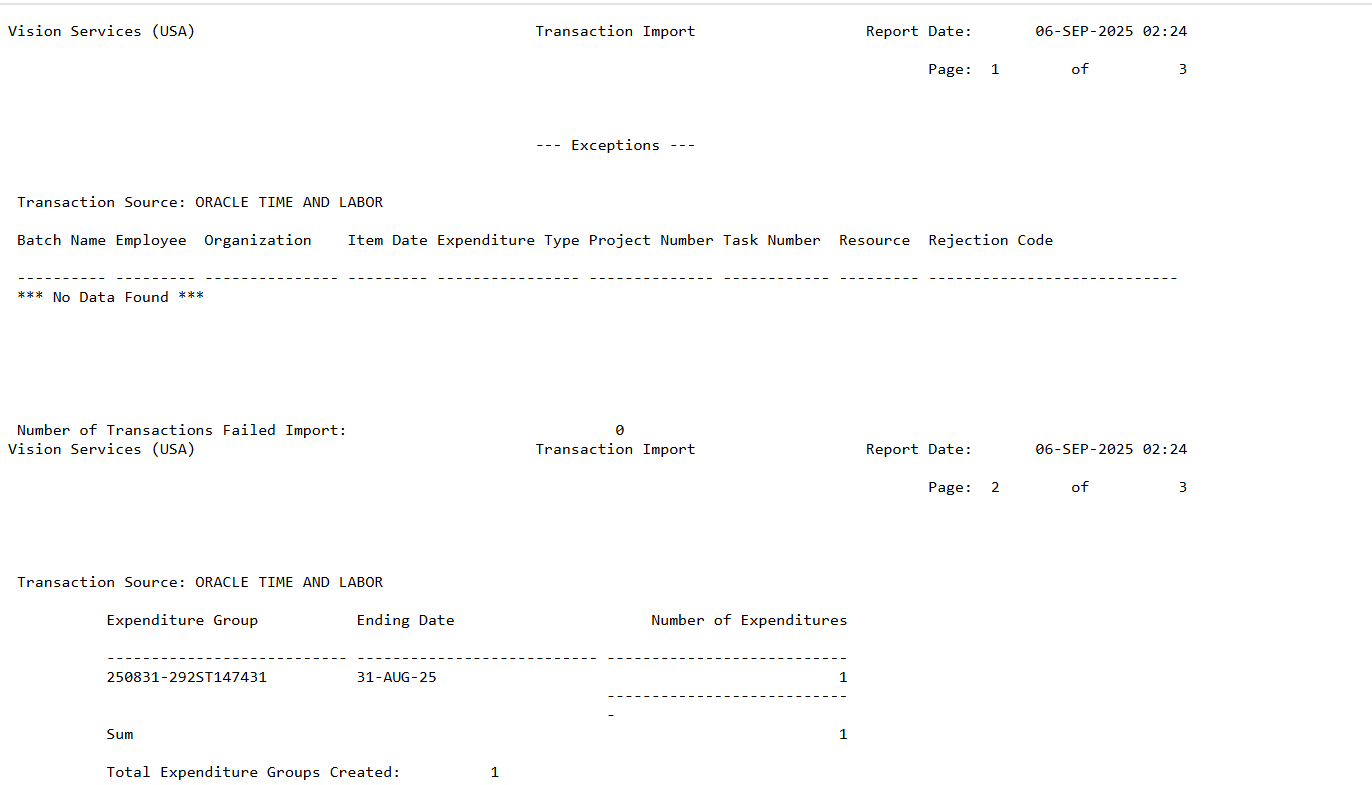
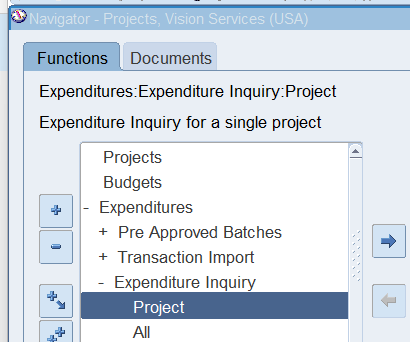
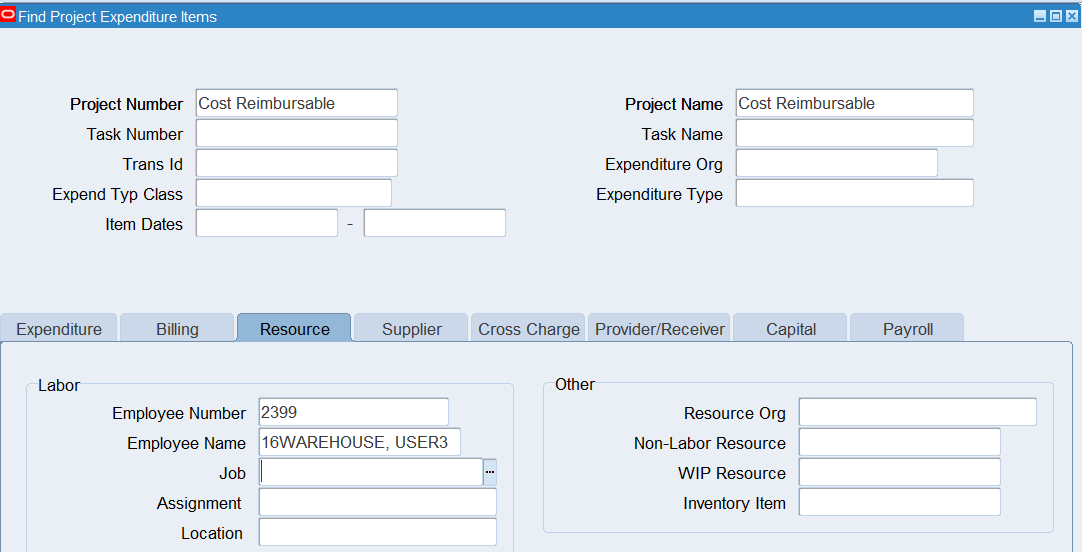
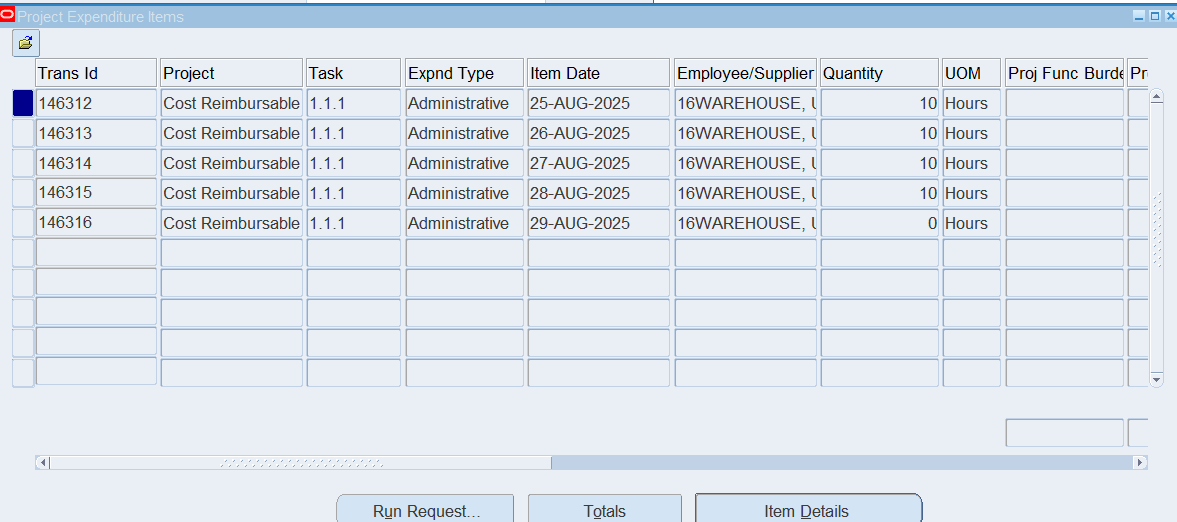
Review the results in Oracle Projects
Responsibility : Projects, Vision Services (USA)
Navigation : Expenditures 🡪 Expenditure Inquiry 🡪 Project
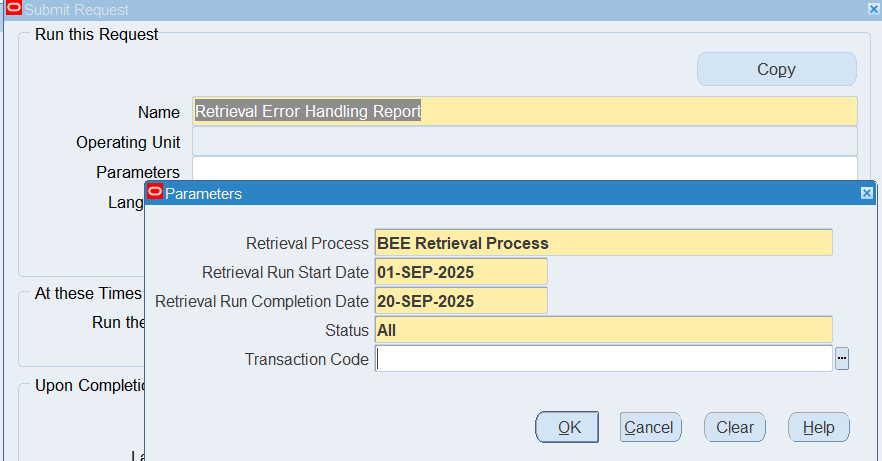
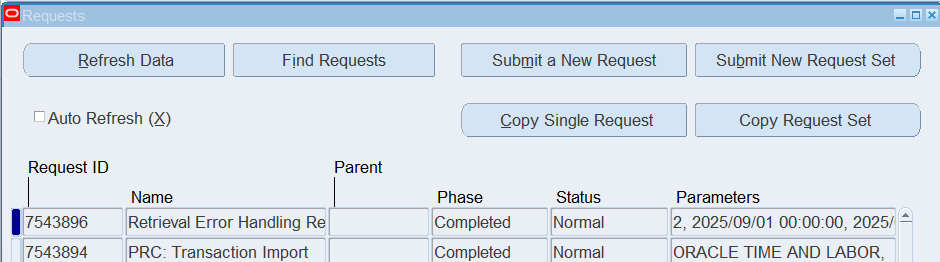
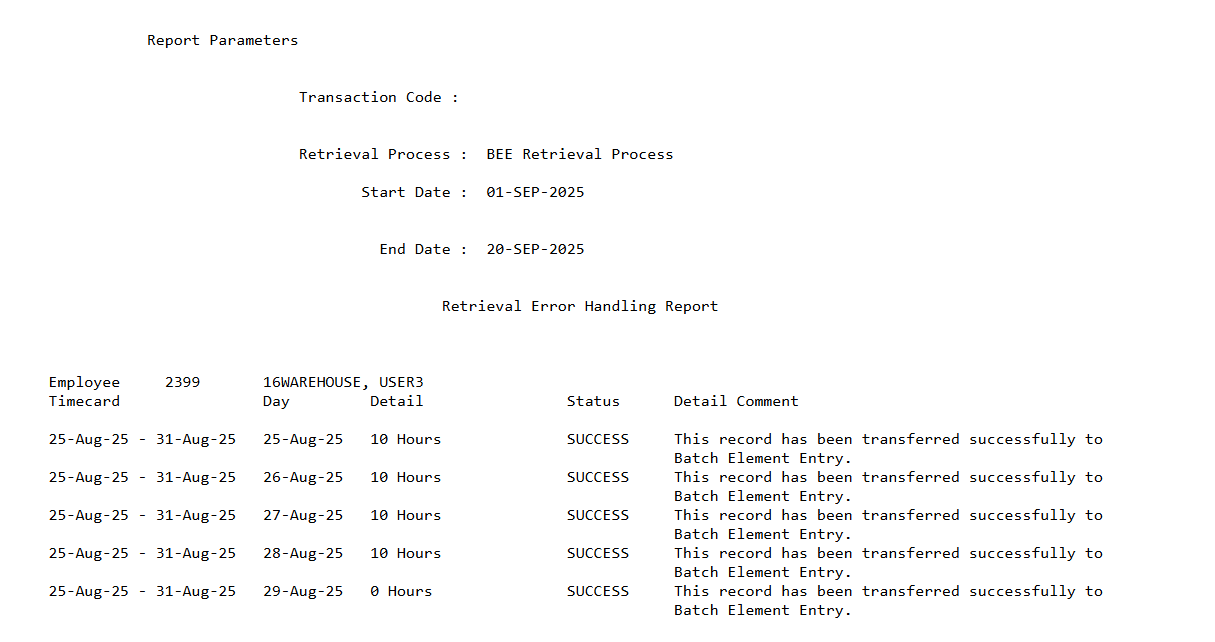
Running the Retrieval Error Handing Report
Responsibility : US OTL Application Developer
Navigation : (N) Process and Reports 🡪 Submit Requests
Report Name : Retrieval Error Handing
Practice 17: Transfer time for Corporate Employee
Business Scenario
Run the OTL process for retail and corporate employees, this process will transfer the time and labor data entered in self service to the professional timecard window. Also, make exception entry in the professional timecard window.
Solution
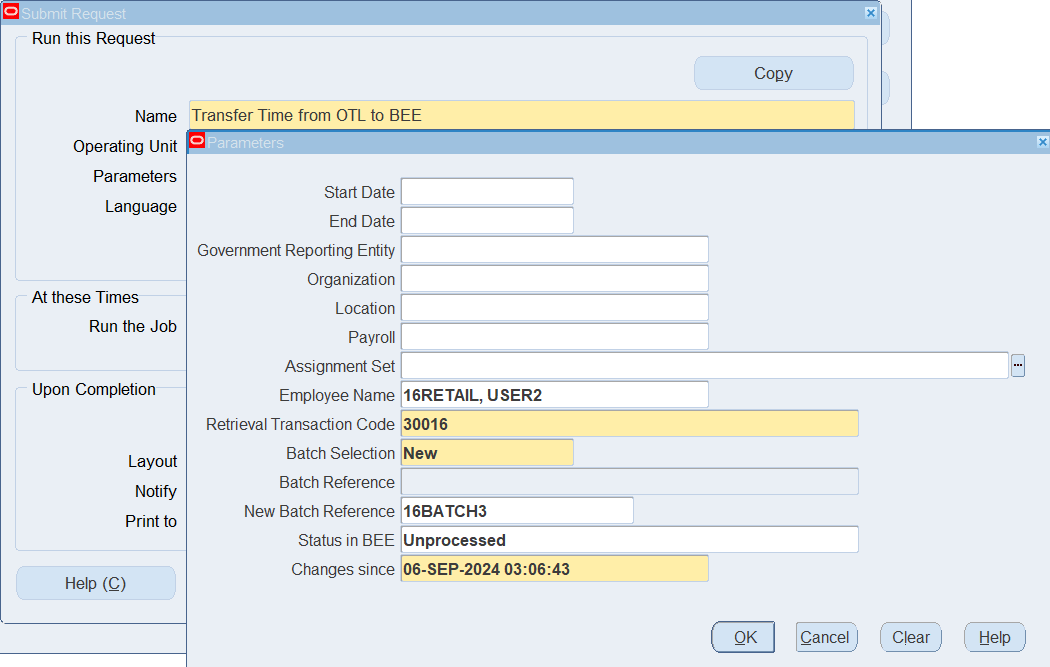
Transferring Time from OTL to BEE
The Transfer Time from OTL to BEE process works in 2 ways. If the Rules Evaluation Preference is set to “Yes” then the process transfers the timecard data from SS to PUI Timecard form, eg. Retail and Corporate employees. If the Rules Evaluation Preference is set to “NO”, the batches get transferred directly to BEE bypassing the PUI Timecard form eg. Warehouse Employees.
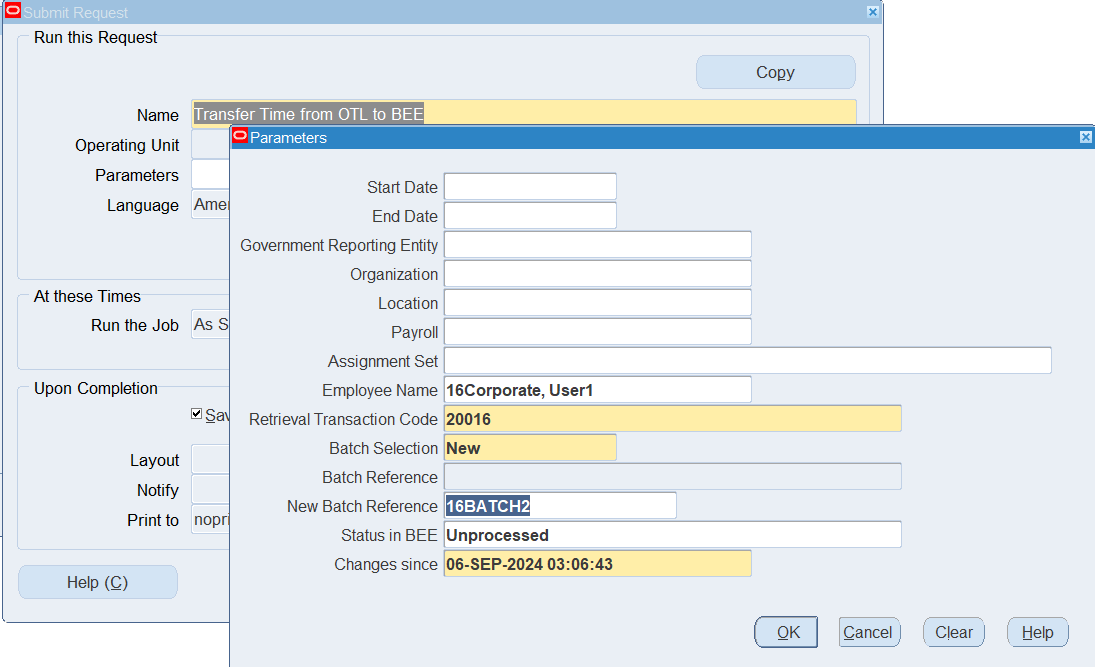
Sign-on as 16Corproate, navigate to the Submit Request windows using the US Super HRMS Manager responsibility
Responsibility : US Super HRMS Manager
Navigation : (N) Processes and Reports 🡪 Submit Processes and Reports
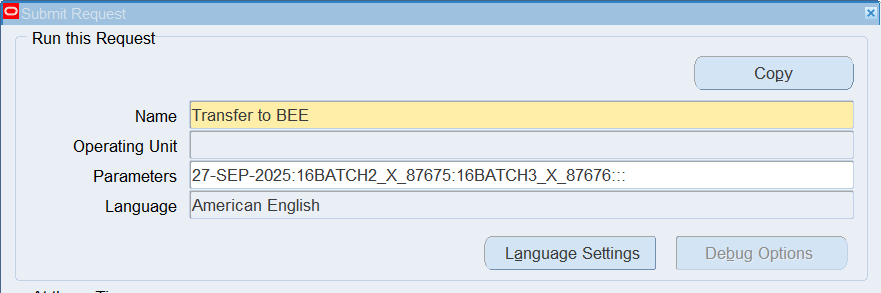
Report : Select Transfer Time from OTL to BEE
| Employee Name | 16Corporate, User1 |
| Retrieval Transaction Code | 20016 |
| Batch Selection | New |
| New Batch Reference | 16BATCH2 |
| Status in BEE | Unprocessed |
Repeat the same steps to transfer time from OTL to BEE for the 16Retail Employee with following parameters:
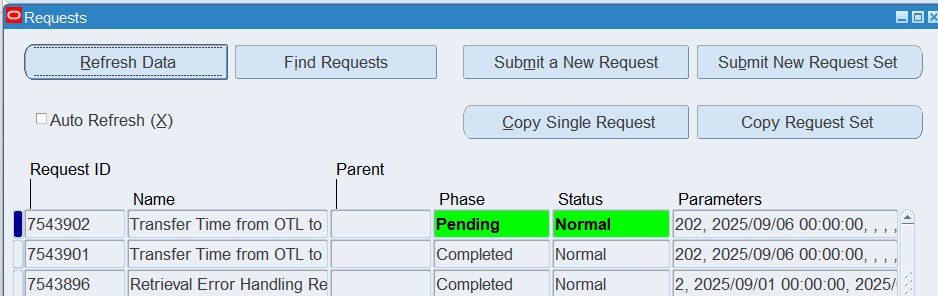
Validating Timecards for BEE
Responsibility : US OTL Application Developer
Navigation : (N) Process and Reports 🡪 Submit Requests
Program : Validate for BEE

Transferring Timecards to BEE
Responsibility : US OTL Application Developer
Navigation : (N) Process and Reports 🡪 Submit Requests
Program : Transfer to BEE


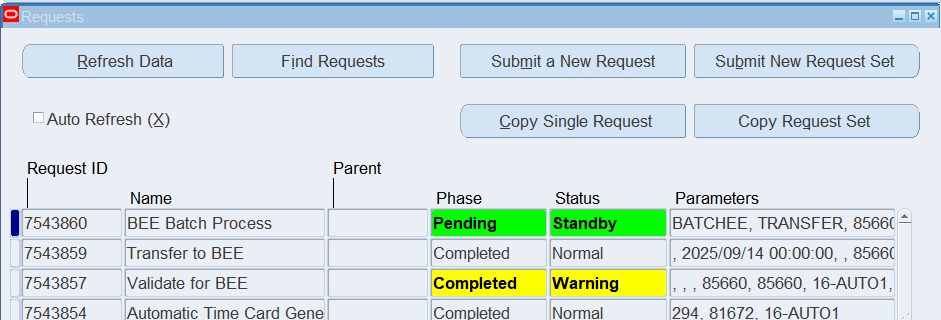
Viewing Batch Status
Navigation : (N) OTL Time Accounting 🡪 Mass Info. eXchange:MIX🡪Batch Element Entry
Perform Query : 16BATCH2%
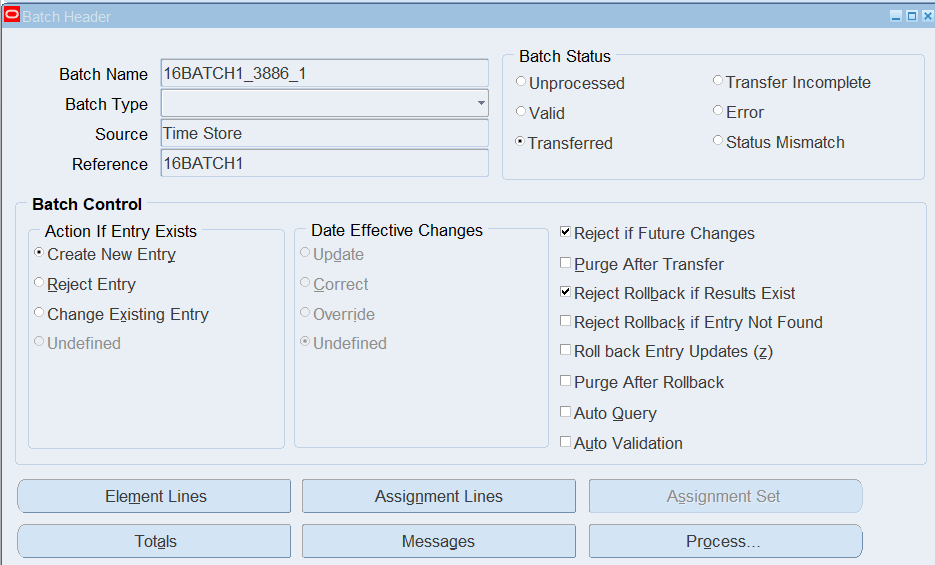
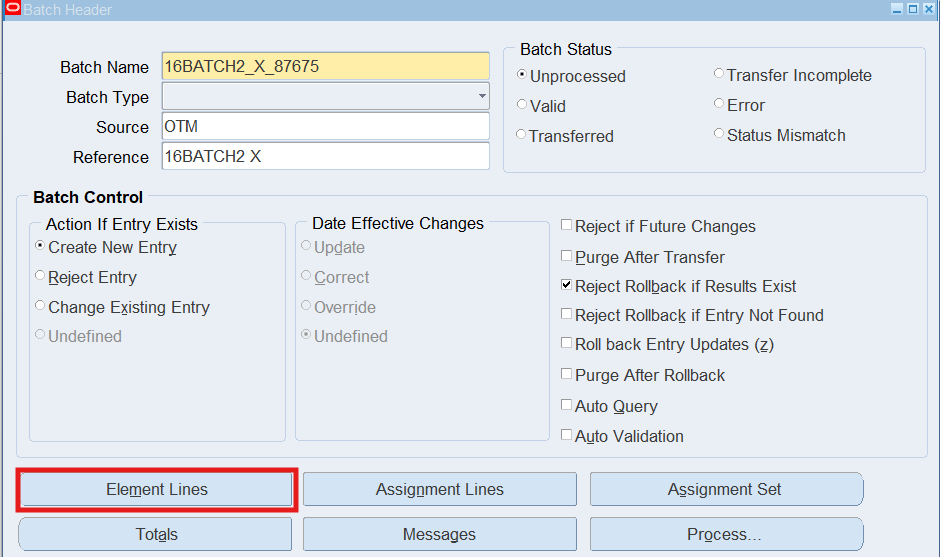
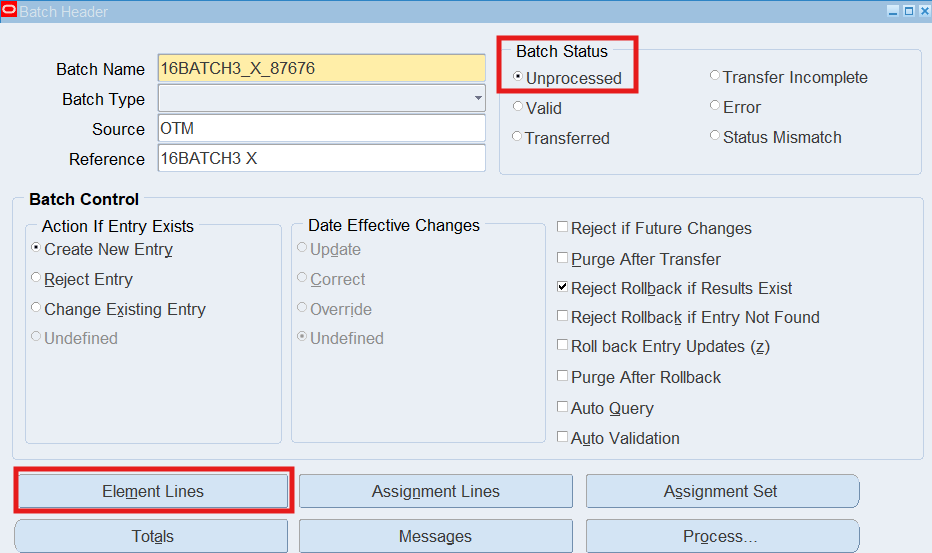
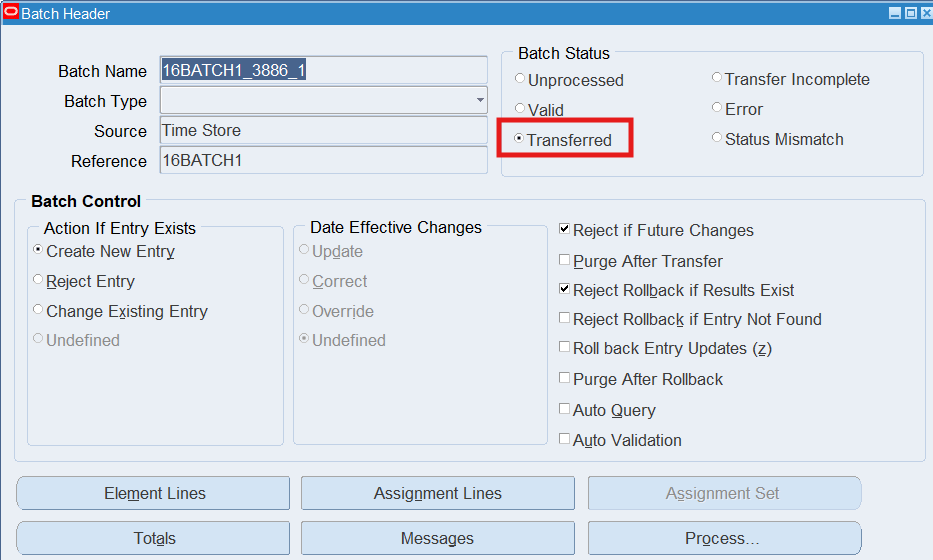
Note: If the Batch Status is “Unprocessed”, choose the Process button, select “Transfer” as the Process Mode, choose the Start Button.

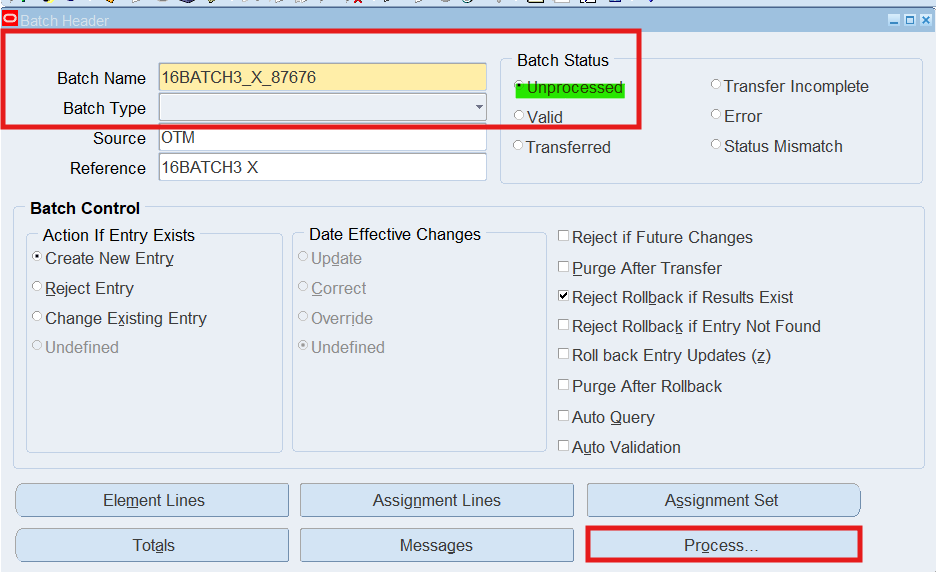
Note: Review the Batch Status, it should now display “Transferred”
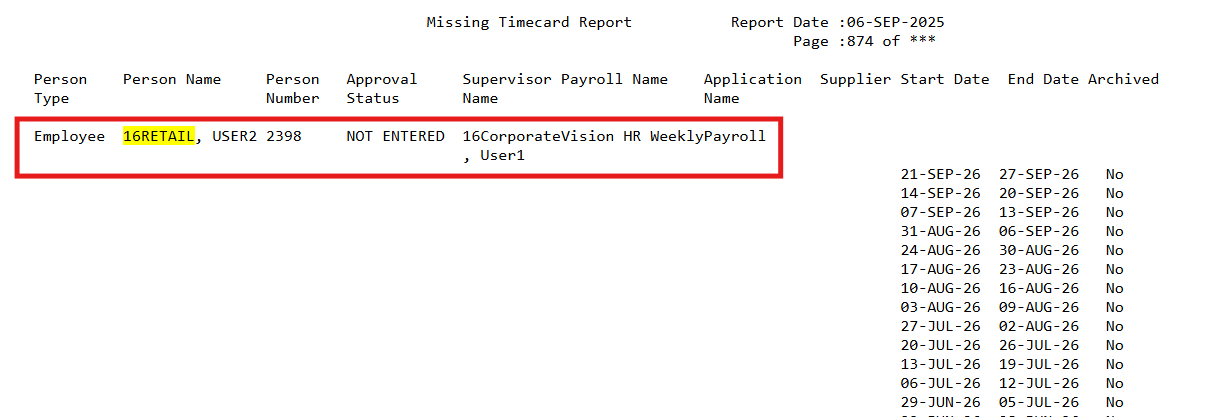
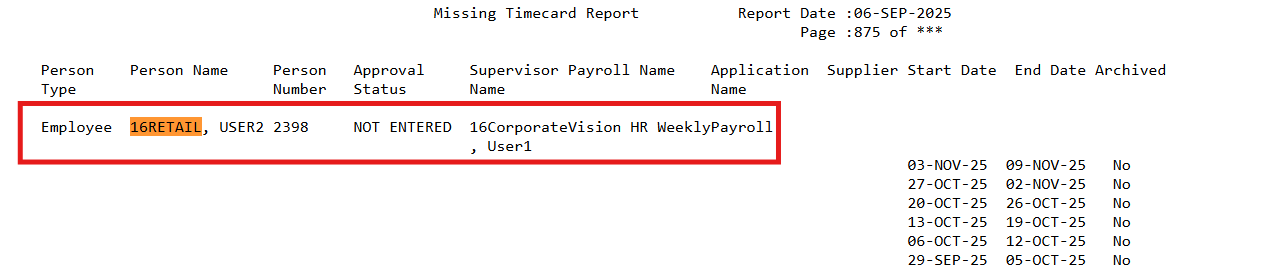
Practice 18: Using Oracle Time & Labor Reports
This section will explain ability to run the Missing Timecard Report, and the Approval report, also ability to access the Employee Time folder.
Business Scenario
Run the missing timecard report for the period other than submitted time and review employee’s time using the Review Employee Time Folder
Solution
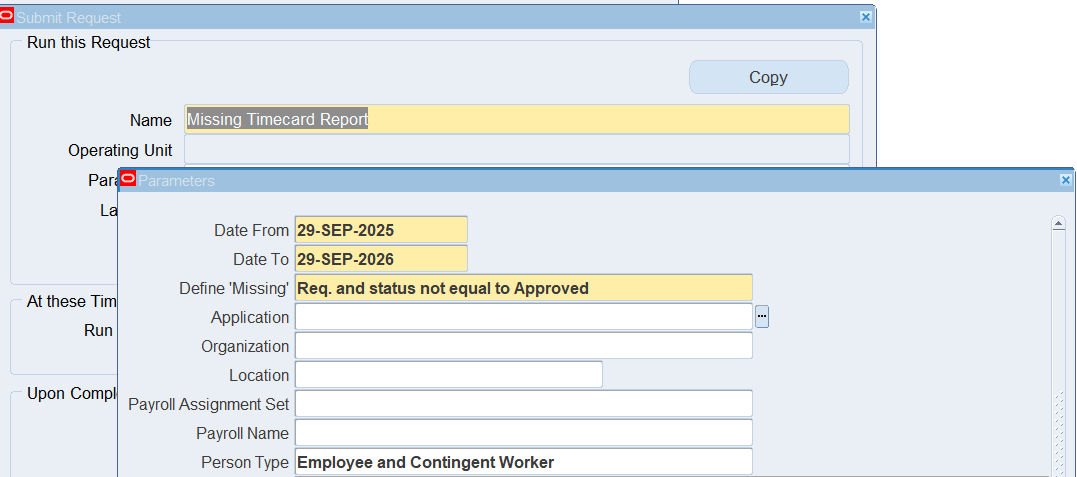
Responsibility : US OTL Application Developer
Navigation : (N) Process and Reports 🡪 Submit Requests
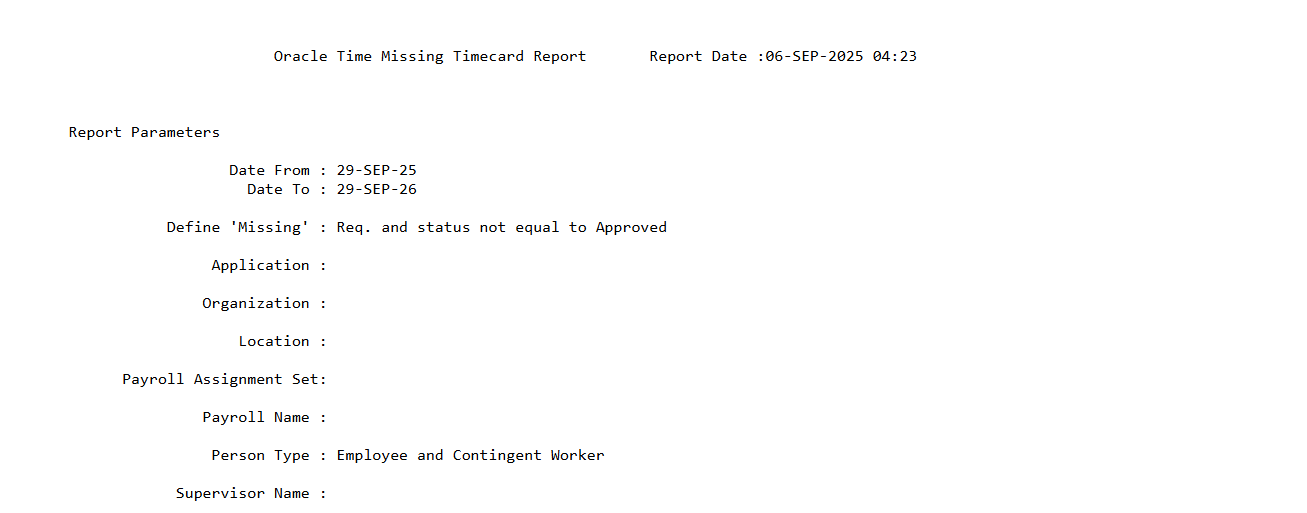
Report : Missing Timecard Report (Application is Oracle Time and Labor)
Review Report Output
Reviewing Employee Time Folder
Responsibility : US OTL Administrator
Navigation : (N) View 🡪 List 🡪 Review Employee Timecards
Select employee’s name in the name field
Practice 19: Defining Reason Codes for CLA
Business Scenario
Define reason codes for change and late entries using the Reason Code Lookups. Reason codes are used when making changes to timecards, or late entries. Each reason code has a definition that will be displayed on the Change and Late Audit timecard entry.
Tasks
Define a Change Reason of Manager’s Request with a code equal to MGR.
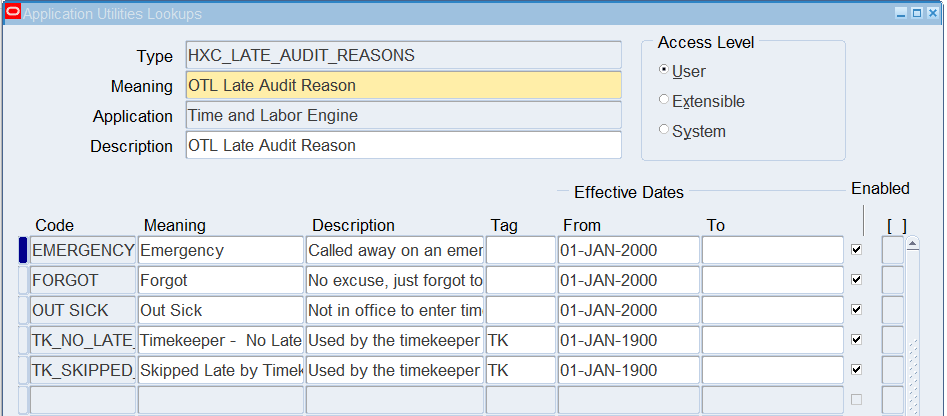
Define a Late Reason of Sick Leave with a code equal to SL.
Solution
Defining Change Audit Reason Codes
Responsibility : US Super HRMS Manager
Navigation : (N) Other Definitions 🡪 Lookup Tables
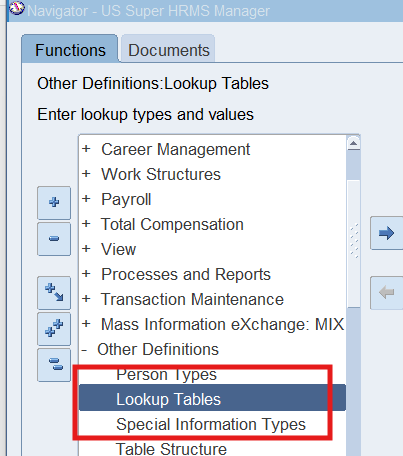
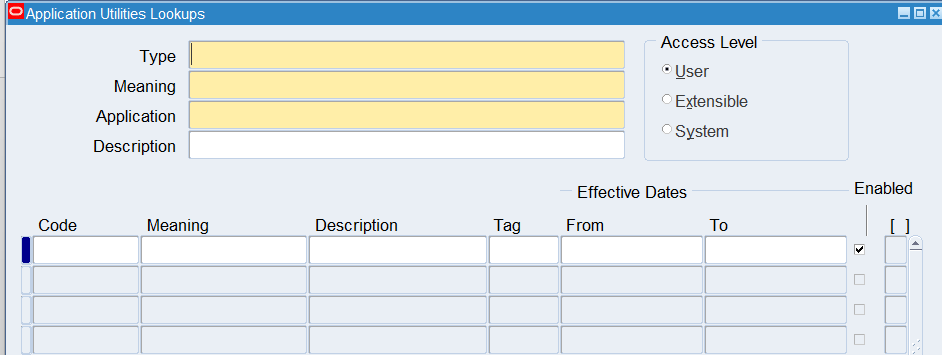
Query “HXC_CHANGE_AUDIT_REASONS”
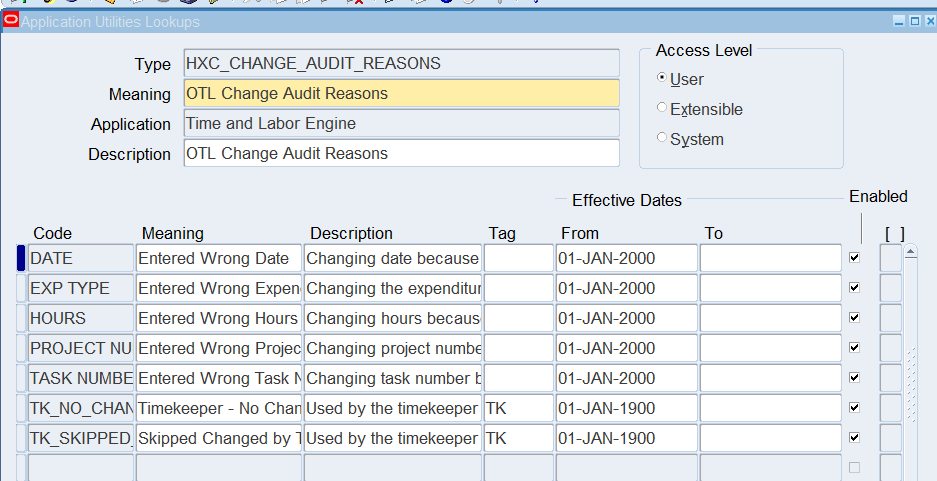
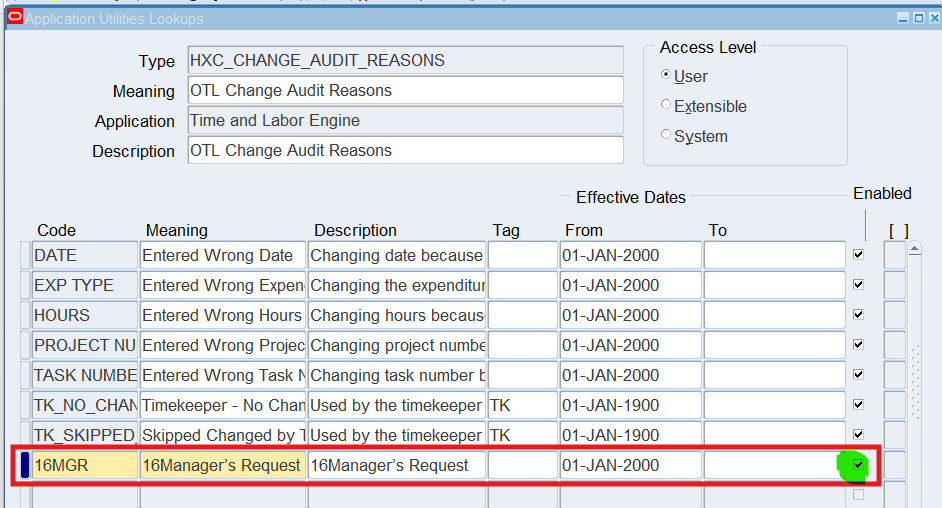
Note: Leave the Enabled check box is selected. If you do not select this check box, the code will not display in the list of values.
Defining Late Audit Reason Codes
Query “HXC_LATE_AUDIT_REASONS”

Practice 20: Defining Time Categories for Change and Late Audit
Business Scenario
Time categories can be used within time entry rules to determine what fields to audit for change and late entries. We can define time categories to audit specific line items on the timecard.
Tasks
Define time categories to audit line items on a timecard and use this time category in the creation of time entry rules for change and late audit
Using the operator of “OR” you will ensure if changes, or late entries are made you will be initiating the change and late audit rules.
Solution
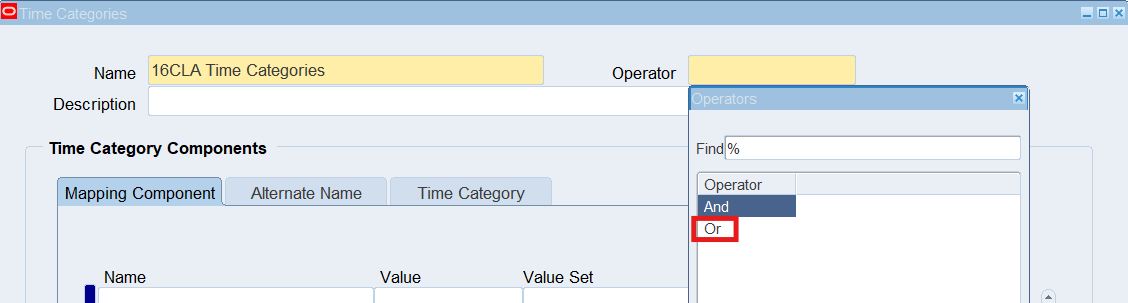
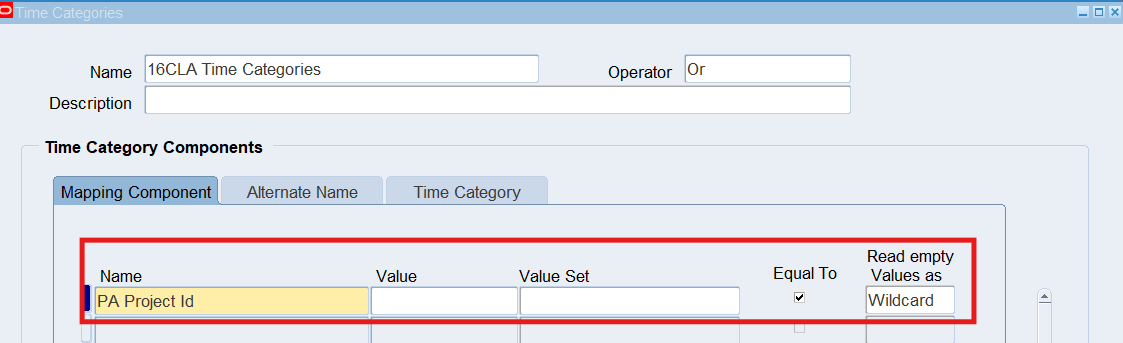
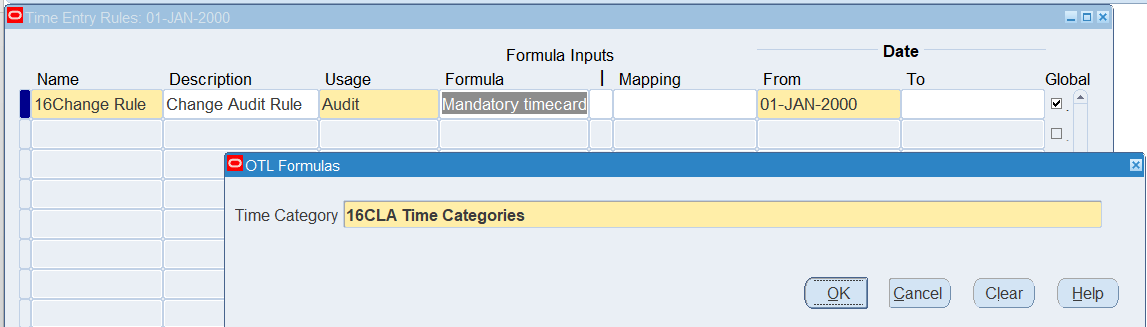
Defining Time Categories for Change and Late Audit
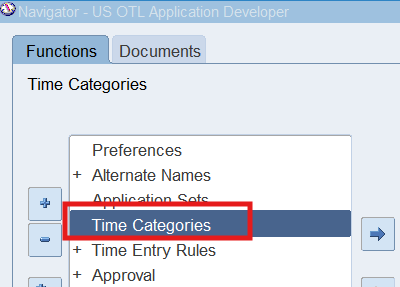
Responsibility : US OTL Application Developer
Navigation : (N) Time Categories
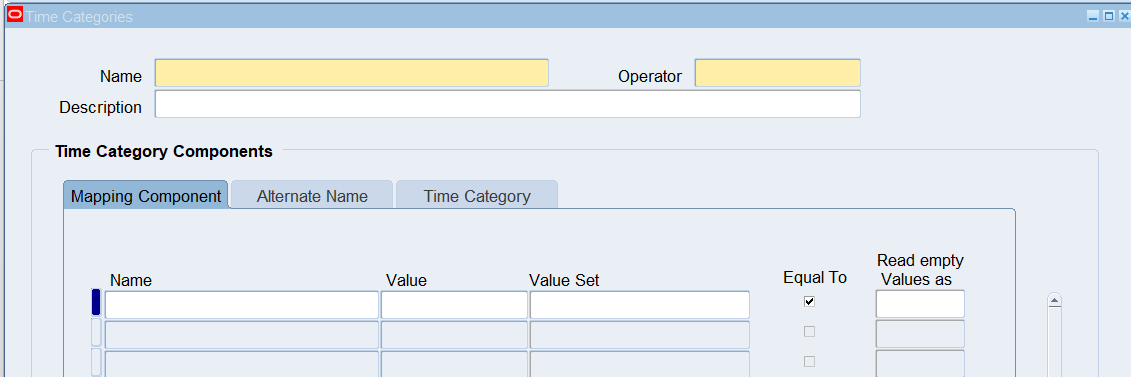
Name : 16CLA Time Categories
Operator : Select “OR”
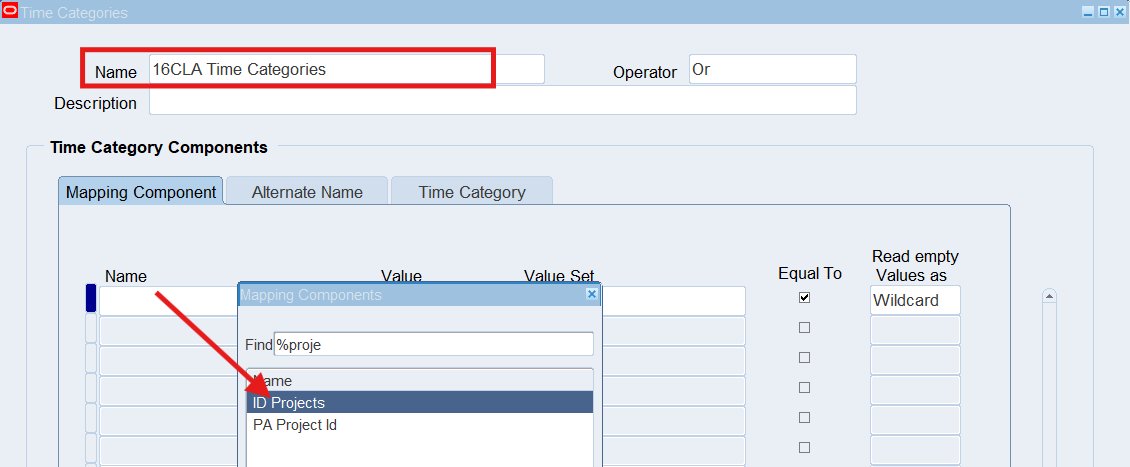
Select “PA Project Id”
Practice 21: Defining Time Entry Rules for Change and Late Audit
Business Scenario
Time entry rules use formulas to control what is defined as Late and what fields you wish to monitor when a change is made. Once we define our time entry rules, we can group rules together using Time Entry Rule Groups. Time Entry Rule Groups are assigned to a person or group of people using preferences.
Tasks
- Define a change rule using time category same as defined in last step. Also, create a late time entry rule also using the late time category defined previously. Both time entry rules with use Audit as the usage, to activate the change and late audit rule when the worker selects the next button from timecard page.
- Once define time entry rules for change and late audit, will need to group rules using Time Entry Rule Groups window and make the Outcome equal to Reason to indicate Change and Late Audit
Solution
Defining Time Entry Rules for Change and Late Audit
Responsibility : US OTL Application Developer
Navigation : (N) Time Entry Rules 🡪 Define Time Entry Rules
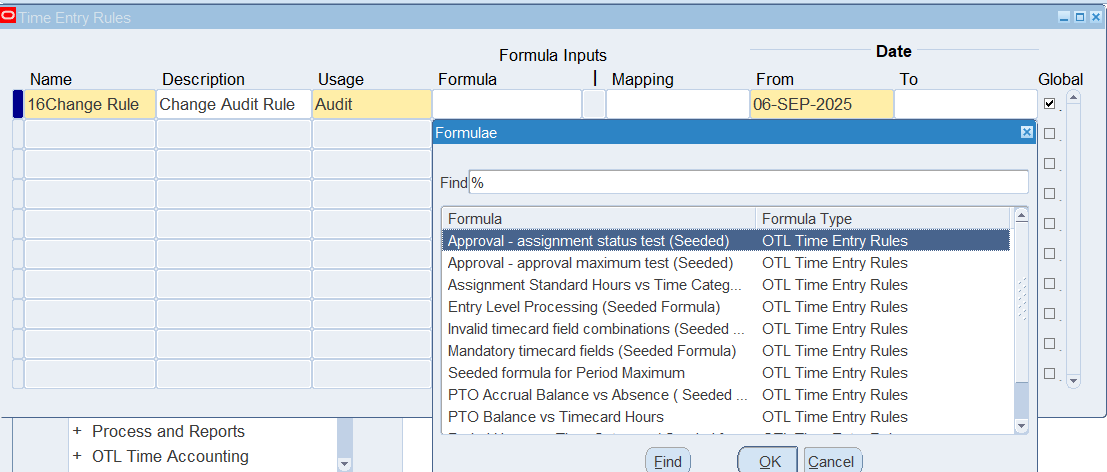
Name : 16Change Rule
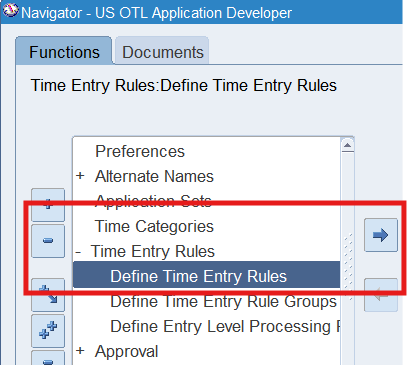

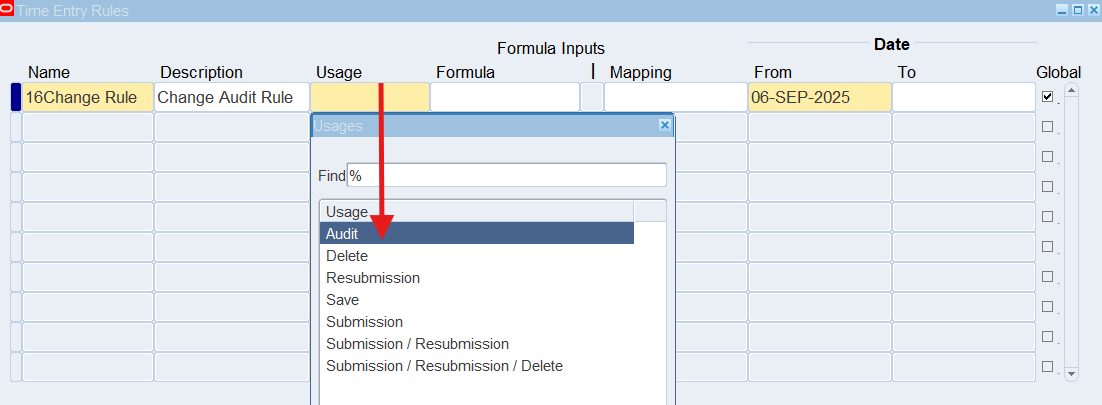
Note: This determines when the validation will take place by selecting Audit, the validation will be performed when you select the next button from the timecard page.


Defining Time Entry Rule Groups
Responsibility : US OTL Application Developer
Navigation : (N) Time Entry Rules 🡪 Define Time Entry Rule Groups
Name : 16CLA Audit Rule Group
| Name | Outcome |
| 16Change Rule | Reason |
| 16Late Rule | Reason |
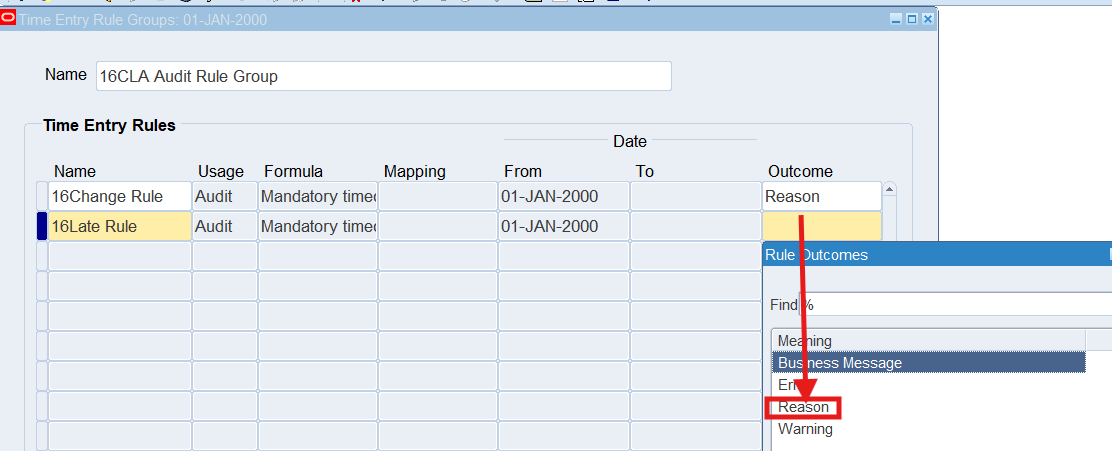
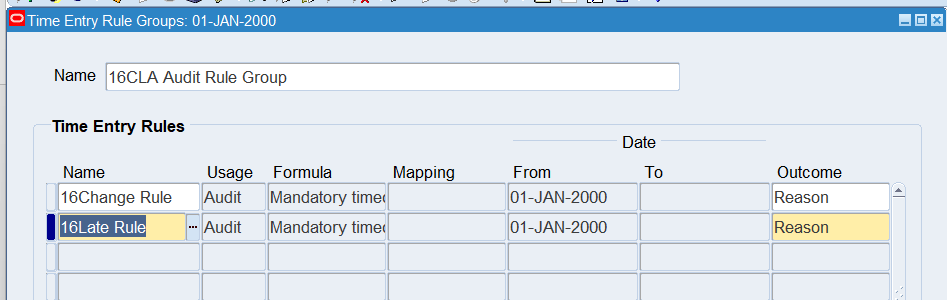
Note: The Reason outcome enables the worker to enter a reason when the audit rule is activates
Practice 22: Defining Preferences for Change and Late Audit
Business Scenario
Preferences define many rules about how individuals or groups of workers use the application. Preferences hold rules for the time store and about Self Service timecard. While Oracle Time & Labor deliver predefined preferences you cannot change these rules. However, we can create as many new hierarchies as needed for our business requirements.
Tasks
- Create a new preference hierarchy for Time Entry Rule Groups, and other required preferences in order to successfully enter a timecard using Change and Late Audit rules.
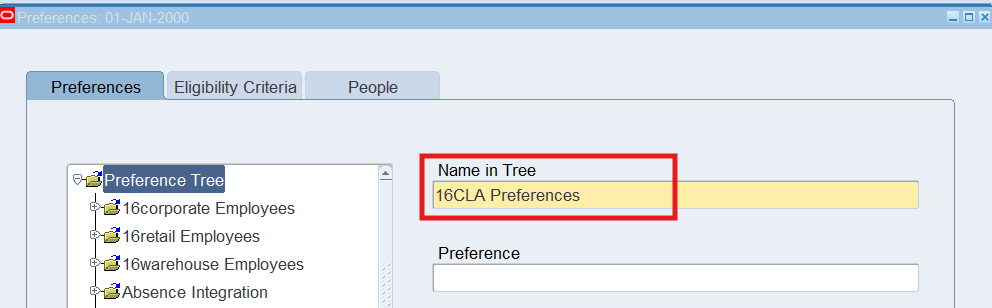
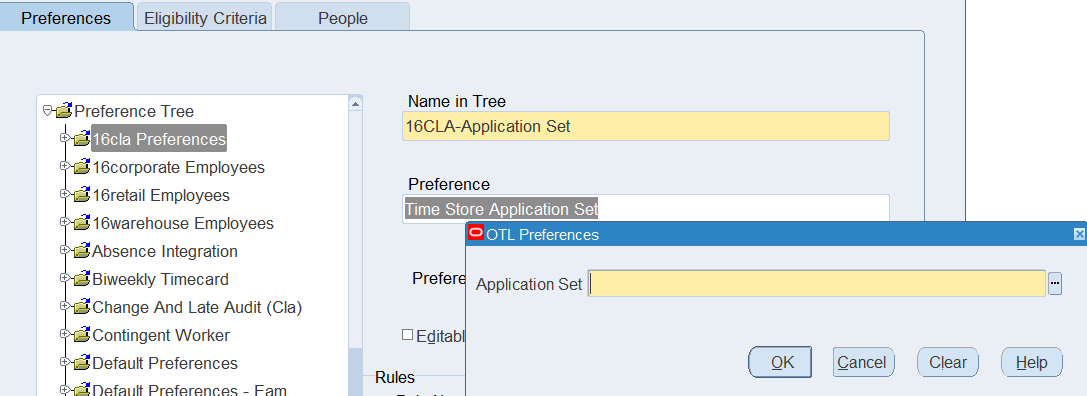
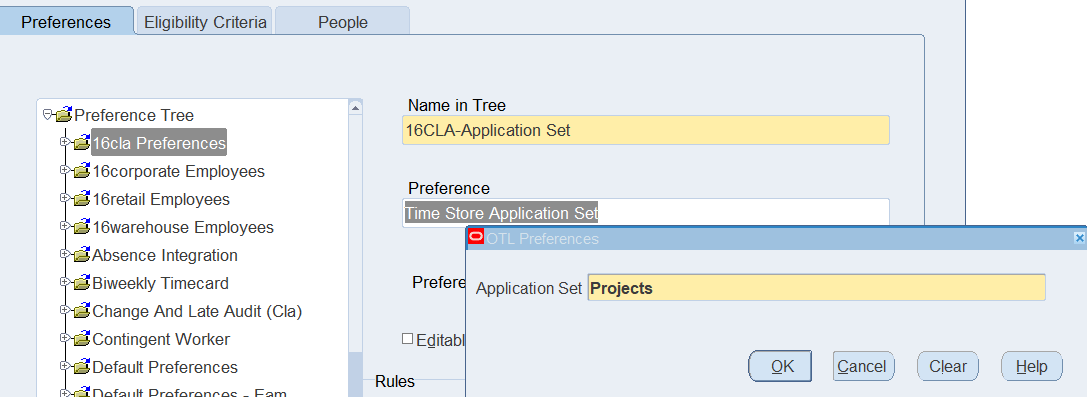
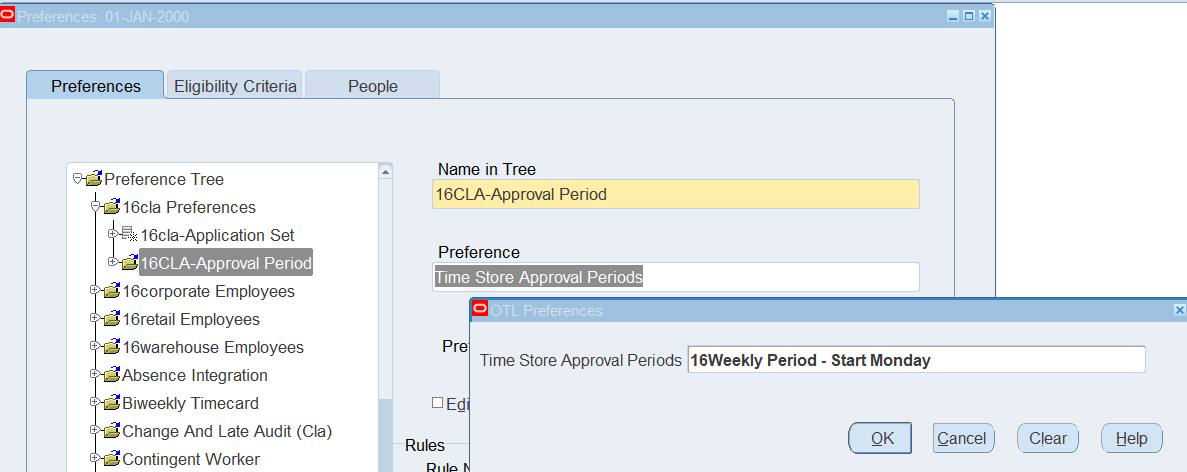
Batch Name is 16CLA Preferences (10 Preferences)
| Name in Tree | Preference | Preference Value |
| 16CLA-Application Set | Time Store Application Set | Application Set = Projects |
| 16CLA-Approval Period | Time Store Approval Periods | Time Store Approval Periods = 16Weekly – Starts Monday |
| 16CLA-Approval Style | Time Store Approval Style | Approval Style = Projects Approver |
| 16CLA-Audit Req | Time Store Audit Requirements | Audit Requirements = 16CLA Audit Rule Group |
| 16CLA-Delete Allowed | Timecard Delete Allowed | Timecard Delete Allowed = No |
| 16CLA-Retrieval Group | Time Store Retrieval Rule Groups | Group Name = Projects
Retrieval Rule Group |
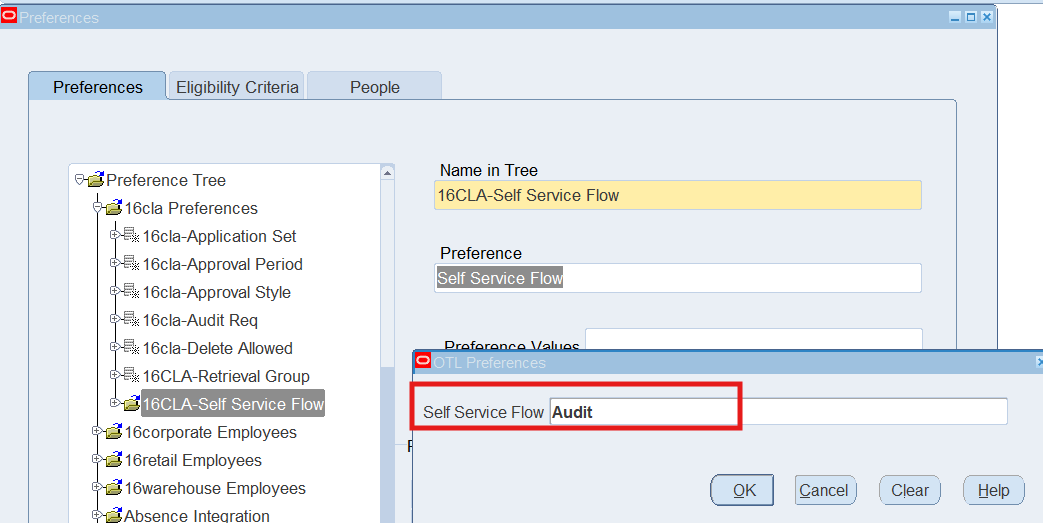
| 16CLA-Self Service Flow | Self Service Flow | Self Service Flow = Audit |
| 16CLA-Timecard Alternate Name | Self Service Timecard Alternate Name Set Defined for a User | Timecard Alternate Name1 = 16Warehouse Employees |
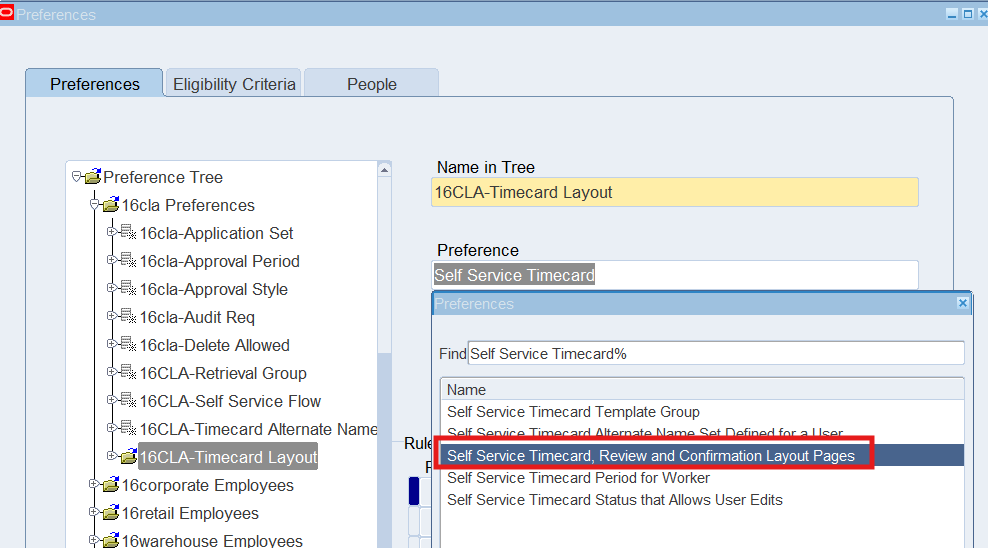
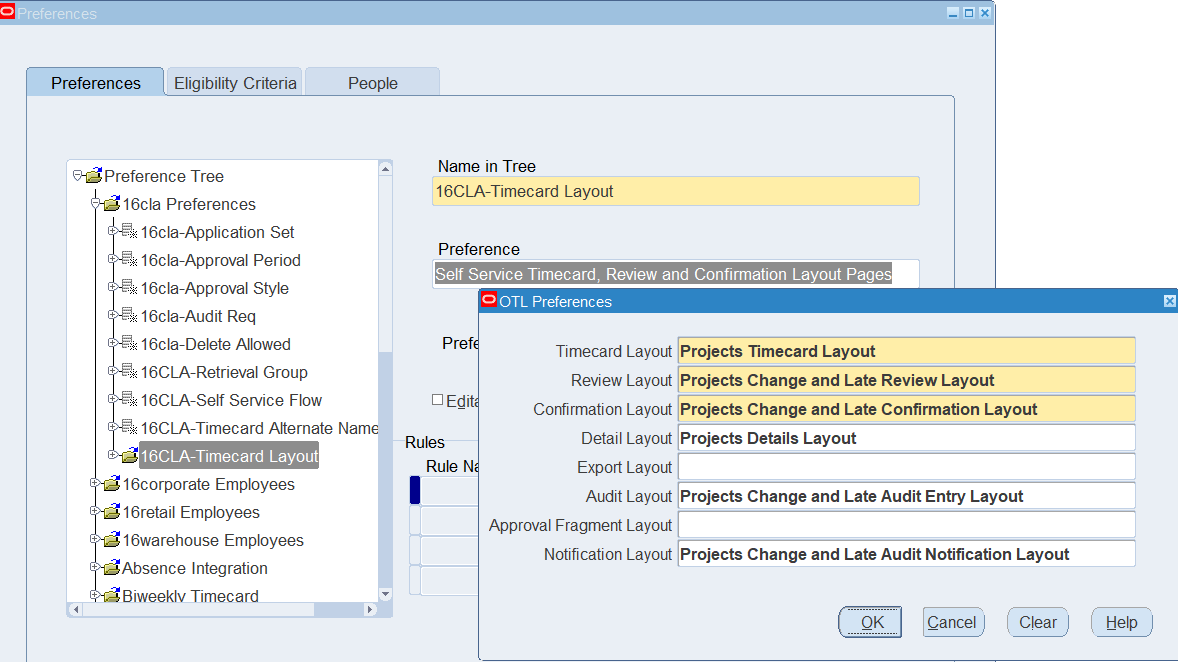
| 16CLA-Timecard Layout | Self Service Timecard, Review and Confirmation Layout Pages | Timecard Layout = Projects Timecard Layout
Review Layout = Projects Change and Late Review Layout Confirmation Layout = Project Change and Late Confirmation Layout Detail Layout = Projects Detail Layout Audit Layout = Projects Change and Late Audit Entry Layout Notification Layout = Project Change and Late Audit Notification Layout |
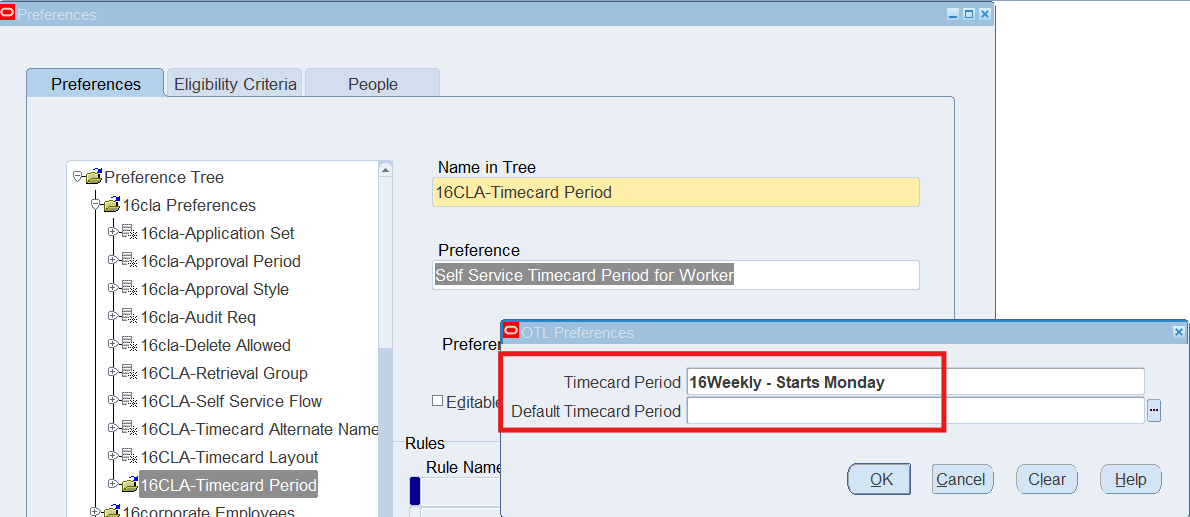
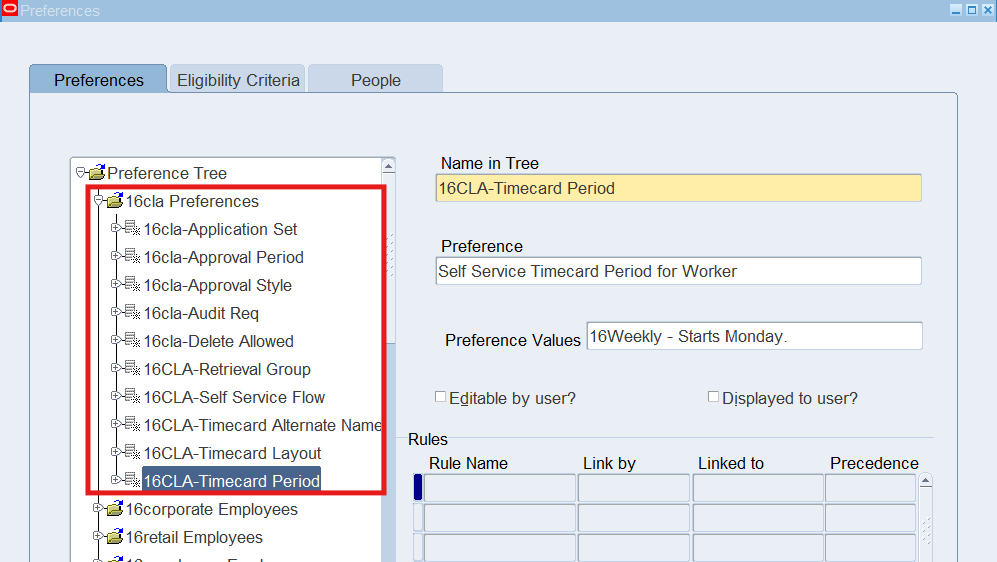
| 16CLA-Timecard Period | Self Service Timecard Period for Worker | Timecard Period = 16Weekly – Starts Monday |
Defining Eligibility Criteria
Once completed setting preference link new preferences to an employee using eligibility criteria
Viewing People Preferences
View workers preferences using the People Tab within the Preference window.
Solution
Responsibility : US OTL Application Developer
Navigation : (N) Preferences
Click on the + Sign to open the Preference Tree Node
Right-click on the Preference Tree node and select “NEW”
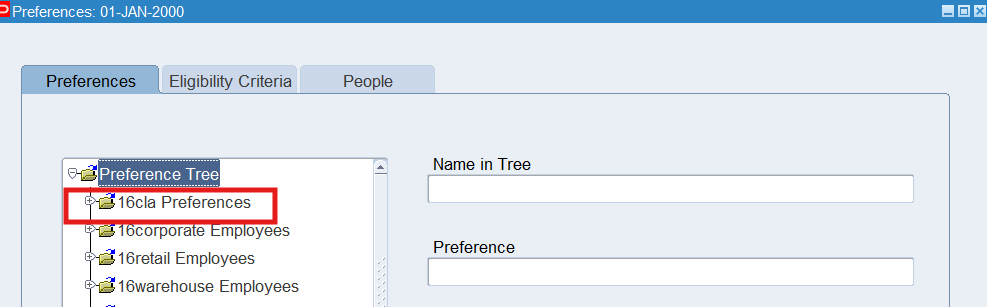
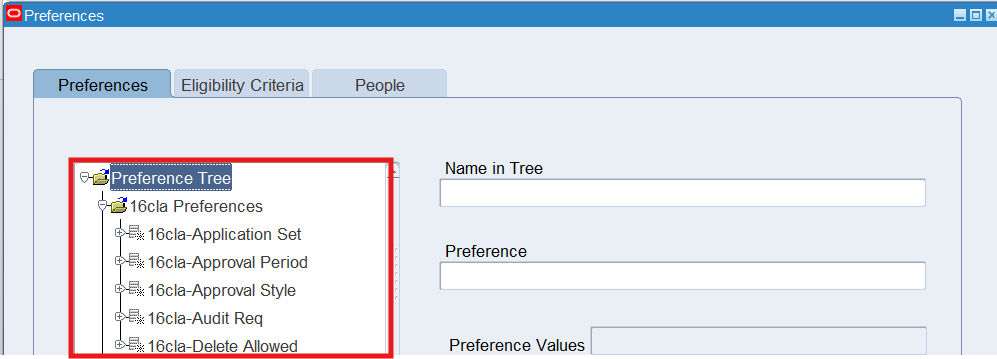
Adding Preferences to a branch
Select “16CLA Preferences” node, right-click and select New.
Add all Preferences as per Table

Create 16CLA Employee
Responsibility : US Super HRMS Manager
Navigation : (N) People 🡪 Enter and Maintain

Defining Eligibility Criteria for an employee
Responsibility : US OTL Application Developer
Navigation : (N) Preferences
Select “Eligibility Criteria” Tab

Viewing People Preferences
- Choose the People Tab
- Expand the Employee Tree by clicking on the + icon
- Select 16CLA to view.
- Close the form
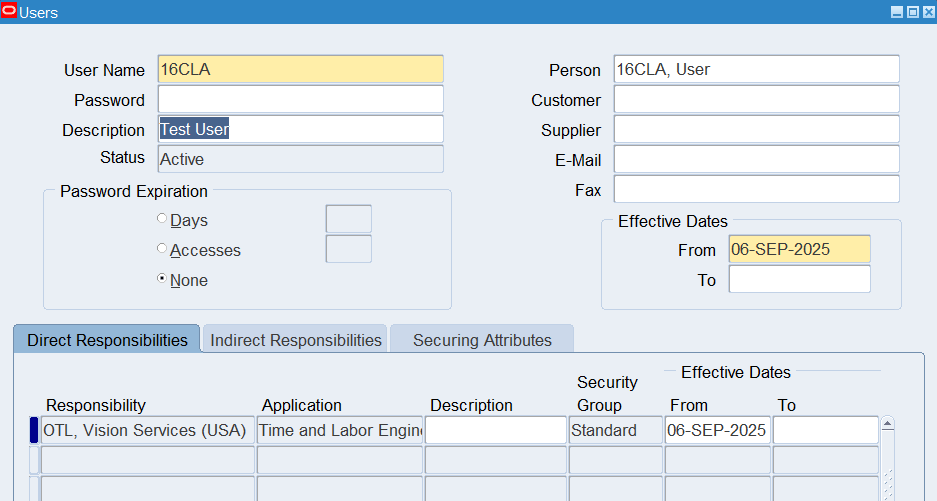
Create Application User for the Corporate Employee
Responsibility : System Administrator
Navigation : (N) Security 🡪 User 🡪 Define
Name : 16CLA as the User Name
Practice 23: Entering a Timecard for Change and Late Audit
Business Scenario
Change and Late Audit enables to track all changes to new timecard, as well as previously saved and submitted timecards
Tasks
- Enter a timecard to activate late rules. Enter a reason code to Sick Leave, and enter any additional comments as require
- Enter timecard to activate change rules. Enter a reason code of Manager’s Request and enter any additional comments as require
Solution
Enter a Late Audit Timecard
- Logon to Self Service using 16CLA sign on, and choose the OTL, Vision Services (USA) responsibility
- Navigation (N) Time 🡪 Time Entry
- On the Recent Timecard page, select Create Timecard button